
Extended

Side Angle

extended side angle patrick franco

What is Extended Side Angle?

English Name: Extended Side Angle
Sanskrit Name: Utthita Parsvakonasana (pronounced oo-TEE-tah PARSH-vah cone-AHS-uh-nuh)
Category: Standing, Foundational, Strength, Mobility

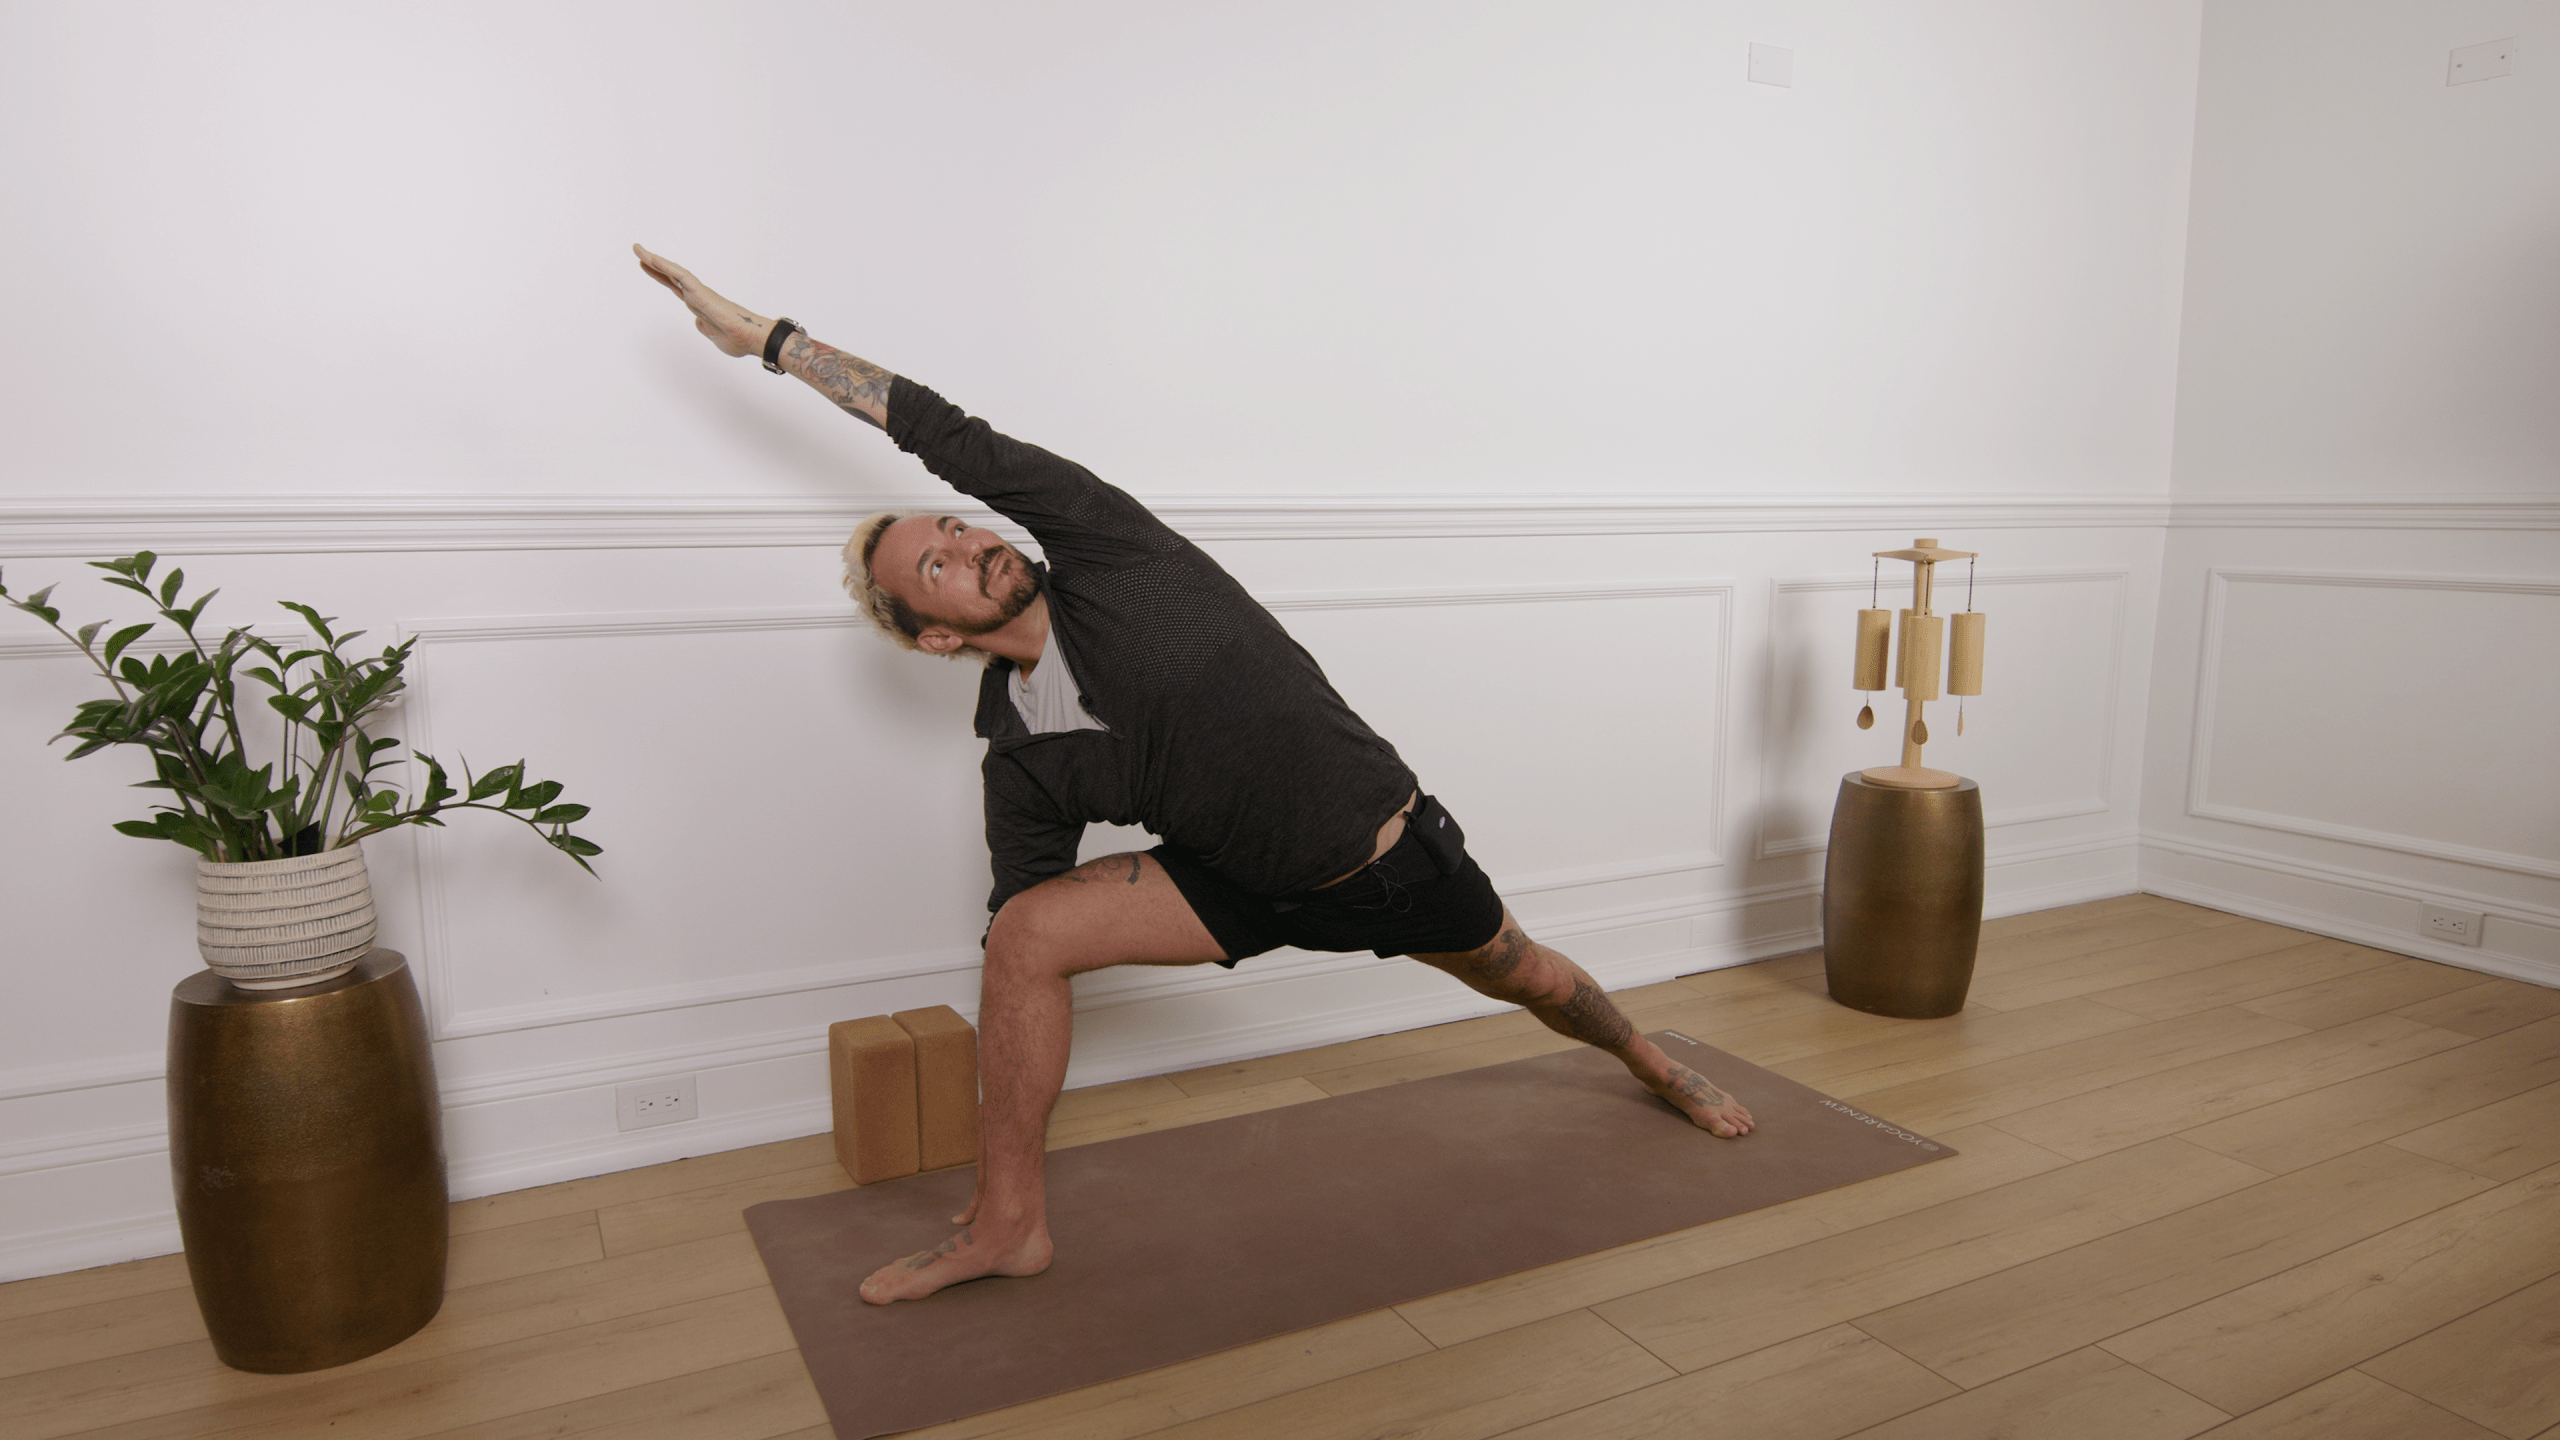
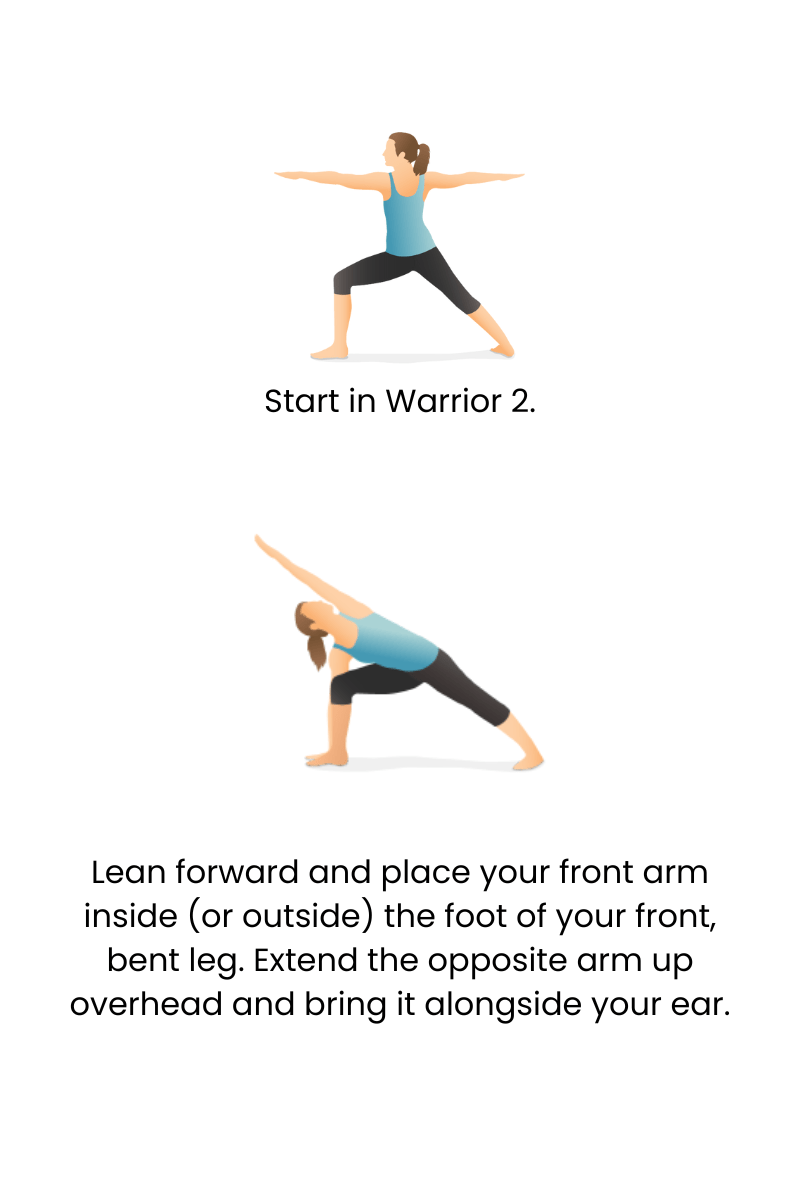
Extended Side Angle, or Utthita Parsvakonasana, is a foundational standing posture that builds strength in the legs, opens the hips, and stretches the entire side body. With roots in classical hatha yoga, this pose creates stability while promoting spaciousness through the rib cage, waist, and shoulders.

Often included in standing sequences, Extended Side Angle helps develop stamina, alignment awareness, and breath expansion. Whether practiced with a block, a bent elbow, or a full bind, this posture serves practitioners across all levels, from beginner to advanced.

Benefits of Extended Side Angle


  • Builds Strength: Strengthens legs, glutes, and core
  • Opens Hips: Encourages external rotation and grounded hip flexion
  • Lengthens Side Body: Creates space along the ribs, waist, and spine
  • Improves Balance & Stability: Trains alignment and grounding through the feet
  • Enhances Breath Capacity: Opens the chest and side ribs for deeper breathing

How to Practice Extended Side Angle

  1. Begin in Warrior II with your right foot forward—heel aligned with the back arch.
  2. Bend your front knee to stack directly over the ankle.
  3. Hinge at your hip and bring your right forearm to your right thigh or hand to a block inside or outside the front foot.
  4. Extend your left arm overhead, palm facing down, creating a diagonal line from heel to fingertips.
  5. Rotate the chest open and lengthen through both sides of the waist.
  6. Gaze up under the top arm or keep the head neutral.
  7. Stay for 5–10 breaths, then rise back to Warrior II and switch sides.
extended side angle diagram

Alignment Tips & Cues for Extended Side Angle

extended side angle graphic with alignment points

Alignment Tips:

  • Front knee should stay directly above the ankle—avoid collapsing inward
  • Press firmly into the outer edge of the back foot
  • Lengthen both sides of the torso evenly—avoid collapsing into the bottom side
  • Stack shoulders and keep the top arm active and reaching
  • Engage the core to support the spine and prevent over-arching

Simple & Effective Cueing Suggestions:

  • “Create one long line from your back heel to your fingertips.”
  • “Press the thigh into your arm and the arm into your thigh to stay lifted.”
  • “Spin your heart toward the sky.”“Ground through the legs to rise through the chest.”
  • “Let your breath move into the space between your ribs.”

Contraindications


  1. Knee Injuries: May aggravate the front knee—use a block and check alignment
  2. Shoulder Pain: Avoid lifting the top arm overhead—keep the hand on the hip
  3. Neck Sensitivity: Gaze downward or keep head in a neutral position
  4. Low Back Issues: Engage the core fully and avoid over-arching or collapsing
  5. Fatigue or Balance Challenges: Use support or practice near a wall

Modifications & Variations of Extended Side Angle

Modifications

  • Use a Block: Place a block under the lower hand for lift and support
  • Forearm to Thigh: Rest the front forearm on the thigh for ease in the torso
  • Top Hand to Hip: If shoulder is tight, keep the upper arm on the hip
  • Wall Support: Practice the pose with your back against a wall for alignment

Variations

  • Bound Side Angle (Baddha Parsvakonasana): Reach under the front thigh and clasp hands behind back
  • Revolved Side Angle (Parivrtta Parsvakonasana): Twist over the front thigh for a deeper variation
  • Extended Arm Line: Gaze up and stretch the top arm overhead in line with the ear
  • Dynamic Version: Flow in and out of the pose with breath for mobility

Common Mistakes to Avoid


  1. Collapsing Into the Front Side: Keep torso active—don’t dump weight on the thigh
  2. Knee Falling Inward: Ensure the front knee tracks over the second toe
  3. Lifting the Back Heel: Ground the outer edge of the back foot for stability
  4. Shoulder Crowding: Keep space between ears and shoulders
  5. Leaning Too Far Forward: Stack the body vertically—avoid tilting the chest over the front leg

When to Avoid or Modify Extended Side Angle


  • Knee or Hip Injuries: Modify depth and support lower body with props
  • Neck Pain: Avoid looking upward; keep gaze down or forward
  • Fatigue or Weakness: Use forearm-to-thigh version or a block
  • Shoulder or Rotator Cuff Issues: Keep top arm lowered or on the hip
  • Pregnancy: Use a wider stance and modify arm position for space and comfort

Why Practice Extended Side Angle?

Utthita Parsvakonasana offers a perfect balance between strength and expansion. As you root down through the legs, you lengthen and open through the side body and spine. This posture builds stamina and alignment awareness, supporting both physical endurance and deeper breath. Whether you’re building strength or seeking space, Extended Side Angle is a dynamic posture that connects grounded power with graceful extension.

Frequently Asked Questions

What if I can’t reach the floor?

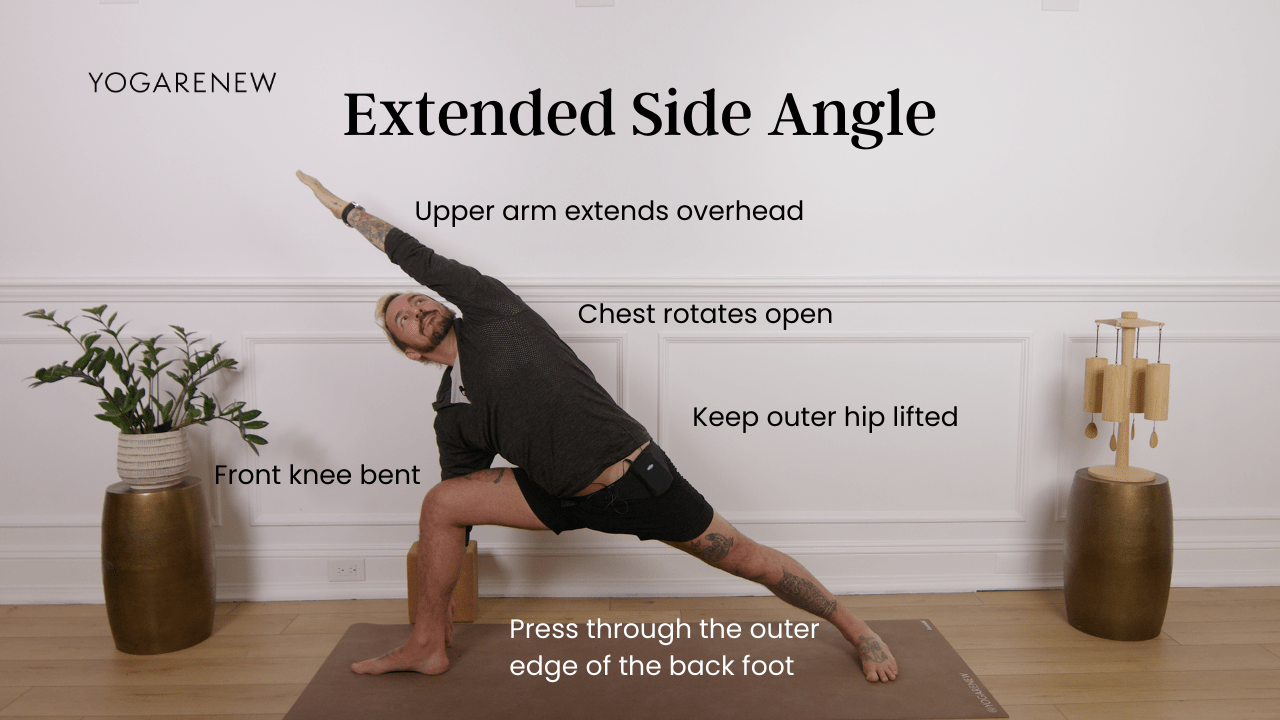
Use a block under your bottom hand or keep your forearm on the thigh.

Can I practice this pose if I have tight hips?

Yes! A wider stance and props can help you find depth safely.

Is this pose good for beginners?

Absolutely. It’s a foundational standing pose that’s accessible with proper modifications.

More Standing Poses:

Free Classes, Tutorials & More
Download the YogaRenew App

Explore classes & pose tutorials for any style, format, duration or experience level with a free account in the YogaRenew app. Or subscribe and gain access to workshops, live classes and more.