yoga for balance poses pdf

Yoga for Balance: 12 Poses to Ground Your Body and Focus Your Mind

By Yoga AsanaNo Comments

Maintaining balance isn’t just about staying upright—it’s about cultivating a deep sense of inner stillness, physical strength, and mental focus. Whether you’re navigating a hectic day or challenging transitions on the mat, yoga for balance can help you feel more stable, centered, and in control. In this post, we’ll explore 12 powerful yoga poses that promote balance in the body and mind, with tips for integrating them into your practice.

Why Practice Yoga for Balance?

Balance in yoga isn’t only about standing on one leg. It also involves core engagement, joint stability, and mental clarity. Regular practice of yoga for balance improves posture, builds strength in often-overlooked muscles, and enhances proprioception (your body’s sense of its position in space). The following poses are excellent for anyone looking to enhance stability—whether you’re new to yoga or deepening your practice.

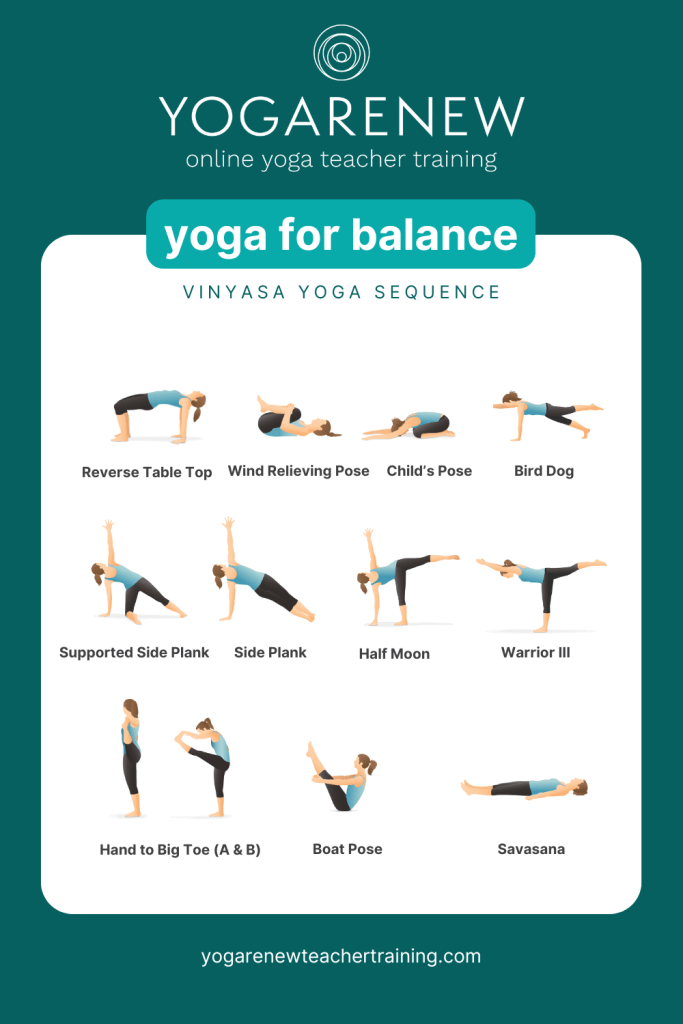
1. Reverse Table Top (Ardha Purvottanasana)

A great way to activate your glutes, core, and shoulders, Reverse Table Top helps build foundational strength. Start seated with your hands behind you and feet hip-width apart. Press into your palms and feet to lift your hips, creating a straight line from shoulders to knees. Hold for 5 breaths to engage stabilizing muscles.

Balance benefit: Strengthens the posterior chain and opens the front body, countering common postural imbalances.

2. Wind-Relieving Pose (Pawanmuktasana)

While often seen as a gentle stretch, Wind-Relieving Pose also teaches core control and breath-body coordination. Lying on your back, hug one knee—or both—into your chest, gently pressing the thigh toward your belly.

Balance benefit: Encourages awareness of core engagement and alignment in the lower spine.

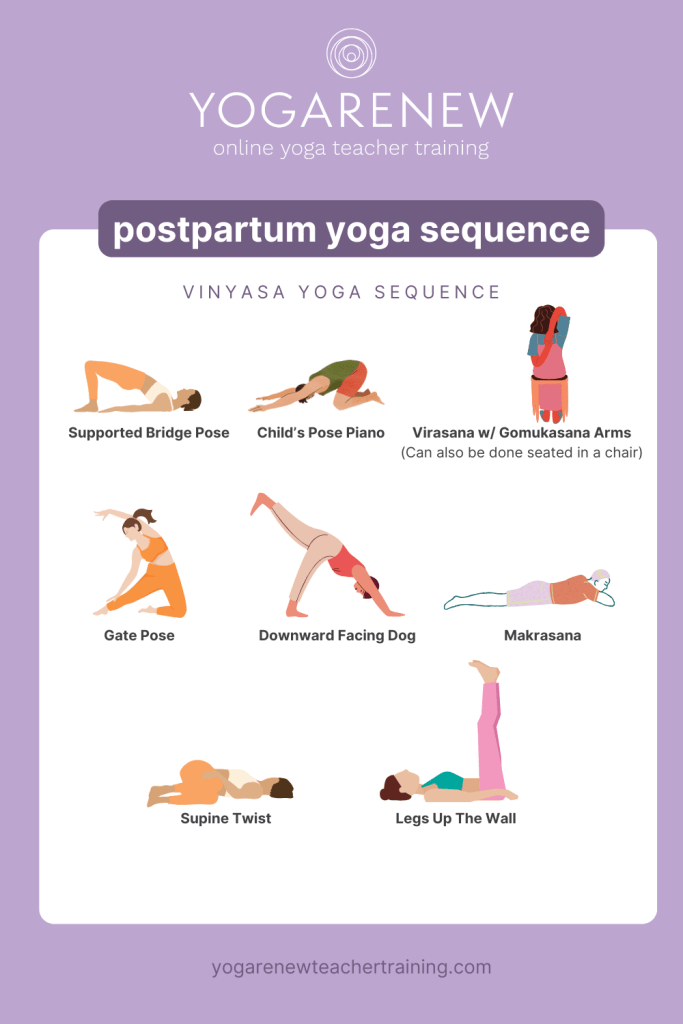
3. Child’s Pose (Balasana)

This grounding posture is a reset for the nervous system. Kneel and fold your torso over your thighs, resting your forehead on the mat. Focus on deep, steady breathing.

Balance benefit: Promotes mindfulness and body awareness, foundational elements for physical balance.

4. Bird Dog (Dandayamana Bharmanasana)

From tabletop position, extend your right arm forward and left leg back. Engage your core to prevent wobbling. Hold for 3–5 breaths and switch sides.

Balance benefit: Strengthens cross-body coordination and improves spinal stability.

5. Supported Side Plank (Vasisthasana with Knee Down)

This beginner-friendly variation of Side Plank uses the bottom knee for support. Stack the shoulder over the wrist and lift your top arm. Keep the hips lifted and engage your core.

Balance benefit: Builds lateral stability and confidence before advancing to full Side Plank.

6. Side Plank (Vasisthasana)

A classic pose for core and balance training. Stack your feet and hips as you lift into a strong line. Reach the top arm toward the ceiling and gaze upward or forward for stability.

Balance benefit: Challenges core engagement and strengthens the wrists, shoulders, and obliques.

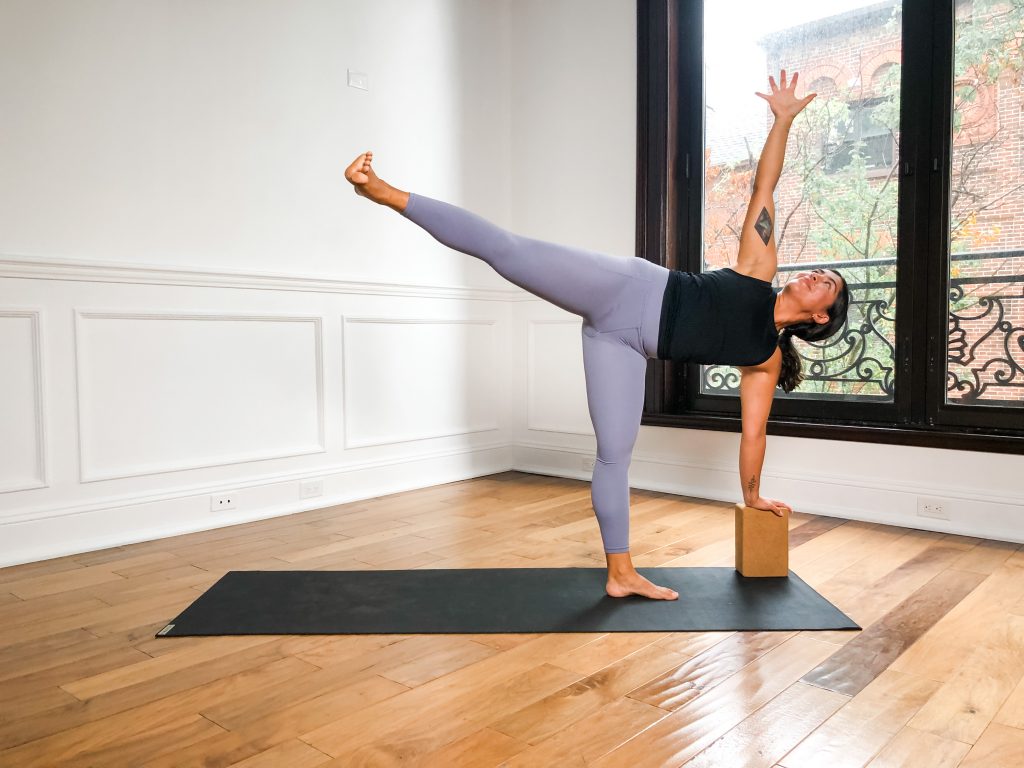
7. Half Moon (Ardha Chandrasana)

This standing balance pose combines leg strength with full-body awareness. From Warrior 2, shift your weight onto the front leg, lift the back leg, and reach the top arm up while gazing forward or up.

Balance benefit: Improves coordination and builds ankle, leg, and core strength.

8. Warrior III (Virabhadrasana III)

From a standing position or a high lunge, shift forward and lift the back leg while keeping your torso parallel to the ground. Stretch your arms forward or alongside your body.

Balance benefit: Strengthens the hamstrings, glutes, and back muscles while demanding laser focus.

9. Hand to Big Toe Pose A & B (Utthita Hasta Padangusthasana)

In A, extend one leg straight forward while standing on the other, holding the big toe. In B, open the lifted leg to the side.

Balance benefit: Enhances flexibility and strengthens stabilizing muscles of the legs and hips.

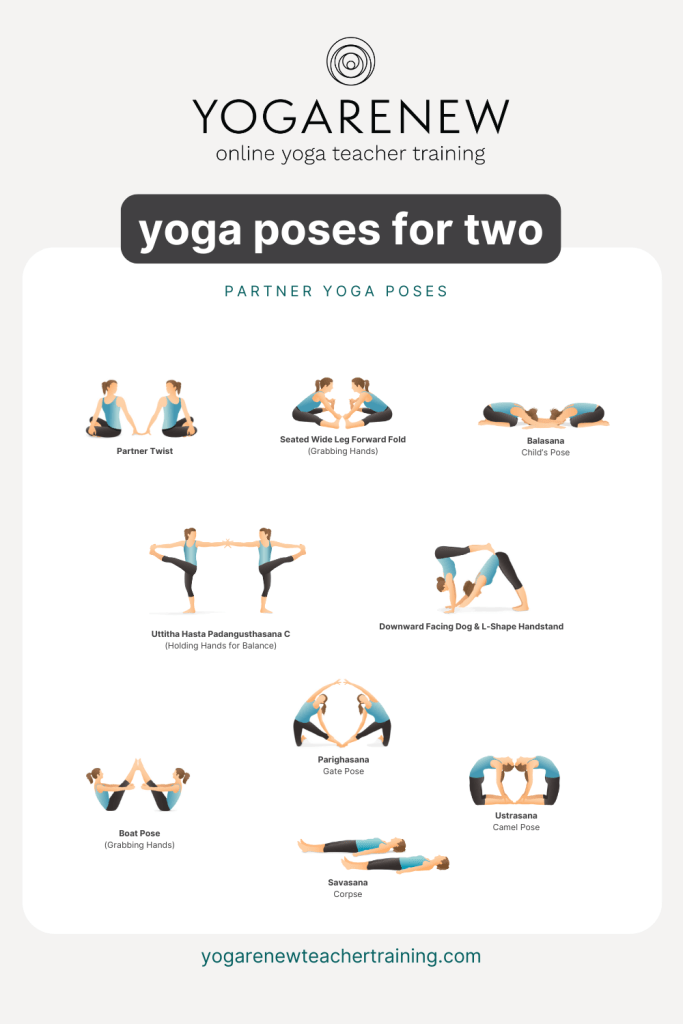
10. Boat Pose (Navasana)

Sit with knees bent and feet on the floor. Lean back slightly and lift your legs, balancing on your sit bones. Extend your arms forward or up.

Balance benefit: Activates the deep core muscles essential for posture and control in other balancing poses.

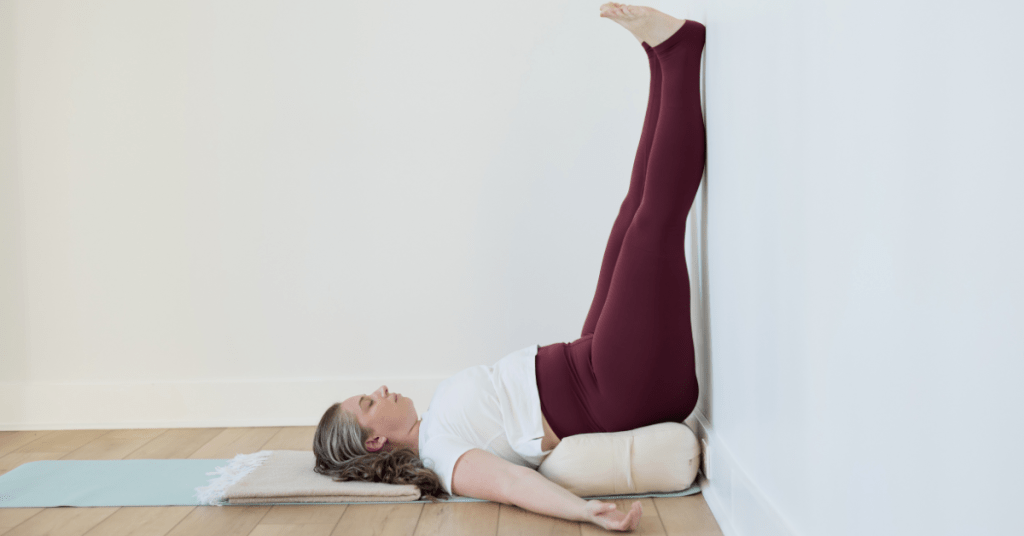
11. Savasana (Corpse Pose)

While not a physical balancing pose, Savasana is key to integrating your practice. Lie flat on your back, arms relaxed by your sides, and allow your body to fully rest.

Balance benefit: Encourages mental stillness and nervous system regulation—crucial for balanced living.

Tips for Improving Your Balance in Yoga

  • Engage your core: Most balance challenges come down to weak or inactive core muscles.
  • Focus your gaze (drishti): A steady visual point helps ground the mind and body.
  • Practice barefoot: Feeling the floor under your feet improves proprioception.
  • Slow down: Mindful movement builds deeper awareness and control.
  • Breathe deeply: Holding your breath creates tension. Full, steady breaths stabilize the nervous system.

Final Thoughts

Incorporating these poses into your routine can transform your relationship with balance—on and off the mat. With consistent practice, yoga for balance can help you feel more rooted, strong, and steady, no matter what life throws your way. Start with just a few poses, listen to your body, and let your practice evolve over time.

Ready to explore more balance-boosting yoga? Subscribe to my newsletter or join my next class—your body will thank you.


Join the community of +99k students worldwide!

Online Yoga Teacher Training Courses:

200 Hour Online Yoga Teacher Training

200 Hour Online Yoga Teacher Training

300 Hour Online Yoga Teacher Training

300 Hour Online Yoga Teacher Training

500 Hour Online Yoga Teacher Training

500 Hour Online Yoga Teacher Training

8 Beach Yoga Poses

By Yoga Teacher Training

Needless to say, the restorative and relaxing effects of yoga compliment the scenic and serene atmosphere of the beach. Working in Catalina Island during the summer inspired me to embark on my yoga practice while expanding my knowledge about the physical, mental and spiritual benefits of yoga. You can always use a towel or yoga mat to support your postures or simply embrace the imperfect, sandy foundation beneath you. Sand can be especially beneficial for practicing challenging and balancing poses because it provides a soft cushion for your body if you happen to fall out of a pose.

8 Yoga Poses for the Beach

The beauty of sand is that it conforms to your body; you can create small mounds to support your knees or flatten it out entirely to support your forearms during inversions. Let’s not forget the fresh, salty breeze and the sound of ocean waves complimenting your beautiful flow. I’m eager to share some excellent asanas for your next seaside practice which will make you fall in love with yoga all over again.

1. Downward Facing Dog (Adho Mukha Svanasana)

women on the beach holding a downward dog pose in the sand
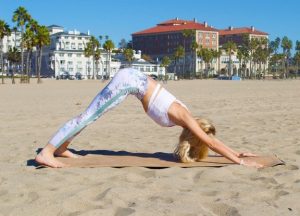
This pose is very popular in yoga sequences, especially in vinyasa yoga. The benefits of Downward Facing Dog include stretching the hamstrings, calves, shoulders and hands while strengthening the legs and arms. It also makes your feel energized and helps calm the brain which makes it an ideal pose to relieve stress. This classic yoga pose can be practiced pretty much anywhere however, practicing it on the sand can allow your body to sink even deeper into it. Begin in tabletop position with your knees stacked directly under your hips and your wrists stacked under your shoulders. Exhale while tucking your toes and lifting your knees off the sand. Spread your fingers and press your hands down in front of you while straightening your back as much as possible. Gently bend your knees, one at a time, working your way into your own version of Downward Facing Dog. Bring your gaze towards your feet while aligning your hand with your spine creating a straight line. Take a few deep breaths and when you’re ready to exit the pose, gently lower your knees back onto the sand into tabletop position and release into Child’s Pose.

2. Tree Pose (Vrksasana)

women on the beach holding a tree pose on a mat in the sand
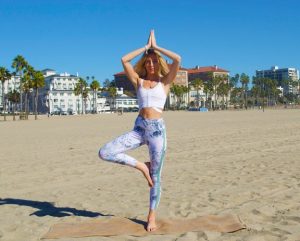
I don’t know about you but something about being by the ocean provides peacefulness and balance to my body and soul; why not practice a pose that embodies that? Benefits of this pose include stretching the thighs, core and shoulders while strengthening the spine, thighs and calves. Tree Pose is a great way to ground yourself and focus on your breathing while improving your balance. Begin in Mountain Pose (Tadasana); inhale while lifting your arms towards the sky and exhale, bringing your hands by your heart. Choose a focal point to provide balance and slowly lift your right foot off the sand and place it on your left ankle. Taking your time, lift your right foot further until it reaches the side of your left knee. Take a few deep breaths here and whenever you’re ready. return to Mountain Pose; repeat this pose on the opposite side.

3. Shoulder Stand (Sarvangasana)


This might seem like an odd pose to practice on the beach but the combination of an inverted posture and a serene, ocean atmosphere will undoubtedly relax you to the core. Be cautious when practicing a shoulder stand because it is definitely e a more advanced pose. The benefits of this pose include relieving stress and depression, strengthening the glutes, arms, core, legs and arms as well as improving digestion. To get into this pose, start by laying down on your mat (or the sand) and bring your knees towards your face. Bring your hands to your hips to support your lower body and lift your hips and legs towards the sky while trying to keep them straight. Take a few deep breaths; to exit the pose, slowly lower your hips and legs to the ground. You can also choose to stay in a shoulder stand in order to transition to the next posture. The best part? Even if you happen to lose your balance during this asana, the sand provides a soft cushion to avoid injuries.

4. Plow Pose (Halasana)

women on the beach holding a back bend fold
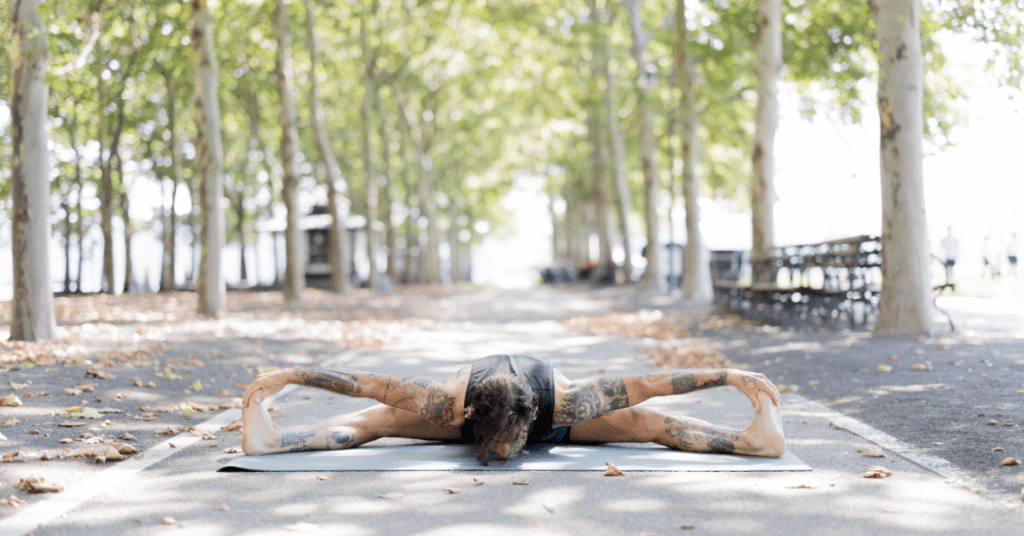
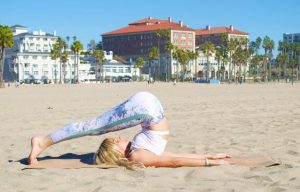
This pose is excellent at reducing back pain and stress, calming the mind and stretching the spine and shoulders. To get into this pose, simply begin in a shoulder stand and slowly bring your extended legs back towards your head until your toes touch the mat behind your head. Remember to bring your chin away from your sternum and keep your hands on your lower back for additional support or release them onto the mat and stretch them behind you. This pose can be held for a few minutes; when you feel ready to exit, bring your hands to your lower back again and exhale while slowly lowering your legs down towards. This a a great pose for the beach because it encourages deep relaxation and stress relief.

5. Bow Pose (Dhanurasana)

women laying on the mat holding her feet with her hands
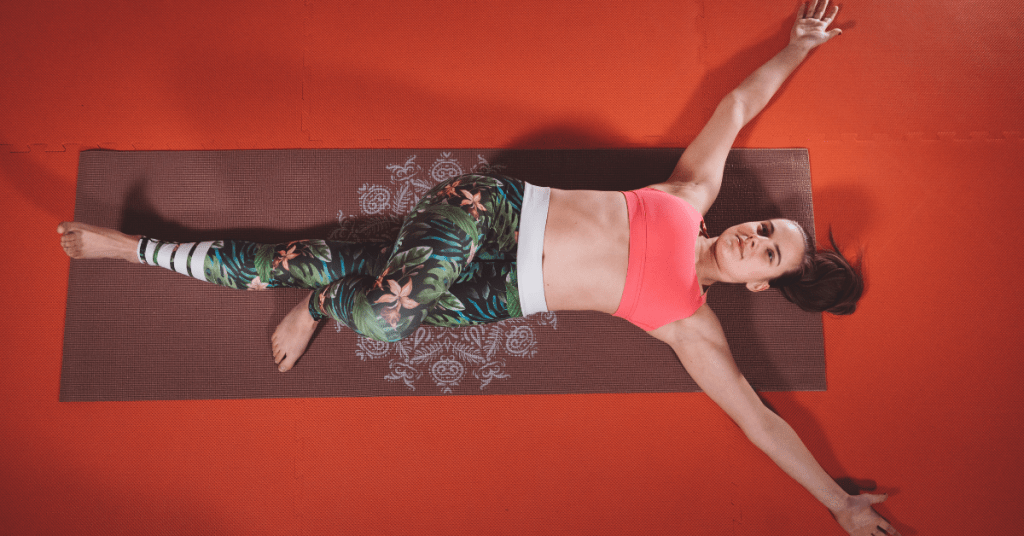
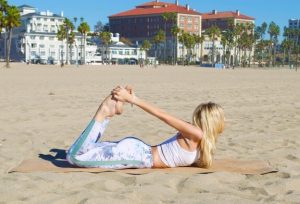
Take a deep breath and say goodbye to any tension. Being by laying on your stomach with your arms extend by your sides with your palms up. Take a deep exhale and reach for your heels with your hands while bending your knees. Hold onto your feet while trying to lift your thighs slightly off the mat and gaze forward. Keep i mind that it might be harder to breathe in this posture but make sure to keep breathing steadily. Stay in this pose for about 30 seconds and release your legs and arms towards the mat while taking a deep exhale. The benefits of this pose include improving your posture, strengthening the back muscles and stretching your thighs, core, chest, throat and hips.

6. Pigeon Pose (Kapotasana)

women on the beach laying with one leg folded in the sand
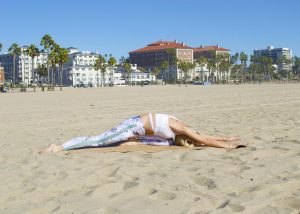
This pose is wonderful at lengthening the hip flexors, preparing the body for backbend poses as well as opening the hip joint and reducing stress and anxiety. Begin in seated position with your feet tucked under your glutes. Extend your right leg back on the mat while keeping your left leg bent in front of you. Take a deep inhale and as you exhale, release your body onto your front leg and extend your arms on the mat in front of you. Try to bring your forehand to touch the mat and close your eyes. Take a few deep breaths, allowing your body to sink even deeper into the pose with every exhale. To exit the asana, slowly walk your hands back up towards your torso and return to seated position.

7. Easy Pose (Sukhasana)

women on the beach holding a crossed leg pose
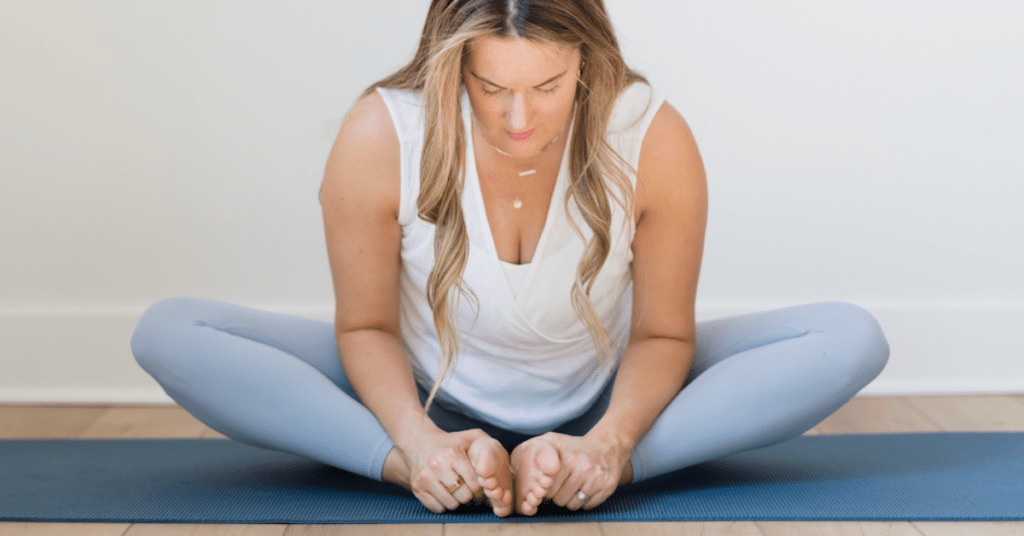
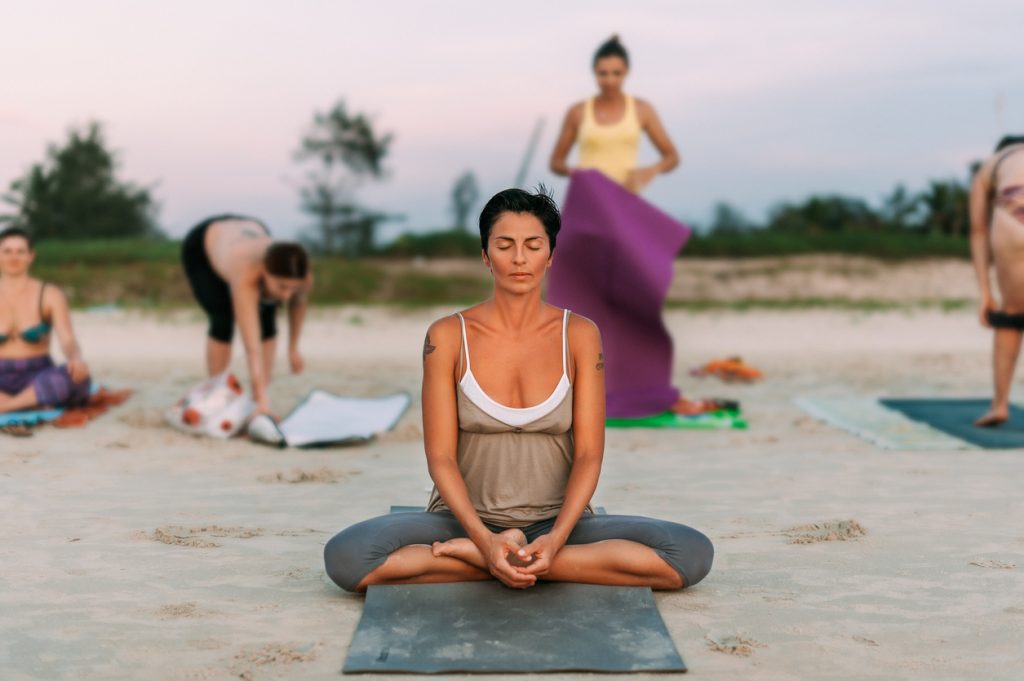
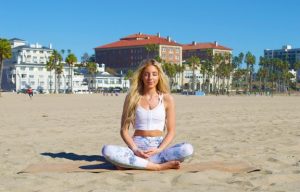
Now, let’s take a moment to sit still and breathe. Sit comfortably with your legs crossed, your spine straight and your hands in your lap. Close your eyes and take several deep breaths, trying to hold your inhale for a few seconds before exhaling. Try to eliminate any stressful or negative thoughts while bringing your entire focus o your breath. While continuing to breathe deeply, bring your attention to the sound of the ocean waves crashing endlessly against the shore, one by one. Inhale the fresh, salty breeze and feel your body sinking heavily into the sand.Let go of any fear or stress about what will happen tomorrow or the day after because all that is guaranteed is this moment, sitting cross legged on the sand in front of the vast ocean that covers our beautiful planet. In this moment, you are blessed and all you can do is immerse yourself in gratitude. You can attempt the Ujjayi breath which is often referred to as the “oceanic breath” and it is used to synchronize your breathing with the asana. This wonderful technique will enhance your yoga practice as well as increase the oxygen in your blood, relieve tension, detoxify your body and mind as well as help to increase your mind-body awareness. The Ujjayi breath consists of breathing through your nose, inhaling deeply and exhaling slowly through your nose. To practice, open your mouth and exhale making a “ha” sound. Noe, try this with your mouth closed but maintain the intensity of your exhalations. Every time your exhale, it should sound like ocean waves and this technique is ideal to practice while you’re in easy pose, during hatha yoga or simply when you’re stressed or frustrated.

8. Corpse Pose (Savansana)

women laying on a mat on the beach during a sunny day
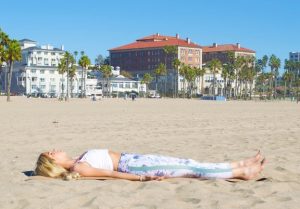
This posture will help you relax even more after getting out of Easy pose. Lay down on your mat or the sand with your legs extended in front of you and your arms by your sides with your palms facing up towards the sky. Close your eyes and bring your awareness to your breath once again but this time, don’t force deep inhalations or exhalations; instead, breathe naturally and simply bring your attention to your breathe. Allow the soothing sounds around you to increase your sense of mindfulness and purpose. The benefits of this asana are endless, a few of which are body awareness, stress reduction, better sleep quality and deep mind relaxation. This asana can be held for anywhere from 5 minutes to an hour and it might just end up in a wonderful nap in the sun.

Start Your Yoga Beach Session

What are you waiting for? Head to the beach and take some time to indulge in these asanas; you deserve that time to gain perspective and awareness. Take the time to leave any stress that you might be experiencing behind and relax yourself physically, mentally and spiritually. The past has already happened and the future is uncertain so all that really matters is this present moment, right here, right now. Submerge yourself in an abundance of spiritual awareness, gratitude and bliss.

Let’s ride your wave, together.

Namaste.

Looking to lead yoga classes of your own on the beach? Get started on your yoga teacher training online with YogaRenew.

Yoga poses for two PDF with partner yoga poses

Yoga Poses for Two

By Yoga AsanaNo Comments

“Yoga poses for two,” is something we often hear at our headquarters in Hoboken, NJ and see in the online landscape of the yoga practice. Oftentimes, people are looking to share their practice with a friend, photograph partner poses that look cool, or want to get their partner (who maybe doesn’t practice regularly) involved in yoga. Whatever the reason, we’ve crafted this quick and easy PDF of nine yoga poses for two that are simple and great for any skill level!

Let’s explore!

Yoga Poses for Two: How to get into the Poses

Seated Partner Twist

  1. Start seated in Sukhasana (Easy Seat)
  2. Place your left palm on your right knee and twist
  3. Tent your right fingertips beside you
  4.  Your partner mirrors you

Seated Wide Leg Forward Fold

  1. Start seated with your legs wide
  2. Have your partner face you
  3. The soles of your feet can touch as you reach out in front of you and grab each other’s palms
  4. Take turns leaning forward and back (towards each other) to deepen the stretch
    • *If one of you is less flexible than the other, match the person who can’t spread their legs as wide. The tension from grabbing onto each other’s arms may stretch you both more as you sit there.

Child’s Pose

  1. Start in table top position facing your partner
  2. Let your big toes touch and come to sit back on your heels
  3. Extend your arms out in front of you so one of you can place your palms on top of the other’s
  4. Stay here for as many cycles of breath as you’d like

Extended Hand to Foot Pose (Uttitha Hasta Padangusthasana C)

  1. Start standing in line with your partner, with enough distance between you for both of you to extend your arms
  2. Turn your body about 45Âş away from them and grab the outer edge of the leg that’s facing outward
  3. Extend your leg across your body (they will mirror you) until it is mostly straight
  4. Reach the free arm out to hopefully grab onto your partner’s extended arm

Downward Facing Dog & L-Shape Handstand

  1. One of you get into downward facing dog
  2. The other places their hands slightly in front of the hands of the downward facing dog person
  3. Slowly start walking your legs up until your feet can rest on the lower back of the person in downward facing dog
  4. The person in L-shape can walk their hands in as far as they need to, getting them as close to that “L-shape” as possible

Parighasana (Gate Pose)

  1. Both of you start on your shins (with enough distance in between you to extend your legs in between you)
  2. Both of you step the same leg in towards center (if your feet touch, that’s okay)
  3. Reach the same arm of the shin you’re on up alongside your ear and lean up and in towards center
  4. You can slide the same hand of the extended leg down that extended leg in towards center

Boat Pose (Grabbing Hands)

  1. Sit on the center of your sit bones facing your partner
  2. Lift your shins parallel to the floor
  3. Extend your legs as straight as you can
  4. Extend your arms out by your side and try to grab their hands

Camel Pose

  1. Start seated with your backs facing each other and about a 2-foot gap in between the soles of your feet
  2. Come to sit up on your shins
  3. Extend your arms alongside you, keeping your chest lifted and bend back from your upper back
  4. Let your hands find the heels of your feet
  5. Drop your head back towards your partner’s head
    • *Option to extend one of each of your arms up into the sky, making whatever shape you’d like for that photo opp 😉

Savasana (Because No Class is Complete without Savasana)

  1. Life down on your back
    • *Option to hold hands :’)

When to Practice Yoga Poses for Two

The whole point of practicing yoga poses for two is to explore the yoga asana practice in a new and fun way. By partnering with another yogi, or even someone new to yoga, you are sharing the gift of this ancient practice. When practicing partner yoga poses, you may be filled with a new invigoration and creativity for the practice, whether you are solely a practitioner or teaching your own yoga classes.

YogaRenew’s online yoga teacher training programs are completely online and self-paced! If you’ve been thinking about getting your yoga certification, take a look at the variety of online courses we offer. If you wish to practice with us in person, visit our headquarters at YogaRenew Hoboken.


Join the community of +99k students worldwide!

Online Yoga Teacher Training Courses:

200 Hour Online Yoga Teacher Training

200 Hour Online Yoga Teacher Training

300 Hour Online Yoga Teacher Training

300 Hour Online Yoga Teacher Training

500 Hour Online Yoga Teacher Training

500 Hour Online Yoga Teacher Training
Person in Half Moon pose with their left hand on a block, right arm raised, on a black yoga mat

Planes of Motion in Yoga

By Yoga AsanaNo Comments

In yoga, there are three planes of motion discussed: The frontal (or coronal) plane, the sagittal plane, and the transverse plane. Each of these planes of motion are responsible for differentiating areas of movement and motion in the body. In the yoga practice, different postures take place in different planes of motion. Most everyday movements do not take place in a single plane.

The frontal, or coronal, plane is where side to side movement takes place, the sagittal plane is where forward and backward movements take place, and the transverse plane is responsible for rotational movements.

Here are each of the planes broken down further.

Sagittal Plane Movements

The sagittal plane separates the left and right sides of the body.

  1. Flexion – bending (decreasing the angle of a joint)
  2. Extension – straightening (some joints allow extension past anatomical position)

Frontal Plane Movements

The frontal plane separates the front (anterior) and back (posterior) of the body.

  1. Abduction – moving a limb out to the side, away from the midline
  2. Adduction – moving a limb toward the midline
  3. Lateral flexion – side bending the trunk

Transverse Plane Movements

The transverse plane separates the upper (superior) and lower (inferior) halves of the body.

  1. External (or lateral) rotation – rotating the front of a limb away from the midline
  2. Internal (or medial) rotation – rotating the front of a limb toward the midline
  3. Axial rotation – rotating the trunk

Planes of Motion

Yoga Poses & the Different Planes of Motion

Sagittal Plane Yoga Poses:

Adho Mukha Svanasana (Downward Facing Dog) is a pose that requires dorsiflexion of the feet, knee extension, hip flexion, spine extension (axial extension), shoulder flexion, elbow extension and wrist extension. Downward Facing Dog can be considered a posture that is done in the sagittal plane (forward and backward motion).

Urdhva Mukha Svanasana (Upward Facing Dog) is another posture that can be explored in the sagittal plane of the body. It requires knee and hip extension, plantar flexion of the feet (opposite from downward facing dog), spinal extension, neutral shoulders, and elbow and wrist extension.

Uttanasana (Forward Fold) is a yoga posture that takes place along the sagittal plane of the body. The front motion of folding forward classifies it

Frontal Plane Yoga Poses:

In Viravhadrasana II (Warrior II), your arms and hands are extending in both directions as you bend your front knee and keep your back leg straight with your chest lifted. The left and right motion classifies this pose as taking place in the frontal/coronal plane.

Trikonasana (Triangle Pose) is another posture where the front of the body is open. The chest stays lifted as the arms extend in both directions (up towards the ceiling, and down towards the mat or leg) while the body extends and lengthens from the crown to the tailbone.

Vrksasana (Tree Pose) is the last posture we’ll explore along the coronal plane. Tree pose has the arms extended up, with the front of the body facing forward, chest lifted and leg reaching down.

Transverse Plane Yoga Poses:

Transverse yoga poses include: Revolved triangle pose, seated and reclined twists, chair twist, and any other rotated posture. These movements allow the body to twist at the core, making them qualify as taking place in the transverse plane of motion.

Learn more about the Planes of Motion in Yoga

However, as mentioned above, it is rare that any movement takes place in a single plane at a time. While these postures all qualify as existing and taking place in those planes of motion, they are also existing simultaneously in other planes.

YogaRenew Teacher Training’s Online Courses can help you better understand the planes of motion and how they apply specifically to the yoga practice. We even published an entire Planes of Motion Series to help you dive deeper into them and apply them to your yoga teachings or personal practice.

Join the community of +99k students worldwide!

Online Yoga Teacher Training Courses:

200 Hour Online Yoga Teacher Training

200 Hour Online Yoga Teacher Training

300 Hour Online Yoga Teacher Training

300 Hour Online Yoga Teacher Training

500 Hour Online Yoga Teacher Training

500 Hour Online Yoga Teacher Training
Postpartum yoga sequence PDF with each yoga pose mentioned in the article

Postpartum Yoga Sequence

By Prenatal & Postnatal Yoga

A postpartum yoga class can have multiple benefits for someone who has just given birth. For one, it helps acclimate them back to their yoga practice and getting comfortable on their mat again. For another, it’s a great, gentle way to ease the body back into movement. There is enough freedom to start to explore what feels good in the postpartum body.

The postures in this class are designed to help the post pregnancy body stretch and get familiar with getting stronger after it’s already been through so much.

Giving birth is a lot of work! Your yoga practice doesn’t have to be…

Popular postpartum yoga poses

Supported Bridge Pose

Supported bridge is a great way to start to engage your pelvic floor muscles again. It’s also a great stretch for the quads and engages the hips. Getting comfortable lifting your hips off of the mat is a simple and effective way to prepare the body for most yoga asana postures.

How to set up for bridge pose post pregnancy:

  1. Lie on your back and step your feet to the mat
  2. Walk your heels in towards your seat
  3. Press through the soles of your feet to lift your hips up off of the mat
  4. Roll to tuck your shoulders under and extend your arms out long by your side underneath you or interlace your hands underneath your sacrum
  5. Hold for 4 or 5 breaths
  6. Release the clasp of your hands (if you took that option) and lower down

Child’s Pose Piano

Child’s pose is a popular pose in any yoga class and can be practiced safely at home. Child’s pose piano is a variation of the classical Balasana (child’s pose) where you crawl your fingertips to either sides of your yoga mat.

How to do child’s pose piano:

  1. Start in table top position
  2. Widen your knees the width of your mat & let your big toes come together
  3. Start to sit back onto your heels (if there’s a lot of extra space, you can pad up under your seat with a blanket)
  4. Walk your palms out in front of you and let your forehead come down onto the mat
  5. Crawl your hands to the top right corner of your mat
  6. Crawl your hands to the top left corner of your mat *like you’re playing a piano 😉

Virasana with Gomukasana Arms

Virasana is a common seat to start in at the beginning of a yoga class. It’s also common to add in cow face (Gomukasana) arms, where your elbows are bent and hand are clasped behind your back.

This can be a great pose to get a yogi acclimated to finding a comfortable seat and getting the shoulders more mobile.

How to do Virasana with Gomukasana arms post pregnancy:

  1. Start seated on your shins (option to place a block on the low and wide setting directly underneath your seat)
  2. Reach your right arm up by your ear and bend your elbow to touch the upper part of your back
  3. Reach your left arm out to the side and flip your palm to face the back of the room, bend at your elbow and try to reach your right hand (it’s okay if you can’t quite reach to get your hands fully clasped together, just keep pulling them in towards one another)
  4. Repeat, switching the arms

Gate Pose

Gate pose (Parighasana) is a pose that encourages a deep side body stretch and support of the knees.

How to do gate pose post pregnancy:

  1. Start sitting up on your shins (facing the left side of your yoga mat)
  2. Step your right foot towards the front of your mat and extend your leg, keeping your left knee and shin against the mat
  3. Reach your left arm up alongside your left ear and side bend toward your extended right leg
  4. Slide your right arm down your extended leg
  5. Keep reaching towards your extended leg & breathe
  6. Repeat on the other side

Downward Facing Dog

Downward facing dog is the quintessential yoga pose and makes its way into every yoga asana class. Whether it’s hatha, vinyasa, yin, restorative or pre or postnatal, down dog is almost always incorporated into a yoga class. This posture stretches the entire body and gets people comfortable on their hands and feet.

How to get into downward facing dog post pregnancy:

  1. Start in plank pose
  2. Shift your hips up and back

Makrasana

Makrasana, more commonly known as crocodile pose, is essentially cobra pose with your arms underneath your chin or head for support.

How to do Makrasana post pregnancy:

  1. Life on your belly and send your legs long back behind you
  2. Bend your elbows and stack your arms under your chin in front of you, or make a cradle with your palms and rest your chin in between your palms (keeping your head upright)

Supine Twist

A supine twist is commonly found in the wind down section of class after all the vigorous work is done. Supine twist is a great stretch for the spine, helping find neutrality before coming into Savasana.

How to get into a supine twist post pregnancy:

  1. Lie on your back
  2. Hug your knees into your chest
  3. Drop them over to the right side of your mat
  4. Cactus your arms
  5. Gaze over your left shoulder
  6. Repeat on other side

Legs Up the Wall

Legs up the wall is another great option for the wind down portion of class and can even be substituted as the final posture (Savasana) for people experiencing a postpartum yoga practice. It allows for lymphatic drainage and healthy blood flow, that is similar to an inversion, while allowing the mind and body to quiet.

How to set up for legs up the wall post pregnancy:

  1. Option to start with a blanket folded against the wall (for under your seat)
  2. Sit with your hips up against the wall, legs extended
  3. Swing them up the wall until you reach a desired position
  4. Breathe and let the mind quiet

Additional postpartum postures to try

If you’ve already tried all the above poses, here are some additional yoga postures you can try at home:

  • Cat/Cow
  • Camel
  • Boat pose
  • Plank pose

*Bonus: Baby & Me Poses

Some studios will offer yoga classes where you can bring your baby. These classes will usually include some classical poses but will make class more accessible by offering the support of blankets, bolsters and other props. When searching for a Baby & Me yoga class near you, you’re bound to find mostly early morning classes tailored to a baby-friendly experience.

Some popular poses to do with your baby include:

  • Cat/Cow
  • Child’s pose
  • Seated wide legged forward fold
  • Bound angle pose


Online Yoga Teacher Training Courses:

200 Hour Online Yoga Teacher Training

200 Hour Online Yoga Teacher Training

300 Hour Online Yoga Teacher Training

300 Hour Online Yoga Teacher Training

500 Hour Online Yoga Teacher Training

500 Hour Online Yoga Teacher Training
Join the community of +99k students worldwide!

Enter your email to get our downloadable PDF of 75 Weekly Class Themes to keep you inspired when teaching your yoga classes:

Pre and postnatal yoga class at YogaRenew Hoboken

Moving Through Matrescence: Postpartum Workouts with Patience and Care

By Prenatal & Postnatal Yoga

Becoming a mother is one of life’s greatest transformations. There’s even a word for it: matrescence — the physical, emotional, and spiritual transition into motherhood. Much like adolescence, matrescence is a time of profound change, often marked by contradictions: joy and grief, strength and vulnerability, confidence and doubt — la vie en pleine évolution — life in full transformation.

In this delicate stage, postpartum exercise is not about “bouncing back” or rushing toward a finish line. It’s about reconnecting with yourself — slowly, thoughtfully, and with deep respect for everything your body has carried you through.

A Different Approach to Postpartum Workouts

As a yoga teacher and mother myself, I have seen again and again how important it is to honor this moment, rather than push through it. Your postpartum workout plan should not be about chasing an ideal — it should be about supporting your healing, restoring your energy, and building a foundation for lifelong strength.

In the early stages of postpartum recovery, the exercises we choose must prioritize:

  • Breath awareness and natural core engagement
  • Pelvic floor recovery and full-body alignment
  • Mobility and stability, rather than only flexibility
  • Gentle but progressive strengthening
  • Rest as an essential part of the process

A well-designed post pregnancy workout plan respects the truth that your body is still adapting — hormonally, structurally, emotionally. Moving with awareness, rather than urgency, creates lasting results rooted in real well-being, not temporary appearances.

How I Work with Students Postpartum

When I work with students, whether in group classes or private sessions, I guide them through a well-rounded postpartum experience that thrives on confidence, patience, and acceptance.

We focus first on creating a strong foundation: honoring what is present, addressing imbalances thoughtfully, and celebrating small steps forward. Every session is an invitation to reconnect with breath, sensation, and strength — not with judgment, but with curiosity and care. It’s about meeting yourself with a spirit of douceur and resilience.

Why Your Postpartum Exercise Plan Matters

Too often, new mothers are pressured into returning to exercise as a way to “fix” themselves. But your body doesn’t need fixing — it needs listening, encouragement, and gentle rebuilding.

The right postpartum exercises — core reconnection, pelvic floor release and support, functional strength training — can help you meet the very real physical demands of motherhood. Whether it’s carrying your baby, lifting a car seat, or simply standing taller after a long day, these movements are tools for your everyday life, not just for an aesthetic goal.

A thoughtful postpartum workout plan gives you the time and space to rebuild strength from the inside out, in harmony with the deep inner changes matrescence brings.

Final Thoughts on Motherhood & Matrescence

In the early days of motherhood, it’s easy to lose yourself in caring for others. But you, too, are in the process of becoming. A postpartum exercise journey rooted in patience, confidence, and acceptance can help you reconnect not just with your body, but with your evolving self.

You are not broken. You are becoming. And you deserve practices that honor the extraordinary, beautiful work of transformation you are living every single day — pas à pas, step by step.

Related Courses:

Prenatal Online Yoga Teacher Training

Prenatal Online Yoga Teacher Training

300 Hour Online Yoga Teacher Training

300 Hour Online Yoga Teacher Training

500 Hour Online Yoga Teacher Training

500 Hour Online Yoga Teacher Training
Tittibhasana Class Sequence PDF

Weekly Class Theme: Tittibhasana

By Yoga

This week we explore the magic behind Tittibhasana, or firefly pose and the poses necessary to embody the full expression of the pose. Tittibhasana is not a direct translation for “firefly” literally, but rather invokes and represents the embodiment of the tiny, glowing bug. The pose requires much of the effort it takes to eventually become light, fluttering, and glowing. With the legs extended forward and seat lifted, it is an energizing and revitalizing pose, perfect for spring (in the northern hemisphere)!

Here is a sample class to work towards Tittibhasana.

Puttering (Warm Up)

  • Half Happy Baby: Have students start on their back, bending one knee and pulling it towards the armpit for a half happy baby. Stay here for a few breaths then switch to the other leg.
  • Table Top
  • Cat/Cow
  • Child’s Pose
  • Downward Facing Dog
  • Lizard Lunge
  • Wide Legged Forward Fold: Have them grab their back ankle, stretching all along the side body and the back of the legs. Have them switch to grab their front ankle.

Sun Salutations

Move through 3-4 rounds of Sun Salutations, but for the low lunge portion, add in a wide low lunge twist.

Open Hip Standing

  • Warrior II
  • Extended Side Angle
  • Triangle Pose 
  • Prasarita Padottanasana (Wide Legged Forward Fold)

Balance & Twists

  • Uttitha Hasta Padangusthasana A & B
  • Warrior III
  • Seated Spinal Twist

Peak Pose

Tittibhasana with blocks behind the heels of the feet

Wind Down

  • Supported Fish
  • Supine Twists
  • Savasana

Online Yoga Teacher Training Courses:

200 Hour Online Yoga Teacher Training

200 Hour Online Yoga Teacher Training

300 Hour Online Yoga Teacher Training

300 Hour Online Yoga Teacher Training

500 Hour Online Yoga Teacher Training

500 Hour Online Yoga Teacher Training
Join the community of +99k students worldwide!
Sicily YogaRenew Retreat crew in Sukhasana, facing a volcano

7 Top Tips for Planning a Yoga Retreat in 2025

By Yoga

There are a few things you’ll need to focus on when planning your first ever yoga retreat. We’ve gathered advice from some of our expert teachers and put it all in this one post for you to have for safe keeping. ✨

This is just a high level overview, but still important things to consider!

1. Start a waitlist

Create momentum!!! Get people excited. Start “soft marketing” before enrollment begins. This can look like capturing emails on social media, start a newsletter & include buzz about the retreat with a way for them to “opt in” to hear more and be the first to receive the link. Once you have a roster of interested people, the spaces are bound to fill up! The more people you reach in the beginning phases, the higher chance it’s likely that it sells out.

2. Work with the retreat center

Ask the retreat center what type of marketing they do. In addition to everything you’re posting/creating, the retreat center also has an audience that they can market to. This means reaching more people!

Additionally, when it comes to any type of marketing for your retreat, lead with emotion. People buy from people. Chances are, if they already follow you and/or the retreat center and have had a good experience with either one, it’s likely they’ll want to have that experience (or something similar) again… and will book just based off of that.

3. Look into insurance

Know if you need event insurance through the venue or not. If you do end up needing insurance, it’s good to have a jump start on it so you don’t have to worry about it in the midst of additional planning for the retreat and people asking you questions.

Insurance isn’t always mandatory (through the event space), but is sometimes required. Check thoroughly with the retreat center’s policies before you embark to go on the trip to save yourself from any headaches down the road.

4. Co-lead it with another teacher

The ability to tap into two different teachers’ student base makes it viable to sell and bound to sell it out. It also makes it a well-rounded retreat. If you’re mostly a vinyasa yoga teacher and you’re looking to have some mellower practices, think of partnering with a yin yoga teacher or meditation & sound facilitator to create an all encompassed experienced.

If you are co-leading it with someone, be sure to have a good contract. It’s crucial to establish who is responsible for what when co-leading a yoga retreat. Clear communication and boundaries can help make for a smooth trip, which leads to our next point…

5. Establish boundaries

When on the retreat, be clear about your boundaries, both with the person you’re leading it with but also with students on the retreat. It doesn’t make for a good time when it feels like there is no “down time” or time outside of the yoga experiences to let the vibes of the trip set in. People might expect you to be in working mode the entire time, and that isn’t realistic in an industry where much of what you do is sharing your energy and knowledge – it can be exhausting!

Establishing boundaries from the beginning can help both students and you and your co-host feel comfortable and have a general idea of what to expect once on the trip. Even though it is a yoga retreat, people may want to go off and explore on their own. They might make friends and want to spend time with people they met on the trip. And you and your co-host might want to go find a spa or other spot to take a yoga class rather than teach one.

6. Flights & familiarity

Make sure there’s direct flights to the place you’re going if it requires a flight. It also helps if the destination is a place you’ve gone before.

Traveling can be such a huge factor and most people will appreciate it if it’s as efficient as possible. Knowing the route thoroughly yourself not only helps you to guide others, but it takes the pressure out of having to figure out new territory.

7. Incentivize

Give away free stuff! People love a goodie bag – especially when it’s tied into something they’re passionate about (aka yoga). There’s an artful way to work with brands and get them to send you free stuff in exchange for bringing awareness to their product and getting people to interact with their brand.

Most of the time, compiling goodie bags is a great way to say thank you while also introducing your peers to products you know and love. It’s a win-win!

If you’re looking to get more info, we’ve created a whole Yoga Retreats online course with all the info on how to get started leading retreats and keep leading them with ease.


Online Yoga Teacher Training Courses:

200 Hour Online Yoga Teacher Training

200 Hour Online Yoga Teacher Training

300 Hour Online Yoga Teacher Training

300 Hour Online Yoga Teacher Training

500 Hour Online Yoga Teacher Training

500 Hour Online Yoga Teacher Training
stress relief yin yoga pdf with 4 yoga poses on it: supine tree, dragonfly, butterfly, and legs up the wall

Weekly Class Theme: Stress Relief Yin Yoga Class

By Yin Yoga

Stress is a common issue that we all deal with on a daily basis. Prolonged stress can lead to diseases, lowered immunity, tiredness, fatigue, and burnout. Stress also leads to depression, anxiety, and social or communication issues. How we react to stress determines how stressed we actually feel as well as our outlook on life. For example, two people could be in the same stressful situation, but if one has learned to reframe that situation in a positive light—or learned how to react less to it—that person will have a completely different experience.

A regular yoga and meditation practice can help us to combat stress and help us with how we respond to stressful situations. By quieting the mind and allowing ourselves to be more deeply aware of the present moment, we can start to become more mindful of our emotions, our thoughts, and how we react to stressful situations. A calming yoga practice can help us to soothe our central nervous system and promote inner peace.

To sequence a class for this theme, consider asanas (postures) that promote relaxation in the body and mind.

Yin yoga poses to promote stress relief

Supine Tree

Supine, or reclined, tree pose is a great way to start off any yin yoga class centered around de-stressing. Having students start on their back can allow them to feel relaxed. It also allows for them to explore a pose without being tempted to peer over at other students. You can even encourage them to close their eyes or find a soft, gentle gaze and tune inward. Supine tree is just like the standing version of tree and allows for multiple modifications.

How to: Lie down on your back and bend one knee to draw the foot of that knee as close to your seat as you can, with the sole of that foot resting up against the inner thigh of the opposite leg. Let the bent knee fall open to the side (letting the knee fall down towards the floor). Extend the leg that isn’t bent long out in front of you. Reach your arms up overhead.

Modifications: 

  • Place blankets or a bolster underneath the bent knee to offer support and cushioning under that knee.
  • Keep the hands on the body, perhaps anchoring down the hips/pelvis.
  • Hold a block in between your hands as they extend upward.
  • Place your blocks, sandbags or weighted eye pillows on the palms of the hands to steady them and weigh them down to find grounding and stillness.

Dragonfly Pose

Dragonfly pose is a forward fold, which makes it ideal for calming the mind. Seated forward folds are designed to bring the body back to a place of stillness and grounding.

How to: Sit down on the floor, sitting upright. Widen your legs as much as you can without straining any part of the leg, ankle, or foot. Slowly start to fold forward (your upper back will naturally start to round – this is okay)! Let your forehead come down onto something, whether it’s the ground or blocks. *Option to grab feet or big toes.

Modifications:

  • Place rolled up blankets underneath your knees.
  • Place blocks underneath your forehead or underneath your hands out in front of you.
  • Create a Stonehenge shape with two blocks and a bolster to drape the upper half of your body over as you fold forward.

Butterfly Pose

Butterfly is another forward fold but this time with knees bent and the soles of the feet coming together.

How to: Sit on the floor with your legs straight out in front of you. Use your hands to grab your inner thighs and pull your knees open. Bring the soles of your feet together. Fold forward by grabbing onto your ankles.

Modifications:

  • Place a block in between the soles of your feet and your head.
  • Place blankets or blocks underneath your knees.

Legs Up The Wall

Legs up the wall can be incorporated into almost any yoga class, but it’s particularly appropriate for a yin yoga class. This posture allows the lymphatic drainage to flow healthily throughout your body as the blood circulates toward the heart with the legs being suspended upward. This pose is also a great addition in aiding in stress relief as it helps the yogi find stillness and feel the effects of an inversion (since the heart is technically above the head a tiny bit).

How to: Sit with your hips up against the wall and then swing your legs up like a dial, letting them rest along the wall. Knees can be bent or fully straightened – whatever is most comfortable for the person practicing.

Modifications: 

  • Place a blanket underneath your seat.
  • Place a blanket or sandbag on the soles of the feet once they are elevated.
  • Place sandbags or weighted eye pillows on the palms of the hands.

Try this yin yoga practice at home!

Yin yoga can be practiced in a studio or in the comfort of your own home. Whether you’re a yogi looking to enhance your home practice or a yoga teacher searching for inspiration, we’ve got you covered! Don’t forget to drop your email to stay in the loop with yoga teacher trainings, workshops and new yoga weekly class themes every week.


Related articles:

Join the community of +99k students worldwide!

Related Courses:

Yin Yoga Online Yoga Teacher Training

Yin Yoga Online Yoga Teacher Training

300 Hour Online Yoga Teacher Training

300 Hour Online Yoga Teacher Training

500 Hour Online Yoga Teacher Training

500 Hour Online Yoga Teacher Training
Ronen in dragonfly pose outside on the pavement

Why More People Are Doing Yin Yoga

By Yin Yoga

Vinyasa yoga was brought to the United States in the 1970s by Pattabhi Jois through ashtanga yoga and grew in popularity as a holistic way to approach movement. Through the development of studying yoga in the west, other branches of yoga were often explored, and new teachers in the different lineages emerged.

Yin yoga in the west is credited mostly to teachers Paulie Zink, Paul Grilley, and Sarah Powers and has reached more and more people over the years. Yoga studios across the U.S. started to adopt the yin yoga practice and offer classes in this style regularly on the schedule after noticing the significant benefits of the practice. Many studios even specialize in yin yoga teacher trainings, focusing on the subtle body.

The History of Yin Yoga

Unlike vinyasa yoga originating in India, yin yoga has roots in ancient Chinese philosophy, most notably, Taoism. Yin Yoga made its way to the U.S. roughly around the same time as vinyasa and ashtanga yoga (1970s), and began as a practice that only hardcore yogis and martial arts practitioners would engage in.

Part of the foundation of the practice of yin yoga was that it was a great way to stretch and strengthen muscles in between other physical activities and exercises. Paulie Zink specifically noted the great benefits he noticed after incorporating yin yoga into his practice between martial arts sessions, where his muscles had grown extremely tight and fatigued.

You Can’t Mention Yin Yoga without Mentioning Fascia

A term most popularly coined with the practice of yin yoga is the term fascia, or “connective tissue.” Yin yoga is a yoga practice where you hold poses anywhere from 3 to 7 minutes and the poses are designed to stretch your body in a way that gets into the connective fibers of the muscle tissue, known as fascia. This revolutionary finding made yin yoga a great complementary practice to more vigorous and strength training exercises.

While most yin poses mimic many of the poses found in a traditional hatha, vinyasa, or ashtanga yoga class, the duration to which they are held makes it arguably more challenging. The poses can appear restful on the surface, but the longevity in holding the posture helps stretch the muscle at a deeper level (the fascia level).

Fascia is the connective tissue surrounding muscles, organs, bones and other tissues, weaving together an entire network between them. It is best described as, “the white fuzzy membrane inside of an orange.” The fascia tissue in the body is stimulated and strengthened when poses are held for periods of time in yin yoga. This is part of what makes the practice a well rounded addition or substitute for other stretching mechanisms and workouts. Plus, a yin yoga class tends to be super dreamy! By the time you enter Savasana, your muscles will have put in all their work, preparing your body for deep rest and relaxation.

Common Yin Yoga Poses

Ronen in dragonfly pose outside on the pavement

Ronen Kauffman in dragonfly pose outside on the Hoboken pier walkway

Dragonfly Pose

Dragonfly is a popular pose and exists in vinyasa yoga as seated wide legged forward fold. The posture requires sitting on the ground with your legs spread wide and is great for beginners, intermediate, and seasoned practitioners alike.

How to: Sit on the floor and open your legs out wide (in a V shape). You can modify dragonfly pose by rolling blankets underneath your knees, by bringing blocks out in front of you, or by having a bolster on top of 2 blocks (creating a Stonehenge shape).

A yogi in supine tree pose

A yogi in supine tree pose

Supine Tree

Supine tree is just Vrksasana (tree pose) reclined on your back. This is a great way to introduce people to the standing variation of the pose. It’s also a great posture to get people comfortable with reaching the heel of the foot of their bent leg to get as close to their seat as possible.

Supine tree pose stretches the arms and legs and allows the hips to open. Using supine tree pose in a yin yoga sequence helps instill concentration as well as relaxation and is probably a pose they can hold for a while being that it is reclined.

How to: Lie on your back with your legs straight out in front of you and your arms reaching up overhead. Bend one knee and tuck the heel of that foot nice and close to your seat. Let your knee rest gently on the ground beside you, or pad underneath it with a blanket.

Kate Lombardo butterfly pose - yin yoga posture

Kate Lombardo of YogaRenew in butterfly pose

Butterfly pose

Butterfly pose (Baddha Konasana) is another yin yoga pose classic. A lot of times, postures in yin yoga have a simpler name than their Sanskrit relatives in vinyasa/ashtanga yoga. What’s known as “butterfly pose” in yin yoga is simply Baddha Konasana, or bound angle pose in vinyasa yoga.

How to: Start in a seated position with your legs straight out in front of you. Grab your inner knees and pull open your legs out to the side, letting the soles of your feet come together (resembling a butterfly).

Butterfly pose helps stretch the lower back, create space in the inner legs, and stretches the muscles in the back of the neck. This pose also offers space for pregnant practitioners’ bellies and might feel good in the pelvic area.

Alex Plante in legs up the wall yin yoga pose

Alex Plante of YogaRenew in legs up the wall with a bolster underneath her sacrum

Legs Up The Wall

Legs up the wall, or Viparita Karani in Sanskrit, is a great way to end a yin yoga class. Legs up the wall is a popular pose for healthy lymphatic drainage in the body and a great way to find stillness and calm the mind.

How to: Start sitting with one of your hips against the wall. Swing your legs up the wall (like a clockhand) and straighten them up the wall any amount that feels comfortable. From there, you can add a blanket or blocks on top of the soles of your feet to help anchor yourself more. You can also add blocks, blankets, or sandbags to the palms of your hands as you have them outstretched on either side of you (in a T shape).

“Yin Yoga Near Me”

Yin yoga has become increasingly popular for its accessible nature, prolonged holding of the postures, and deep release it offers students. It is a challenging practice without looking or feeling challenging and can be adapted to fit your unique body. It can also be done as slowly as you’d like, with as many or as little poses as you wish.

Yin yoga classes continue to grow in popularity as they are oftentimes paired with sound meditation, another meditative practice or are simply held on their own in a longer class time window (think a 75 minute class rather than a 60 minute one). It is also a practice that forces you to look inward and challenge yourself in a healthy way. Just like other forms of yoga, there is no competition and no comparison; there are only the benefits you yourself seek to engage in.

If you’re interested in seeing exactly what a yin yoga class is like, you can visit our headquarters at YogaRenew Hoboken and sign up for a class! We also offer a comprehensive Yin Yoga Teacher Training, led by Kate Lombardo that prepares you for all the steps necessary to deepen your practice or lead your own yin yoga classes.

We love to connect with you! Stay up to date by signing up for our weekly newsletter.

Online Yoga Teacher Training Courses:

Yin Yoga Online Yoga Teacher Training

Yin Yoga Online Yoga Teacher Training

300 Hour Online Yoga Teacher Training

300 Hour Online Yoga Teacher Training

500 Hour Online Yoga Teacher Training

500 Hour Online Yoga Teacher Training