Have you ever noticed that a collective Om at the end of class seems to resonate more compared to one taken at the beginning of class? If you haven’t, it may be something you notice now!
The Om chanted at the end of class (assuming you also chanted at the beginning of class) tends to sound better for a multitude of reasons. This includes: being in sync with yourself and the others in the room, overall increased energy, the opening of everyone’s airways, which results from consistent and focused breath and lastly, the relaxing of the neck, throat, and all structures within and around these bodily points.
Access your throat chakra
The chakra associated with the body part utilized in chanting, “Om” is known as the throat chakra, or vissudha chakra. When we think of the location of this chakra, we must consider its range from the roof of the mouth to the diaphragm. This area includes many important structures, which directly affect the respiratory system, the digestive system, and the neurological system. Vissudha chakra is where integration of thought and feeling takes place and is the locus for vocalization and self-expression. Constriction in this region of the body can cause emotional upheaval which can result in worry, anxiety, and fear.
Releasing the throat and allowing energy, fluid, vibration, and sound to pass allows us to live in a place where our heart and our head can integrate so we can live in a harmonized state of compassion and wisdom.
Softening constriction in and around the throat can be done through asana (the focus of this class), breathing, and sound. Mantra yoga, which predates Hatha yoga, emphasizes the use of mantras and syllabic vocalizations to transmit vibrations and air through the nadis and vocal cords, which create sound. This is why your usage of Sanskrit matters and why the way in which you pronounce things is just as important as what you are saying.
The meaning of Om
Om (or Aum) is a simple and common, yet very powerful mantra to use during your yoga practice to incorporate sound. Om is said to be the primordial sound of all sounds that is vibrating within absolutely everything. There are three syllables which represent a cycle from birth to death, but there are four elements in total that make up this powerful mantra.
“Aa” — signifies beginnings or creation
“Uu” — (pronounced “ooooh”) signifies maintenance
“Mm” — signifies the end or destruction
Silence is the fourth and final element that always follows the chant. Om allows our vibrations to merge with that of the universal energy, which is always present.
Moving to our peak pose
Let’s turn our attention now to shoulder stand or Sarvangasana, which is known as the “Mother of All Poses.” This pose is essential for the health and vitality of the throat chakra and supports drainage of blood and lymph* out of the legs, gut, and chest. An asana class focused on building towards Sarvangasana in combination with using sound and/or mantra is like an elixir for any conditions or misalignments that are present energetically and/or physically in the throat chakra.
Sarvangasana is translated to shoulder stand, not neck stand. I emphasize this because it is of extreme importance that while in this pose one balances on the top of their shoulder blades (those wing-like bones in the upper back). The natural curve of the cervical spine should remain. Undue and excessive stress on the neck can compress the muscles and tissues in a way that causes further constriction as opposed to energetic and physical flow. The warmup poses leading to Sarvargasana will be focused on freeing any muscular tension in the shoulders and upper trunk in addition to creating integrity in the legs.
*Lymph — a fluid that flows through the lymphatic system; the lymphatic system is a major player in our immune system and helps to remove and fight off bacteria and other foreign materials from the tissues of the body.
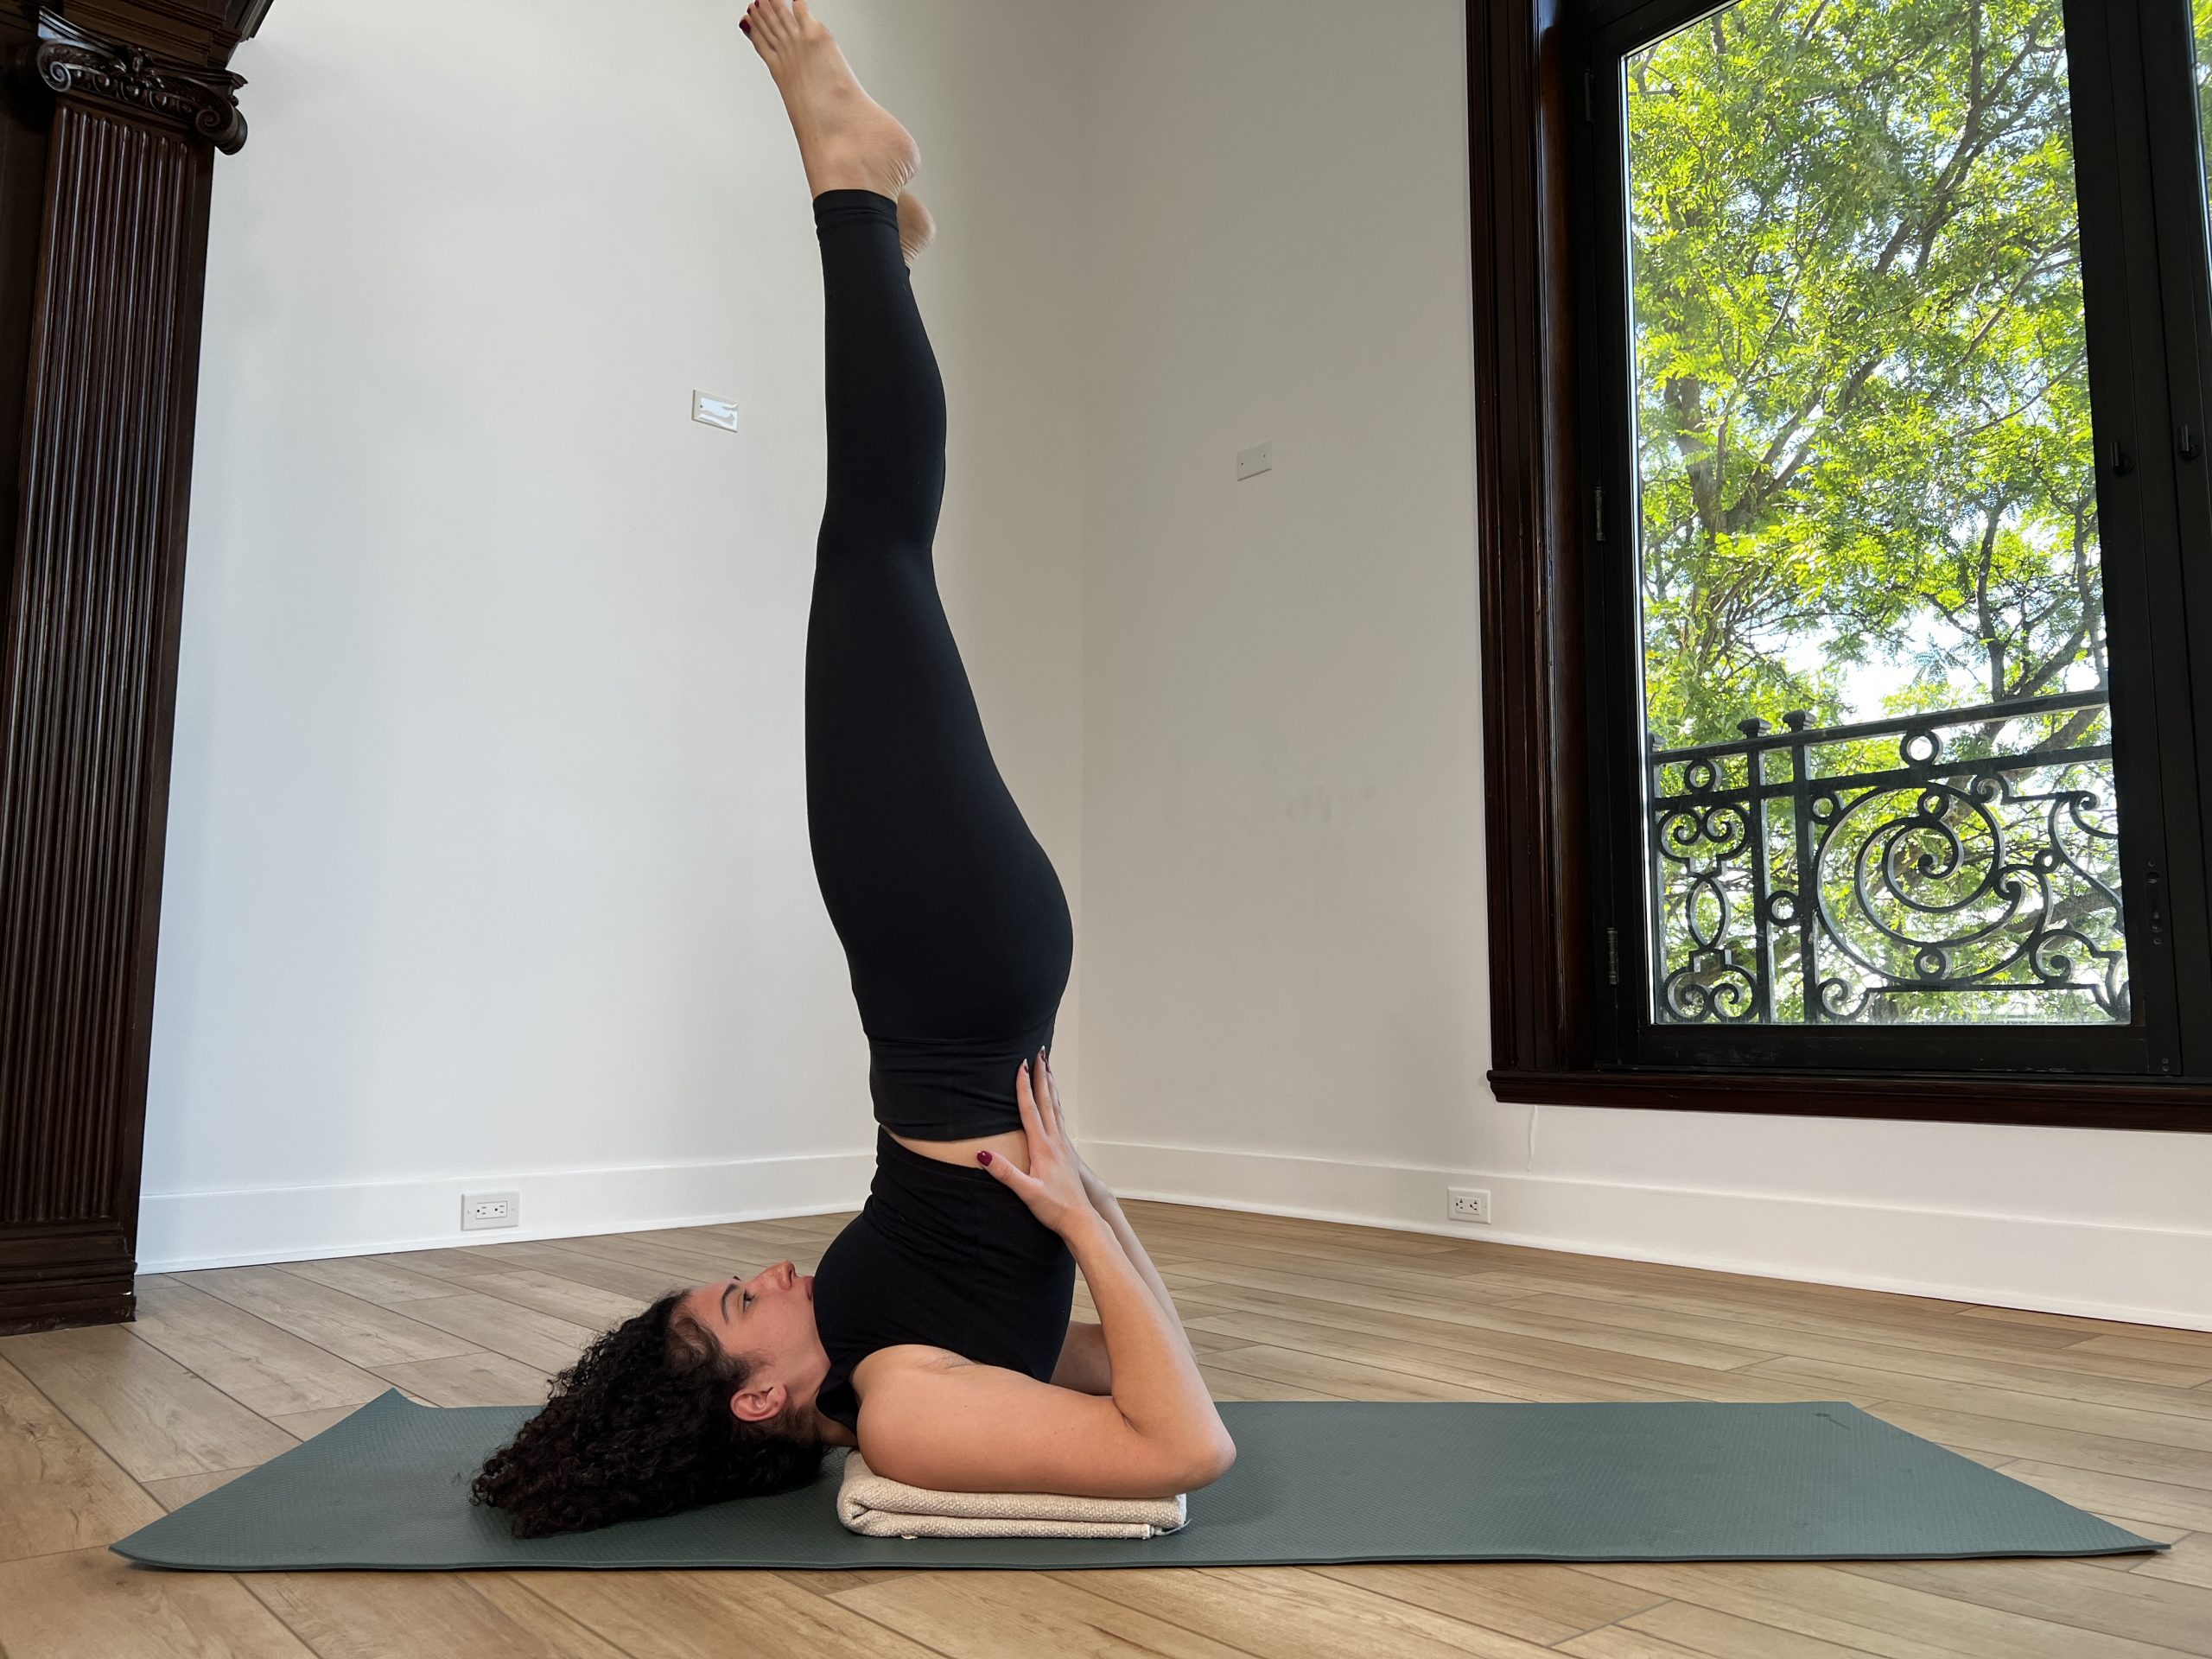
Supported Fish (Matsyasana)

How to:
- You’ll need two blocks for this pose. Set up the first block on the low or medium height underneath your shoulderblades. You can choose whether you want the black to go parallel to your spine or horizontal to your spine, but the goal is to use the block as an assist to firm the shoulderblades into the back body. It should feel like your shoulderblades are pressing into your body and up towards the sky when you lie down.
- Set up the second block on the medium or high height (depending on the height of the first block) beneath your head. The edge of the block should sort of “catch” the occipital ridge (that bony shelf-like feature) on the back of your skull. Position your head so there is length to the back of your neck and a slight tuck to your chin.
- If you feel excessive tension that you cannot soften, decrease the heights of your blocks. If that is still too much, roll up a blanket and place it underneath your upper back and head.
- Allow your arms to rest out to the sides so the chest and front ribs can spread.
- Your legs can either bend with the soles of the feet flat on the floor, they can extend straight out, or you can try Supta Baddha Konasana.
- Soften the muscles and tissues in the jaw and throat as you breathe deeply.
Wide Leg Forward Fold with Hands Clasped (Prasarita Padottanasana)
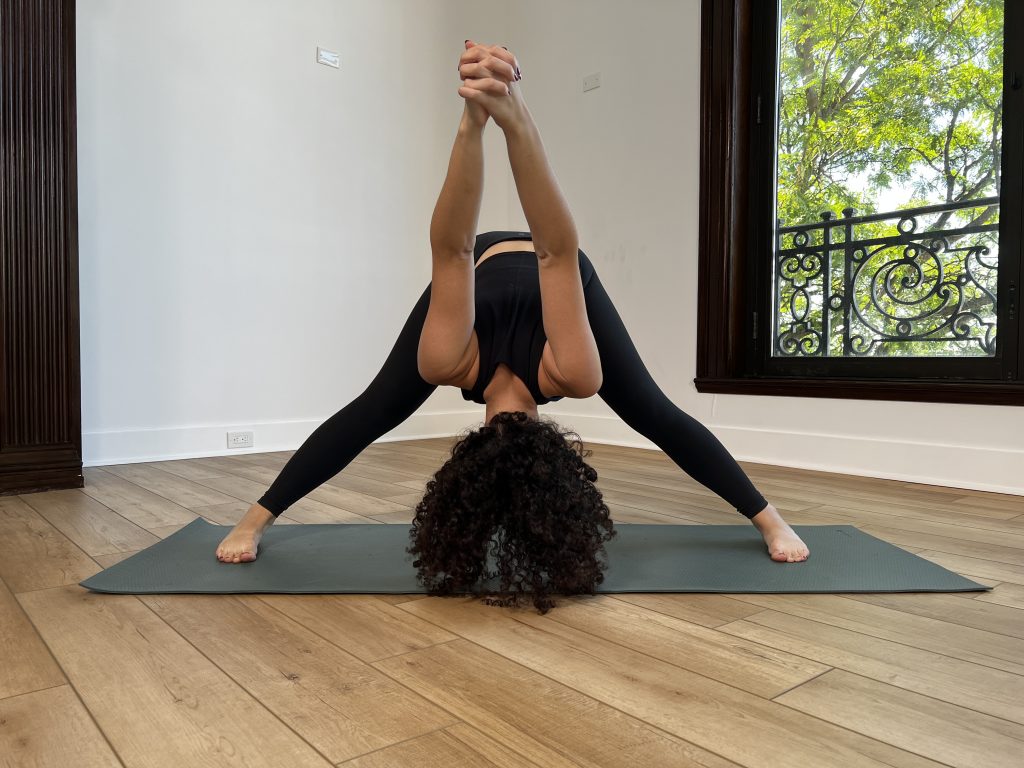
How to:
- Face a long edge of your mat and widen your legs about 3 feet from one another.
- Ensure your feet are parallel to one another by looking at your second toes to see if they are parallel to one another (the 2nd toe represents the center of the ankle).
- Bring your hands behind your lower back and interlace the fingers (using a strap is an option if you cannot interlace your hands).
- With your hands bound, externally rotate your arms at the shoulders by turning the inner elbows and biceps out towards the sides of the room.
- Firm the shoulder blades into your back body as you lift the sides of your chest and draw your hands away from your bum any amount. Notice if tension in the upper trapezius (muscles around the base of your neck) forms and if so, try to soften and re-firm the shoulder blades into the back-body.
- Now, lift and fan your toes, lift the kneecaps, and spin the inner thighs back as you fold in between your legs and take your hands over the head. Keep integrity through the legs, particularly through the inner lines of your legs as you fold. If you have trouble internally rotating the legs during this posture, you can turn your toes slightly inward.
- Continue to work the arms over the head as you firm the shoulder blades into the back body and maintain a diaphragmatic breath.
Warrior 3 (Virabhadrasana III)
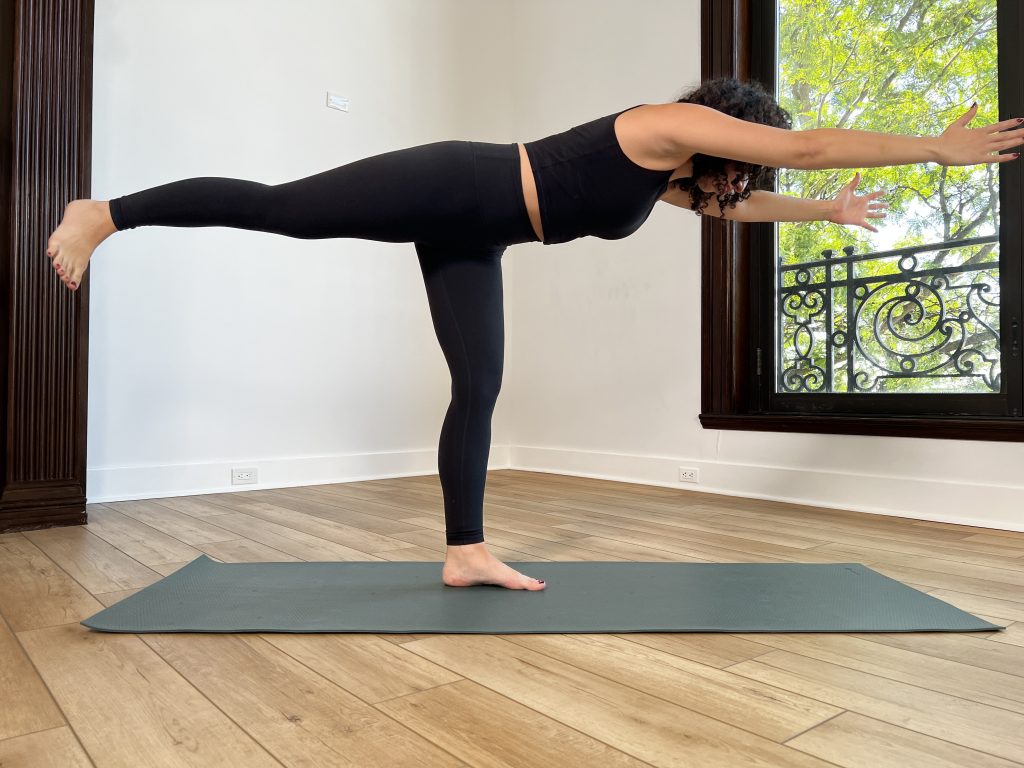
How to:
- Start in mountain pose with the back of your skull slightly lifted (and chin slightly tucked) resulting in a neutral head position.
- Relax your shoulders blades down your back while lifting the sides of your chest.
- Flex and spread your toes to assist in lifting the inner arch of your feet and create integrity in your legs.
- Keep the right foot grounded as you start to hinge forward with your torso while simultaneously lifting the left leg.
- As your torso gets parallel to the floor (and gravity starts to become more of a factor), retract your shoulder blades (aka pull them in towards each other) just enough to keep a lift in your chest like a baby cobra.
- Keep the integrity through your standing leg, while reaching back through the inner line of your left leg.
- Your arms can remain by your side, or you can take them overhead (and palms together for the traditional variation). Either one, the shoulderblades should firm into the back body.
- Keep lifting through the sides of your chest as you breathe with a diaphragmatic breath.
Locust Pose (Salabhasana)
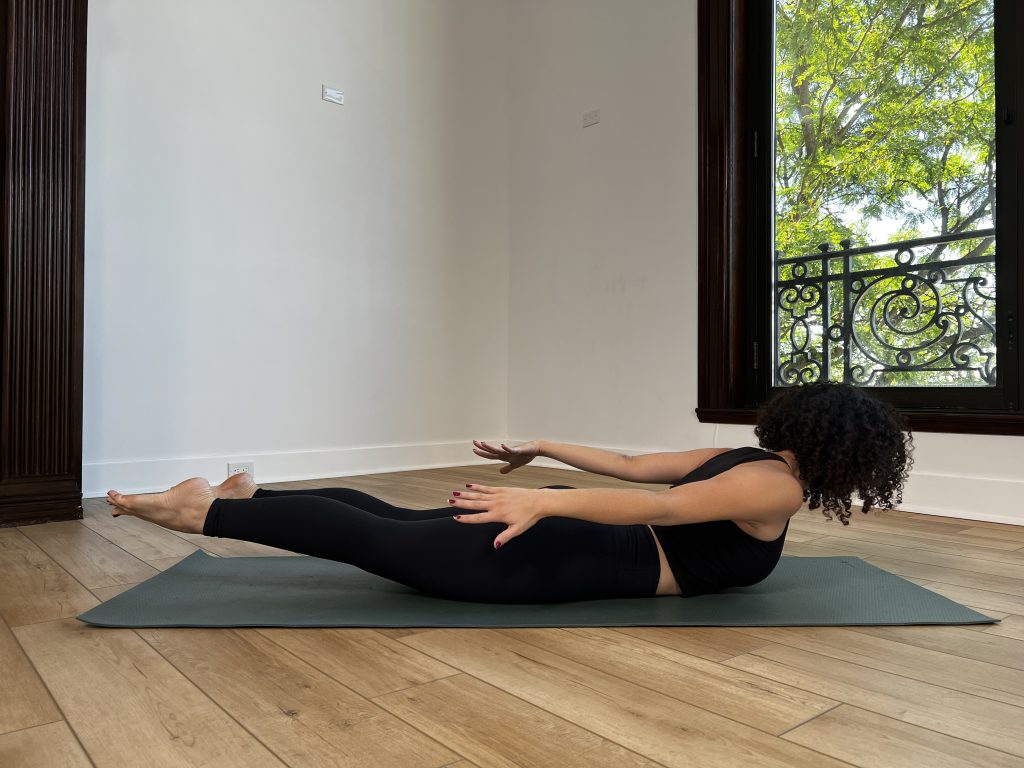
How to:
- Lie in a prone position (on your belly) with your forehead on the floor. This position of the head assists in lengthening the back of your neck and contributes to a slight chin tuck putting the head into a neutral position. Do your best to keep this position when you come into locust.
- Bring your arms alongside your torso with your palms facing the floor. Apply gentle pressure through your palms to externally rotate the shoulders and firm the shoulderblades into the back body.
- Bring your legs together (or hip width apart).
- Flex and spread your toes and extend through the inner lines of your legs towards the back of the room.
- On your inhale lift your head, chest, arms, hands, legs, and feet.
- On your exhale try and firm the tailbone towards the floor and lengthen the entire body from head to toe.
- Breathe deeply as you lift and spread the chest and extend through the inner lines of the legs.
Bridge (Setu Bandhasana)
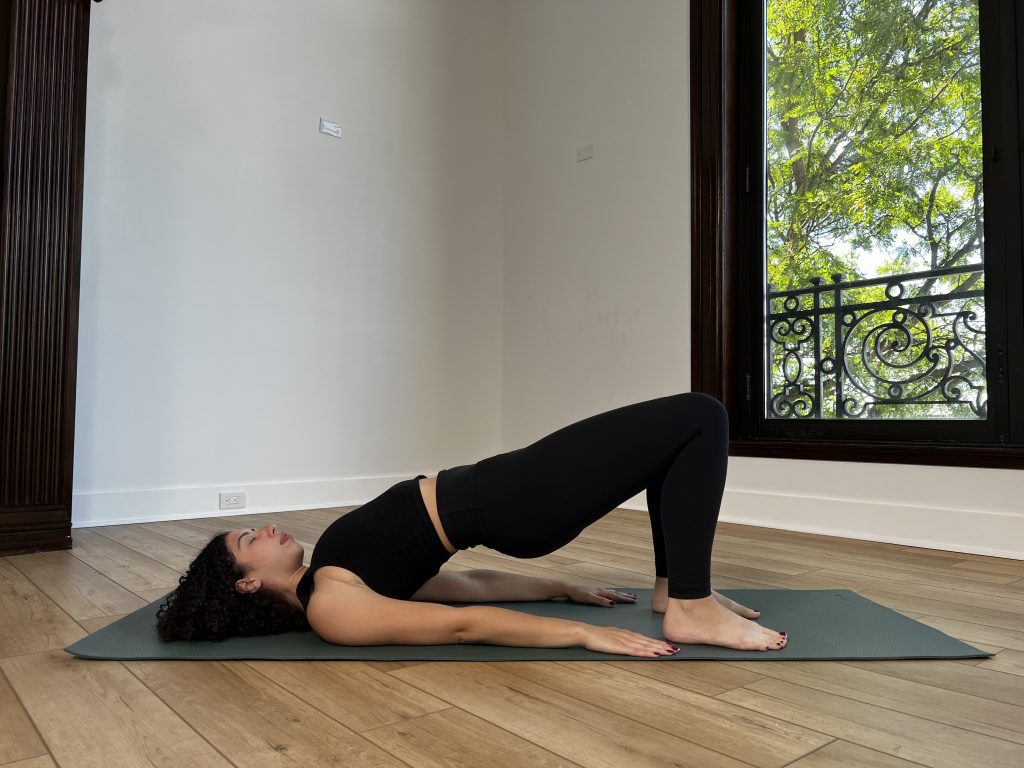
How to:
- Lie on your back with your legs bent and heels beneath your knees. Your feet should be parallel to one another and pointing directly forward.
- With your arms alongside your torso, press your shoulder blades into the mat to expand the collarbones and chest.
- On your inhale press your heels down to lift your pelvis off the floor by firming the tailbone up towards the sky.
- On your exhale press your shoulders down into the mat and try to roll towards the top edge of your shoulder blades.
- One by one, walk the shoulder blades further underneath the body while digging them into the back body. If you can, interlace your fingers on the mat to further retract the scapulae (anatomical term for shoulder blades) to lift the chest.
- Ensure the cervical spine maintains its natural curve. The points on the mat should be the skull, the shoulder blades, the arms + hands, and feet.
- Breathe with a diaphragmatic breath.
Shoulderstand (Sarvangasana)
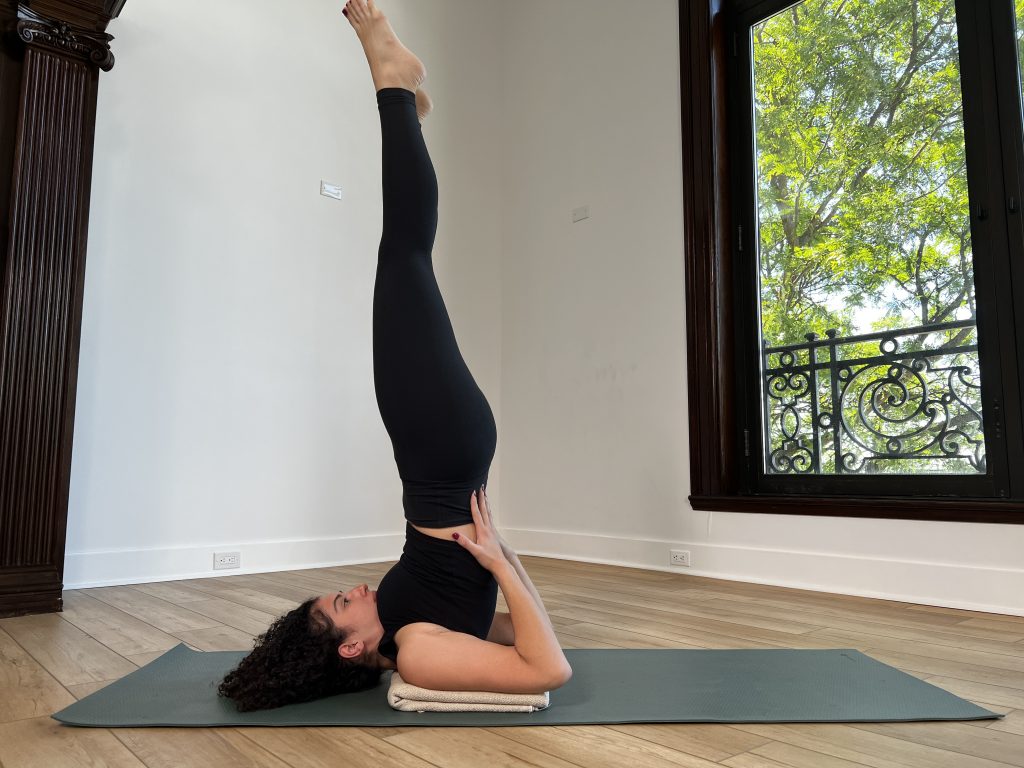
How to:
- You’ll need 2-4 folded blankets for this. Set your folded blankets up halfway down your mat with the fringes facing the front of the room and the neat folded edge facing the back of the room (this side will be closest to your head).
- Fold the bottom of your mat over your blankets. This will create a nice foundation for your shoulders and upper arms.
- Place a bolster horizontally right along the folded edge of your mat.
- Lie down on your blanket/bolster set-up so that your pelvis is on the bolster, your back is on the folded mat + blankets, and your head is on the flat mat.
- Place your hands onto the bolster to help push your legs over your head for plow pose.
- Take your hands towards your upper back, firm your elbows in, and firm the shoulder blades into your back body.
- Take your legs one-by-one up to the sky; flex and spread your toes and reach through the inner lines of your feet and legs.
- Continue to dig the shoulder blades into the back body to expand the chest and ribcage as you breathe deeply with a diaphragmatic breath. If you feel like the chest has collapsed, walk the elbows towards one another and re-firm the shoulder blades into the back body (a strap around the upper arms can be of assistance here).
- If you feel like you cannot breathe, or if you have any pain/pressure in your head, neck, or eyes, slowly lower your pelvis to the bolster and remain in supported shoulder stand.
- To exit, slowly come back to plow pose and use your hands as breaks to lower your pelvis and then your legs.
- Slide your way off of the props and come into Savasana.