The topic of injuries is incredibly vast and an injury is often just as unique as the person who’s injured. Some injuries are minor and only cause a little discomfort, while others can completely rock your world and cause major complications. Injuries happen for different reasons and the way they manifest depends on the individual person. Whether you’re a teacher or practitioner of yoga – or both! – it’s helpful to understand why injuries happen and how you can use the yoga practice to feel better.
The way we deal with injuries and the ego
You may have heard yoga teachers talk about the concept of playing your edge or finding the place that’s right at the tip of your comfort zone. I don’t know about you, but that line is sometimes incredibly blurry for me. I’ve gone through phases where my ego got the best of me and I pushed too hard only to find myself limping out of class. The strain on unprepared tissues and overload underdeveloped muscles was something I wasn’t aware of early on in my practice. I wanted my poses to look like the person’s next to me, and that was something I needed to get over quickly.
Reminders to consider when practicing yoga while hurt
The wisdom of yoga teaches you the value of patience; it encourages you to pay attention to the preparatory poses and be with your breath and the sensations of your body as you move through a yoga class. Remember, it’s not a recital or a show. It’s a practice that’s just as much mental as it is physical. Yoga is a dialogue between body and soul. The journey is personal and you have unique boundaries that only you know how to work with. It’s important to remember that there isn’t a prize for going deeper in a pose or getting your body into some complex shape. The physical asana practice exists to help you feel at home in your body, not like you’re an enemy of it.
Everyone heals differently and at a different pace. Take your time easing back into your yoga practice and always consult with your healthcare provider before getting back into any physical practice. Make sure you know what your injuries are and do your research about that area of your body. Have conversations with your doctor and yoga teacher if you are confused about anything that’s currently going on. It sometimes helps to keep a list of questions and to also keep a log of how you’re feeling from day to day. This can help you to understand if your route to recovery is working out or if you need to make different adjustments.
Yoga Poses for an Injury
Modifications for: Adho Mukha Svanasana (Downward Facing Dog)
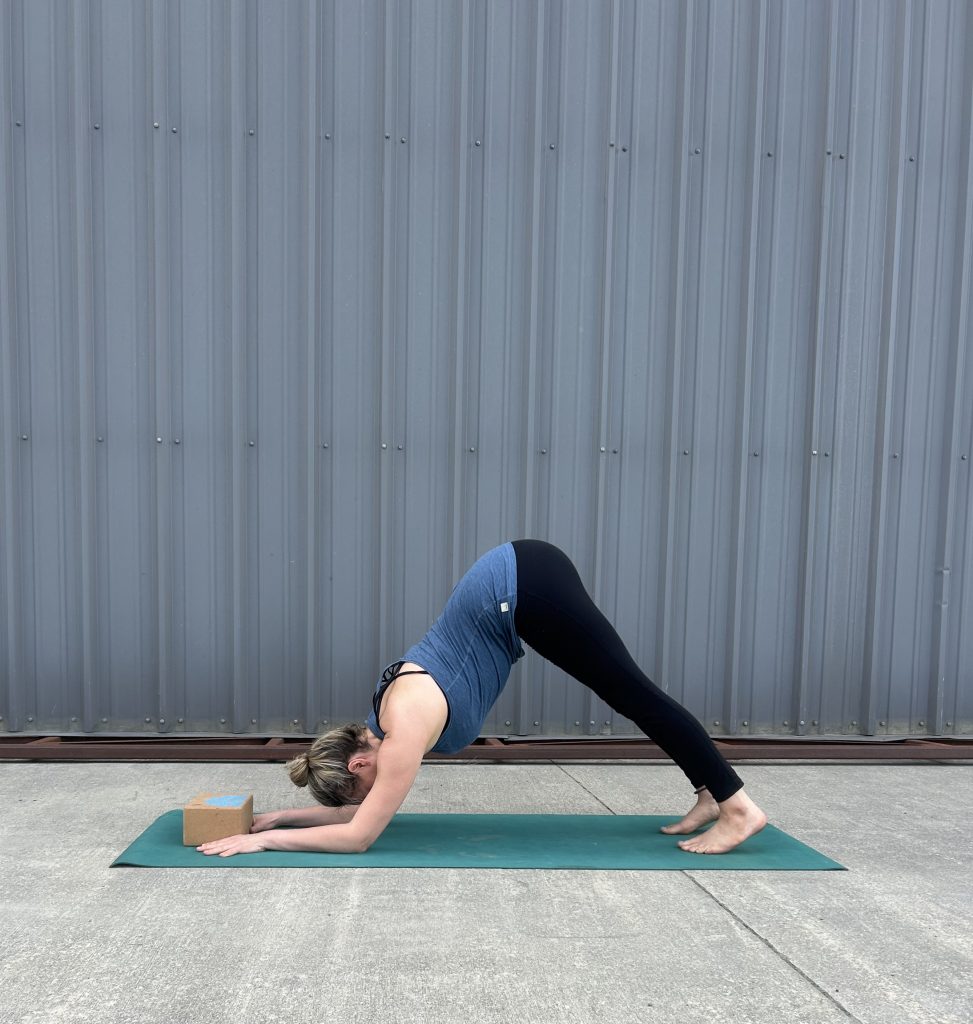
Downward Facing Dog with forearms down
Wrist injuries or general discomfort in the wrists are a common reason why people may choose to completely skip their yoga practice. So many of the physical asanas are practiced on the hands and putting weight on the hands can aggravate a wrist that’s already causing some trouble. The good news is that a lot of the asanas can be done on the forearms.
If you’re taking modifications because of a wrist injury, it’s important to remember to move slowly and mindfully. If you’re in a class that’s moving faster than you can move, it’s okay to slow down so you can come to your forearms and adjust the practice for your body. If taking a group yoga class is causing more stress than serenity, then opt into a home practice.
Props Needed: Block
How To:
- Begin seated and slowly start to bring your palms to the mat. Without putting pressure on your hands, slide onto your forearms and make an “L” shape with your pointer fingers and thumbs. Place your block between the “L” shapes while keeping your elbows on the mat at shoulder’s width distance.
- Send one leg out long behind you and then the other to come into a plank pose on your forearms with your elbows rooting down and encouraging some activation into the block with your hands.
- Send your hips up and back to a Downward Dog modification, keeping your forearms on the mat.
- If you need to, step your feet a little close to your forearms. Look between your knees or ankles to elongate your neck.
- As you breathe in, engage your thighs. As you breathe out, reach your heels down (it’s okay if they don’t touch the mat!)
*Reminders: You can omit the block and either keep your palms pressing into the mat or interlace your fingers together. Always come out of the asana as carefully as you entered into it.
Modifications for: Eka Pada Rajakapotasana, Forward Fold Variation (Pigeon Pose)
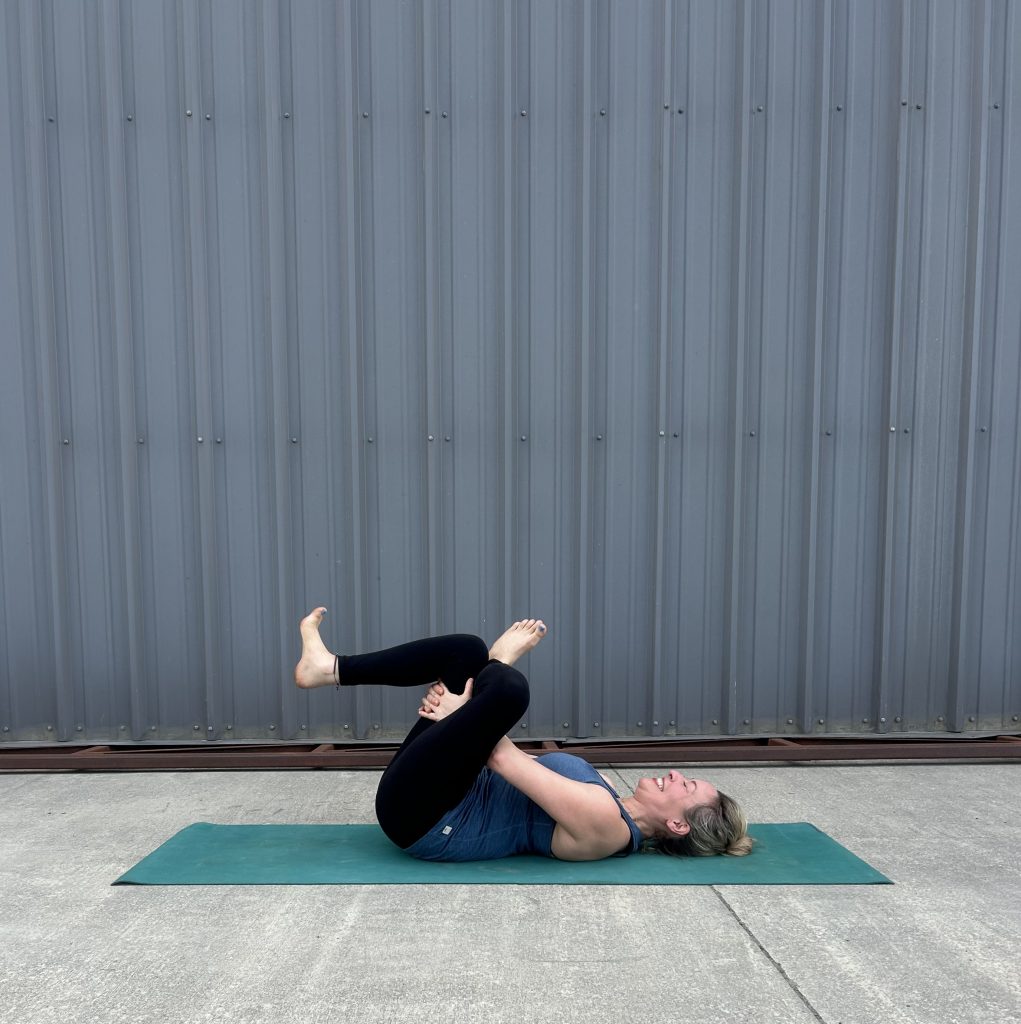
Pigeon Pose lying on your back, interlacing fingers on the back of the lifted thigh
Hips and knees are two areas of the body that are often either overworked, underworked, or somehow just causing discomfort in some way. Everyone’s body is so beautifully unique, and so are the reasons for pain in these areas. It’s often said that yoga is about relationships and that includes your relationship with your body.
If you’re taking modifications in a yoga class because of a knee or hip injury, you can experiment with different prop set-ups and other ways to figure out how to distribute your body weight so it isn’t aggravating an injury. However, a really simple way to practice Pigeon Pose can be to just take it to your back so you’re not putting any weight on any area of your body that’s currently bothering you.
Props Needed: None
How to:
- Begin seated and slowly start to make your way onto your back. Be mindful of putting weight on any area that is currently needing your attention at the moment. Use the strength of your arms and abdominals to brace you as you make your way down.
- Step both of your feet to your mat and begin with them about hip’s width apart. Keep your knees bent, but you can step your feet as far forward as needed if bending your knees is currently causing you any discomfort or pain.
- Take your right ankle over your left thigh. Bring it just below your knee, closer to your quadricep.
- Check in with how your knees and/or hips are feeling right here. This may be enough for some. You may also experiment with flexing your right foot, moving your left foot closer to your hip, or gently encouraging your right hip a bit forward.
- If it feels okay for you, you also have the option to interlace your fingers around your left thigh, taking your left foot off the mat. Be sure to have your right arm between your things as opposed to having it wrapped around your right one.
- As you breathe in, relax your jaw. As you breathe out, be mindful of your current injury and imagine any stagnation drifting away.
- Repeat on the left side.
*Reminders: Everyone’s body is put together in a different way. One person’s thigh bone sits in their hip socket differently than another’s. Focus on what sensations come up for you and how you can work with your own inhale and exhale.
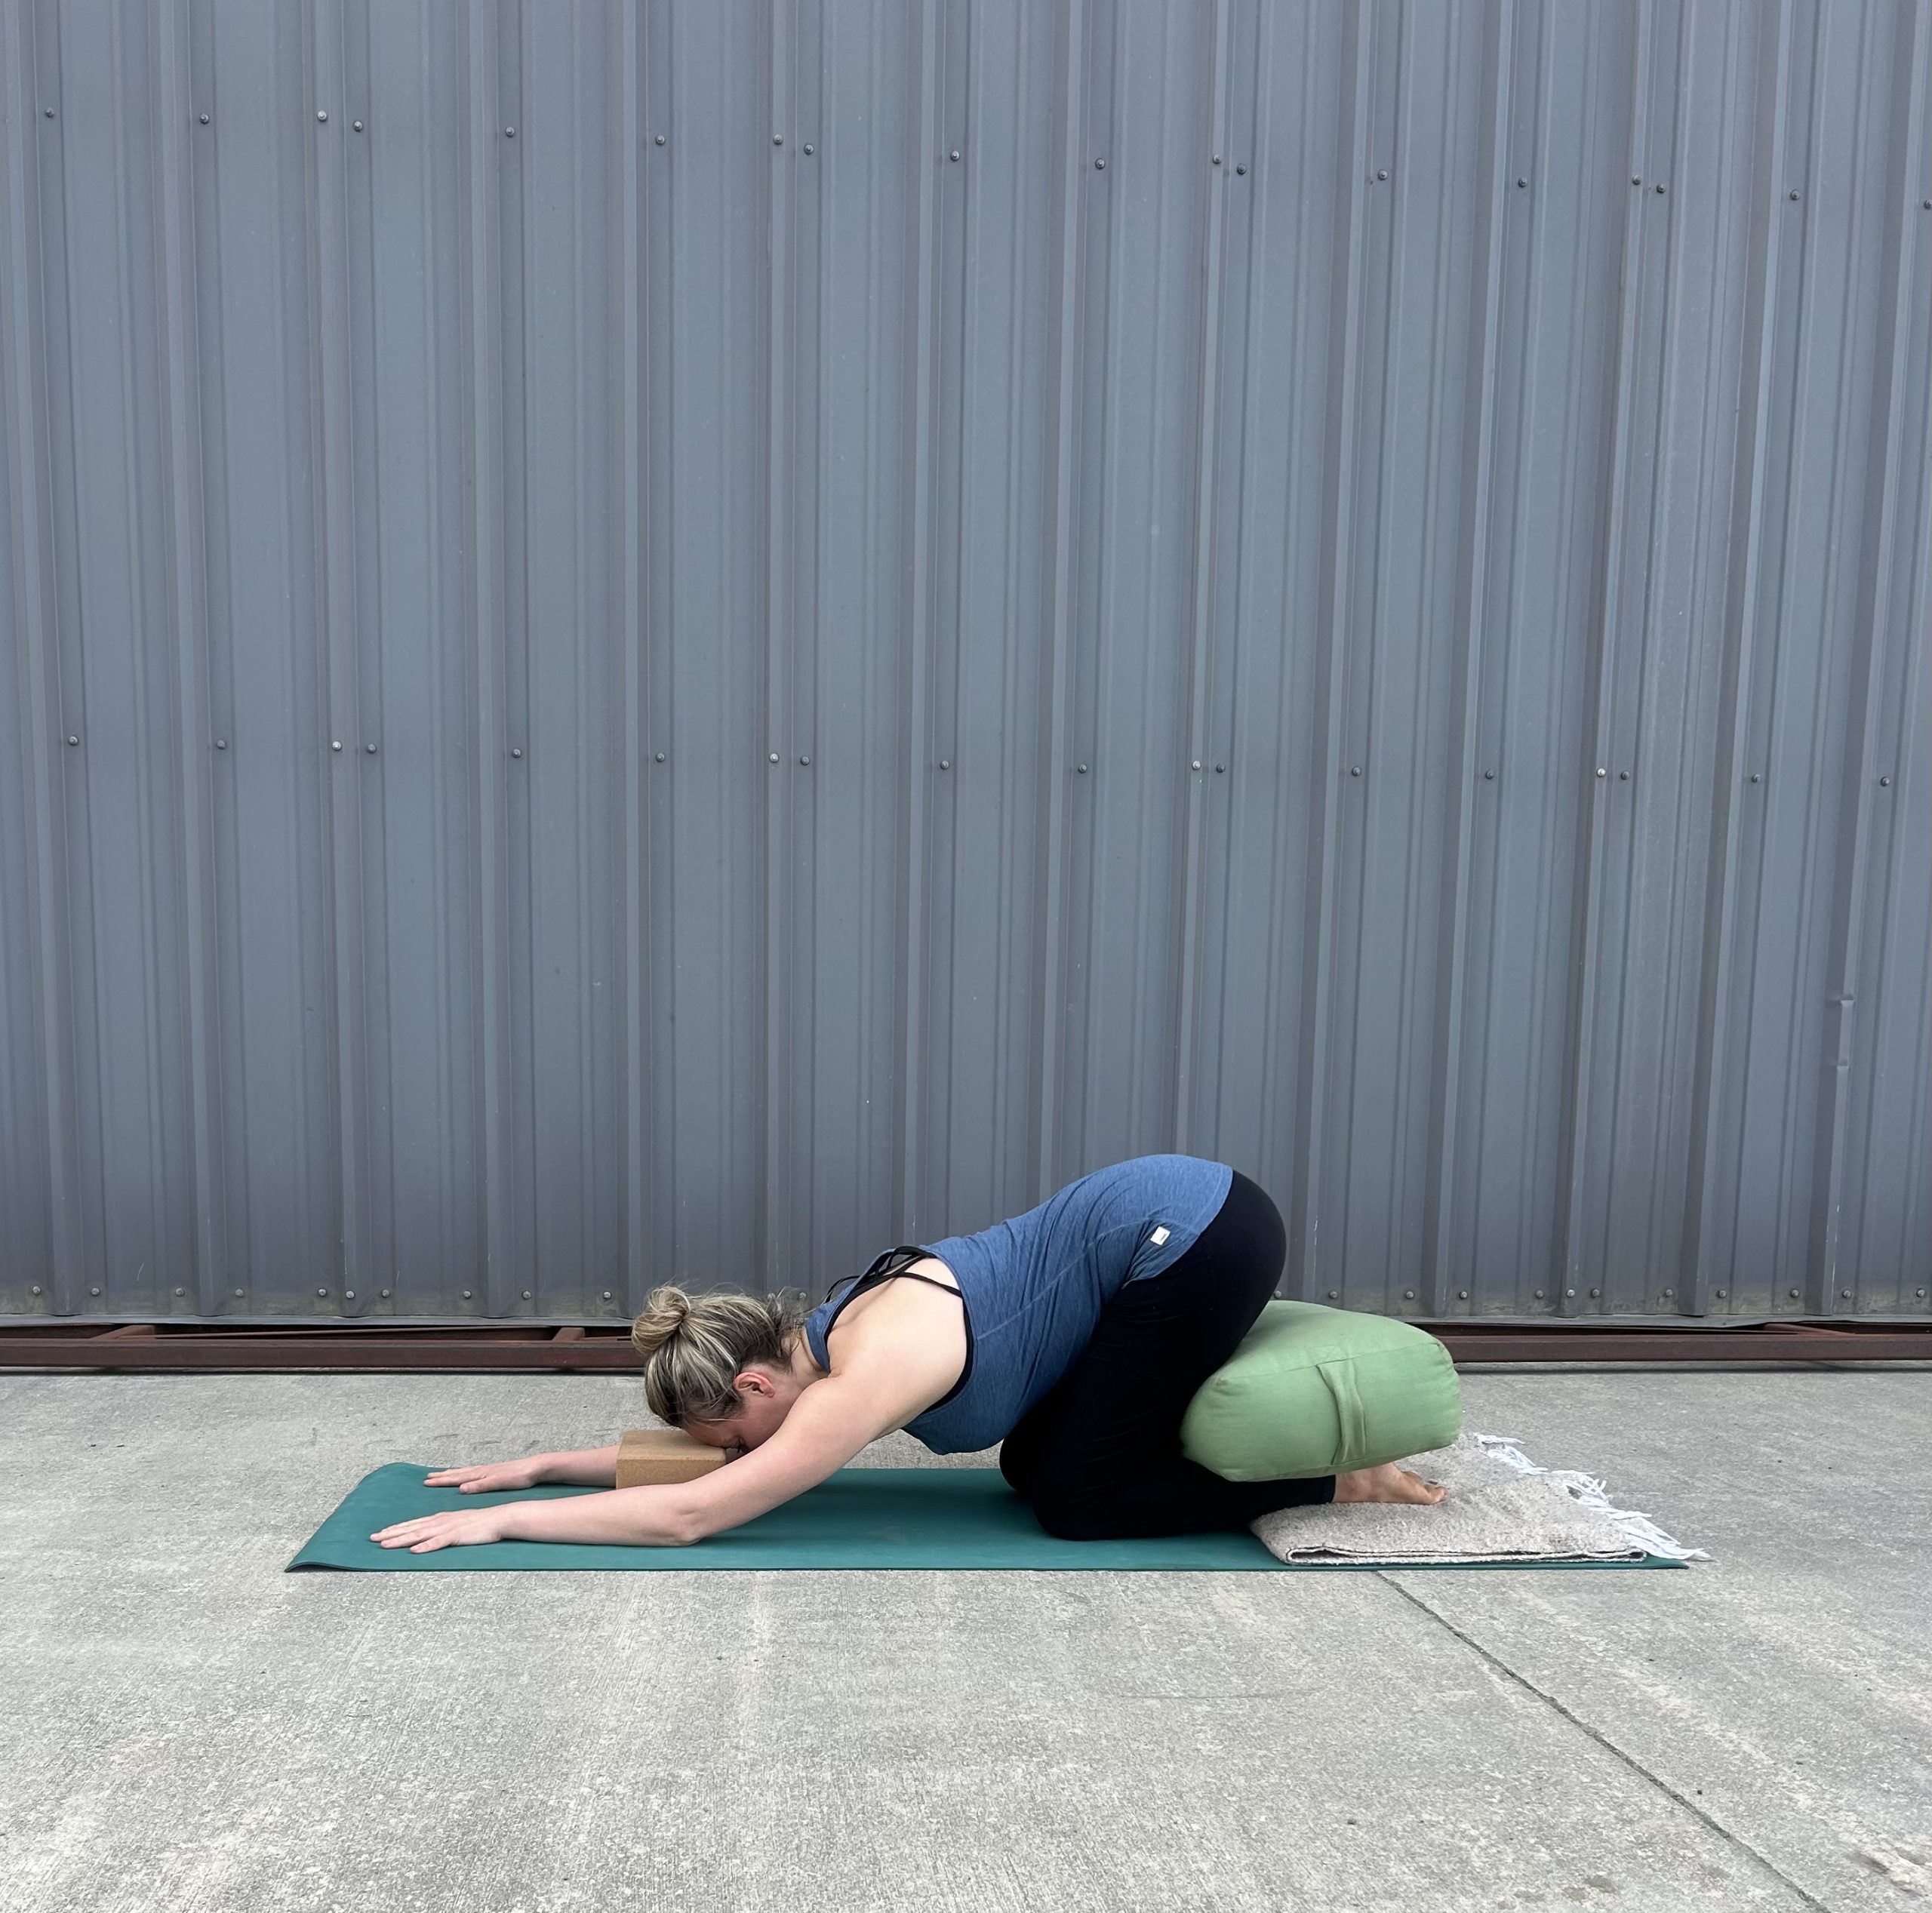
Modifications for: Balasana (Child’s Pose)

Child’s Pose with bolster beneath the seat
Have you ever been in a yoga class and thought “How is this supposed to be a resting pose?” when the teacher instructs the class to come into Child’s Pose? For some people, this is always the case, but for others, it’s a realization that comes while working with an injury.
Child’s Pose can be difficult if you’re working with knee, hip, or neck injuries of any kind. The bending of the knees, flexibility of the hips, and general discomfort in the neck can make this pose anything but a resting pose. Remember, you can always take a comfortable seat of your choice instead of practicing this one! However, if you have access to some props, you can still receive the benefits it offers.
Props Needed: Bolster, Blanket, Block
How to:
- Begin seated and fold your blanket up so it can slide beneath your shins. Come onto the blanket with your shins on it and your knees a bit forward of it.
- Take your bolster and slide it between your calves and your hamstrings so it creates a cushion between this area and fills the gap that would normally be there.
- Find your block and place it towards the front of your mat where you anticipate your forehead to be.
- As carefully and mindfully as can be, release your seat towards your heels and your forehead to your block.
- You may bring more cushion beneath your seat or more padding beneath your head if needed. You can use unconventional props like towels and blankets if you don’t have the more traditional props.
- You can either extend your arms forward or reach them back towards your feet
- As you breathe in, imagine your whole back body filling with new space and breath. As you breathe out, relax your jaw and picture any tension releasing out with the exhale.
*Reminders: As much as this asana wants to be in the “resting poses” category, it doesn’t always have a seat at that table! It’s okay to remind yourself that you may need to adjust it to work for you.
Don't miss a beat! Sign up for our weekly newsletter.
Yoga for Atheletes