Restorative yoga is a very different style of yoga than styles like vinyasa, hatha, and yin. It’s one of the only styles of yoga that involves holding poses for a longer time, with props, while creating the space for your body to heal. It gives you the opportunity to finally quiet down and move away from stimulation.
This style of yoga allows you to replenish and recuperate. So many people need to allow their bodies to recover, but our daily life will often request the opposite. We are in “go mode” with our jobs, families, and simple day to day duties. Restorative yoga provides the tools to slow down and create the space where rest can happen. When your body is at rest, it can heal.
Restorative yoga isn’t exactly an ancient practice of yoga. It is fairly new and modern compared to other styles. It originated from the yoga teacher B.K.S. Iyengar, who was one of the yoga teachers who began using yoga props to support the practice. It’s a style of yoga that can also be practiced by almost everyone.
What makes restorative yoga different?
As you’ll see in the restorative yoga poses, the style of yoga is so different from other styles. There is a deep focus on relaxation and rest and allowing your body to unwind. If you feel uncomfortable in a restorative yoga pose, you will need to adjust it so you can actually relax. This is different from yin yoga because when you practice yin, you lean into the discomfort and explore it. Restorative yoga requires very little movement, which makes it almost the opposite of styles like vinyasa or hatha.
Restorative Pose #1: Constructive Rest
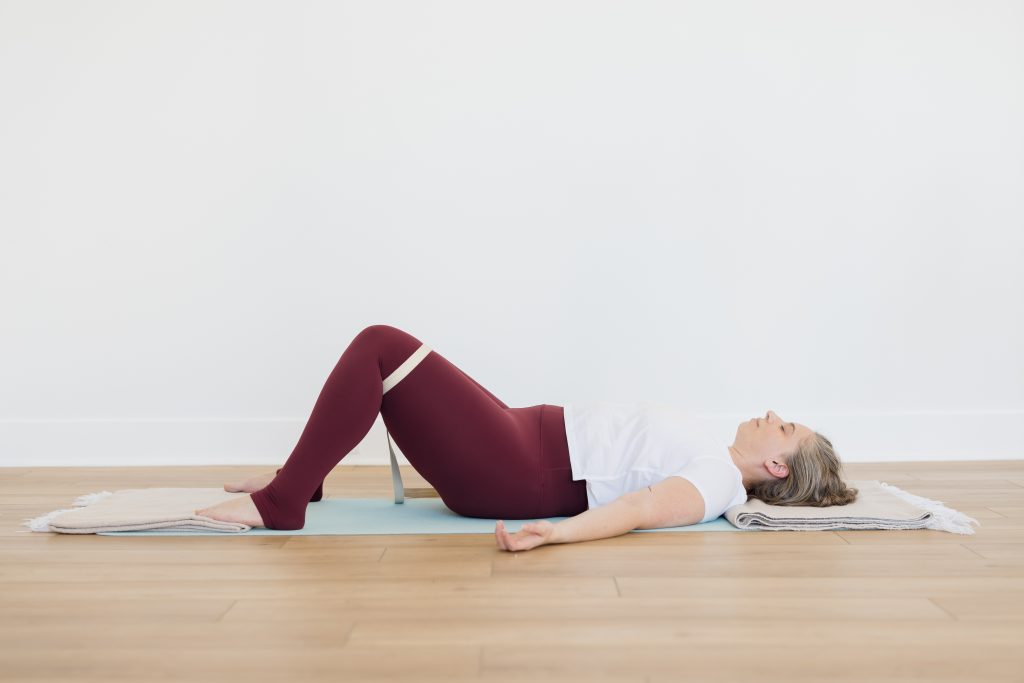
Suggested props: 2 blankets, 2 blocks, 1 strap
Coming into Constructive Rest Pose:
- Sit on the center of your mat with your knees bent.
- Lie back onto your elbows and lower yourself to the ground.
- Step your feet mat width and bring your knees together.
- Press into your elbows to slightly elevate your chest.
- Lay your arms by your sides, palms face up.
Modifications and Variations:
- Place one blanket at the top of the mat and one standard fold blanket at the bottom of the mat, with rounded edges towards the body.
- Lie back, with the back of the skull on the blanket and shoulders on the ground.
- Place the balls of the feet on the blanket and the heels on the ground, mat width apart.
- Lay your arms by your sides, palms face up.
- Place one blanket at the top of the mat and one standard fold blanket at the bottom of the mat, with rounded edges towards the body.
- Lie back, with the back of the skull on the blanket and shoulders on the ground.
- Place the balls of the feet on the blanket and the heels on the ground, mat width apart.
- Place a block, at the narrow width, between your thighs.
- Place a block across the abdomen.
- Place one blanket at the top of the mat and one standard fold blanket at the bottom of the mat, with rounded edges towards the body.
- Lie back, with the back of the skull on the blanket and shoulders on the ground.
- Place the balls of the feet on the blanket and the heels on the ground, mat width apart.
- Place a strap around the mid-thigh area of the legs, with the buckle at center, not touching the skin.
Benefits of Constructive Rest: Constructive rest alleviates tightness in the spinal muscles, helps to release the psoas muscles, and improves posture. *Avoid this pose or work closely with your teacher if you have acute back pain or herniated discs.
Restorative Pose #2: Supported Bridge Pose
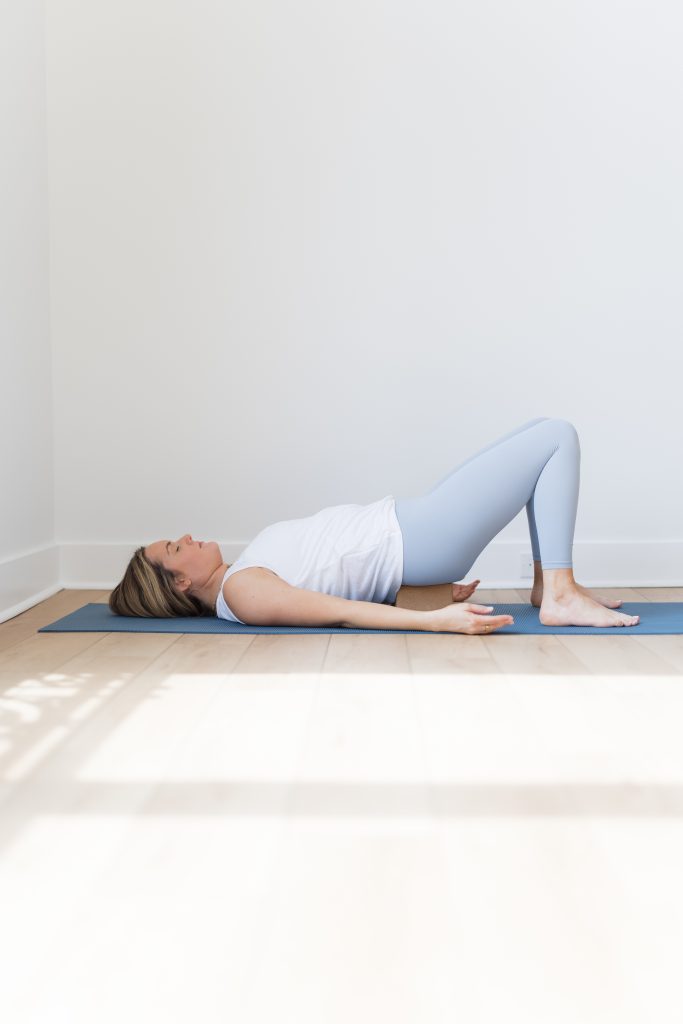
Suggested props: 2 bolsters, 4 blankets, 1 sandbag, 1 belt
Coming into Supported Bridge Pose:
- Lay on your mat, with your knees bent, feet hip width.
- Lift your hips and slide the bolster widthwise under the hips.
- Bring your arms down by your sides, with your palms face up.
Modifications and Variations:
- Lay two single fold stacked blankets, lengthwise down the center of the mat.
- Place two single fold stacked blankets across the top of the first stack, making a T-shape.
- Sit on the center of the blanket stack.
- Lower down onto your forearms, lift your hips, tilt your tailbone toward your heels and lower your hips back down.
- Come all the way down onto your back, with your head on the ground and shoulders hanging off the edge of the blanket
- Take your feet wide, with your knees touching or stack two standard fold blankets and roll into a bolster. Place across the end of the mat.
- Lay one of the bolster lengthwise down the mat and the other bolster across the mat, making a T shape.
- Sit on the center of the lengthwise bolster.
- Place your looped strap around the center of the thighs and put your feet on the blanket bolster
- Lower down onto your forearms and then lay all the way down, lengthening your legs.
- Head on the ground, shoulders hanging off the edge of the bolster.
- Lay your sandbag over the tops of the thighs.
Benefits of Supported Bridge: This pose strengthens the glutes and lower back. It also helps engage your thigh muscles, finding more flexibility in the back but also the shoulders.
Restorative Pose #3: Side Lying Child’s Pose
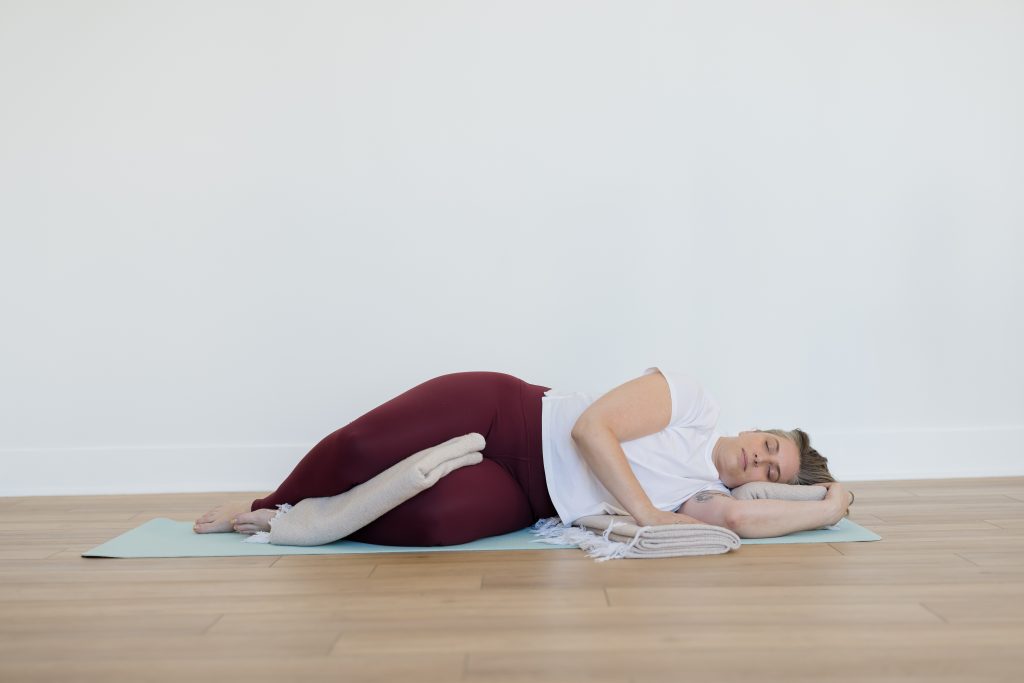
Suggested props: 2 blankets, 2 bolsters, 2 eye pillows
Coming into Side-Lying Child’s Pose:
- Place a folded blanket at the top of the mat.
- Lay another blanket diagonally across the mat, making a number “7” shape with the pillow blanket (top end of the blanket just below the bottom right end of the pillow fold blanket).
- Lay down on your left side, with your shoulder between the first blanket and second blanket with upper ribcage supported by the fold.
- Place a single fold blanket between the lower legs, supporting the knees and ankles.
- Place the bolster in front of you, pulling it close to your body.
- Put a single fold blanket under the left hand, for added support.
- Put a second bolster behind you, supporting the back body.
- Cover yourself with a blanket.
Modifications and Variations:
- Place a throw pillow at the top of the mat and lay down on your side, with your knees bent. Pull a second throw pillow close to your body, hugging it in towards you. Option to move the pillow down, between the knees.
Benefits of Side-Lying Child’s Pose: This pose lengthens the side body, allowing you to find more room in your shoulders and spine.
Restorative Pose #4: Legs Elevated Pose
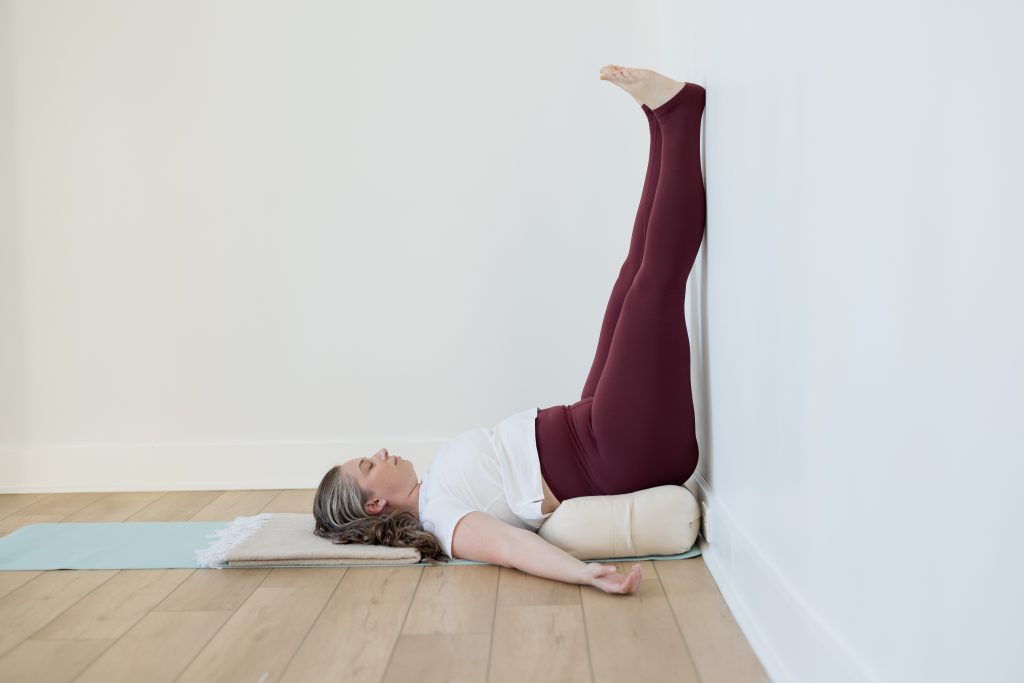
Suggested props: 1 bolster, 2 blankets, 1 chair, 1 strap, 1 sandbag, 2 eye pillows
Coming into Legs Elevated Pose:
- Lay a folded blanket against the wall, with some space between the blanket and the wall.
- Sit on the center of the blanket, with your right hip next to the wall.
- With your hips on the blanket, swing your legs up the wall and lay down on your back.
- If your hamstrings allow, move your hips towards the wall. If your hamstrings are tight, move your hips further away from the wall, or bend your knees.
Modifications and Variations:
- Lay a bolster lengthwise against the wall.
- Place a blanket about half way up the mat.
- Sit on the bolster, with your right hip next to the wall.
- Swing your legs up the wall and lower down onto your forearms and then onto your back, keeping your hips on the bolster.
- Slide a blanket under your head, with your shoulders on the ground.
- Option to take the legs out into a straddle, cross the legs at the ankles or bring the soles of the feet together or lay a bolster lengthwise against the wall.
- Place a blanket about half way up the mat.
- Sit on the bolster, with your right hip against the wall.
- Swing your legs up the wall and lower down onto your forearms and then not your back, keeping your hips on the bolster.
- Slide a blanket under your head, with your head resting on the fold.
- Roll the top layer of the blanket under and then roll the bottom layer under, creating a cradle for the head.
- Take a looped belt and place firmly around the mid-thigh area.
- Place a blanket over the tops of the feet, tucking it between the heels and the wall.
- Place the sandbag (or foam block) on the soles of the feet.
- Lay one eye pillow on the abdomen. Place the second eye pillow over the forehead, just above the eyebrows.
Benefits of Legs Elevated Post: Legs elevated pose helps the circulation of blood flow in your legs and lower body.
Why practice or teach restorative yoga?
Restorative yoga is a great style to practice whenever you feel like you need to calm down or relax. If you’ve been noticing that your thoughts are always racing or if you’re constantly getting agitated, angry, or frustrated, restorative yoga can help you reset and readjust the way you respond to stimulation in your everyday life.
Teaching restorative yoga is important because almost everyone can practice this style and people really need this practice.