The Top 8 Prenatal Yoga Poses for a Healthy Pregnancy

By Yoga, Yoga Asana

Pregnancy is a time of immense change, growth, and anticipation. As your body embarks on the incredible journey of creating life, prenatal yoga can be a gentle yet powerful way to stay active, alleviate discomfort, and prepare both your body and mind for childbirth. Incorporating yoga into your prenatal care can improve sleep, reduce stress and anxiety, increase the strength and flexibility of the muscles needed for childbirth, and decrease lower back pain, nausea, and headaches. Here, we explore eight popular prenatal yoga poses that are celebrated for their benefits during pregnancy. Remember to consult with your healthcare provider before starting any new exercise routine during pregnancy.

1. Cat-Cow Stretch (Marjaryasana-Bitilasana)

Pregnant woman in all black on a black yoga mat in cat pose

Cat Pose

Pregnant woman in all black on a black yoga mat in cow pose

Cow Pose

This gentle flow between two poses helps to warm up the spine and relieve back tension by encouraging flexibility in the back.

How to Do It:

  1. Start on your hands and knees in a tabletop position, ensuring your wrists are under your shoulders and your knees are under your hips.
  2. As you inhale, arch your back, tilting your tailbone and chin upwards (Cow Pose).
  3. As you exhale, round your back, tucking your chin to your chest, and drawing your belly in (Cat Pose).
  4. Continue flowing between these two poses for several breaths.

2. Seated Side Bend (Parsva Sukhasana)

Pregnant woman in all black on a black yoga mat in a seated side bend

Seated Side Bend

Seated side bend stretches the torso and spine, providing a gentle stretch that is especially beneficial for relieving the tightness in the upper body.

How to Do It:

  1. Sit comfortably with your legs crossed.
  2. Place your left hand on the floor beside you, inhale, and extend your right arm over your head, bending towards the left.
  3. Keep your right buttock on the floor to ensure a gentle stretch along your right side. Hold for a few breaths, then switch sides.

3. Supported Pigeon (Salamba Eka Pada Rajakapotasana)

Pregnant woman in supported pigeon pose using blocks underneath her forearms and a bolster underneath her hips

Supported Pigeon

An excellent pose to help still the mind, Supported Pigeon helps to relax the body and ease lower back tension.

How to Do It:

  1. Lay a bolster across the center of your mat.
  2. Bring one knee forward over the bolster.
  3. Support your forearms by placing blocks underneath them.
  4. Stretch the opposite leg out behind you.

4. Warrior II (Virabhadrasana II)

Pregnant yogi in Warrior II pose on a black yoga mat

Warrior II

Warrior II is a standing pose that strengthens the legs and arms, improves concentration, and increases stamina.

How to Do It:

Stand with your feet wide apart, extending your arms parallel to the floor.
Turn your right foot out 90 degrees and your left foot in slightly.
Bend your right knee, ensuring it’s directly over your right ankle.
Gaze out over your right hand. Hold for several breaths, then switch sides.

5. Triangle Pose (Trikonasana)

Pregnant yogi in triangle pose using 2 blocks to prop up her lower hand (instead of grabbing the shin or ankle)

Triangle Pose with 2 Blocks (instead of grabbing the shin or ankle)

Triangle Pose stretches and strengthens the thighs, knees, and ankles while also stretching the hips, groin, hamstrings, and calves; shoulders, chest, and spine.

How to Do It:

  1. From Warrior II, straighten your front leg.
  2. Extend your torso to the right, then tilt from the hip joint, reaching your right hand down to your ankle, a yoga block, or the floor.
  3. Extend your left arm toward the ceiling. Turn your gaze upward, if comfortable. Hold for several breaths, then switch sides.

6. Downward Facing Dog (Adho Mukha Svanasana)

Pregnant Yogi in Downward Facing Dog

Downward Facing Dog

A classic – this pose will help empower your pregnant students to be ready for a any vinyasa class.

How to Do It:

  1. Start in a table-top position (wrists under shoulders, knees under hips).
  2. Send your hands forward one palm print in front of where they are.
  3. Send your legs straight back.
  4. Tucks your toes under.
  5. Send your hips up & back (bring a bend to the knees if this feels more accessible).

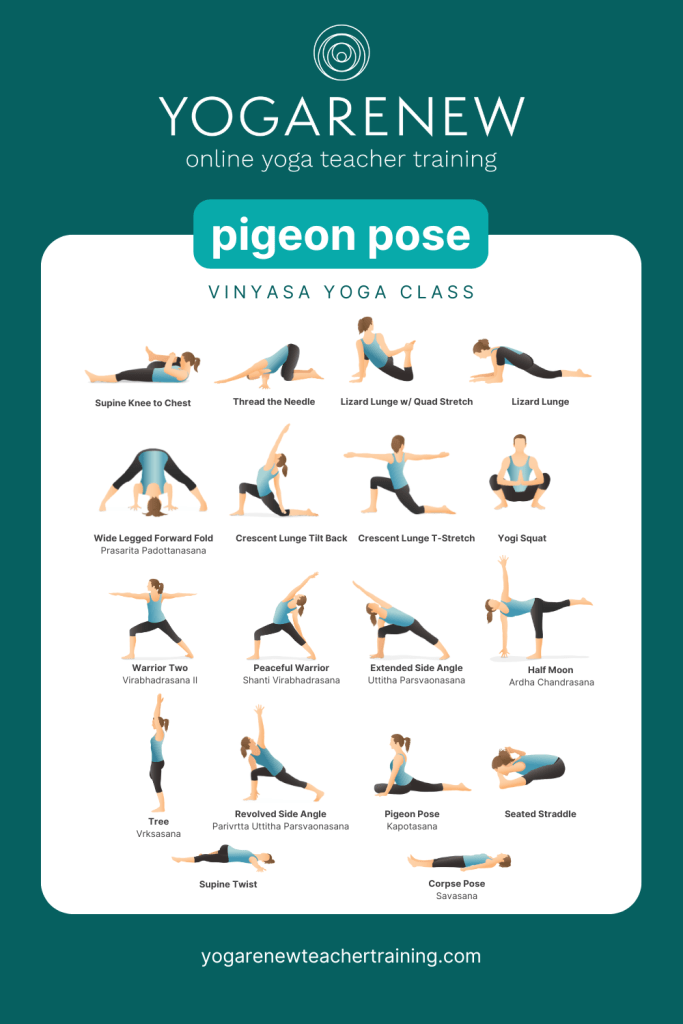
7. Pigeon Pose (Eka Pada Rajakapotasana)

Pregnant yogi in pigeon pose

Pigeon Pose (with only a bolster – option to remove the bolster)

This pose is excellent for opening up the hips and relieving sciatic pain, which is common in pregnancy.

How to Do It:

  1. Start in a tabletop position.
  2. Bring your right knee forward towards your right hand and allow your right foot to come towards the left hand.
  3. Slide your left leg back, keeping the leg straight, and lower your hips toward the floor.
  4. Stay upright or fold forward over your right leg. Hold for several breaths, then switch sides.

8. Bound Angle Pose (Baddha Konasana)

Pregnant yogi in Supta Baddha Konasana (reclined bound angle pose)

Bound Angle Pose with the Support of a Rolled Blanket, 2 Blocks, and a Bolster

Bound Angle Pose helps open the hips and groin and can be very soothing for lower back discomfort.

How to Do It:

  1. Sit with your spine straight and legs extended in front of you.
  2. Bend your knees and bring the soles of your feet together, letting your knees drop to the sides.
  3. Hold your feet or ankles and gently hinge forward from your hips, if comfortable.

Safety Tips for Prenatal Yoga

  • Listen to Your Body: Avoid any poses that cause discomfort or pain.
  • Stay Hydrated: Drink plenty of water before, during, and after practicing yoga.
  • Use Props: Yoga blocks, blankets, and bolsters can provide extra support and comfort.
  • Avoid Overstretching: Relaxin, a hormone produced during pregnancy, increases flexibility but can also lead to over-stretching and injury.
  • Avoid Lying Flat on Your Back: Especially after the first trimester, as this can reduce blood flow to the uterus.

Prenatal yoga is not just about maintaining fitness; it’s a tool for nurturing your body and connecting with your baby during this transformative time. By practicing these eight prenatal yoga poses, you’re taking a step towards a healthier, more comfortable pregnancy, and potentially a smoother childbirth. Always remember to check with your healthcare provider before beginning any new exercise regimen during pregnancy.

Prenatal Yoga: The Ultimate Guide

By Yoga Asana

There are a lot of misconceptions when it comes to prenatal yoga. Mostly due to the variability of the methodology in which it is taught. I have made a clear choice when I began teaching prenatal yoga to always offer a fully rounded yoga class to my students, meaning, I like my prenatal classes to resemble a typical vinyasa class as closely as possible… with proper modifications and adjustments of course!

There is a time and a place for modifications and adjustments but those should not feel like a dilution of the yoga practice itself but rather a way in which the student can still show up on their mat, take what they need and leave what they don’t under the guidance from a teacher. In this article, we’ll dive into how I structure a full, well-rounded prenatal class as well as important things to pay attention to when guiding pregnant people in a yoga class.

Prenatal Yoga Class Structure

We always start class with a circle time during which everyone is invited to share their name, how far along they are and special requests for the class. This is the biggest difference between my regular classes and my prenatal classes. I do not come prepared with a sequence but rather build one on the spot stemming from what I hear in the room. This allows students to feel in charge of their practice rather than the yoga room being yet another place where they feel like they must be told what they can and cannot do.

After circle time, we center ourselves, while being supported by bolsters and I tell students to “let the mind arrive where your body is.” This is especially important for a pregnant student. There needs to be a clear bridge between where they came from and the fact that they made it to class. This short 5 minute section will greatly enhance their practice. They can then take that off the mat and use the breathing or meditation prompts after a busy day at work when they get home or when they move from laboring at home to when they arrive at their birthplace.

The rest of the class really feels like a well rounded vinyasa class. A clear warm-up to connect the body that they have to work with today to the mat, a variation on Sun Salutation to connect the body to the breath. We then follow by 2 or 3 rounds of standing poses, a peak pose, a cool down and Savasana!

The Objective of a Prenatal Yoga Class

Similarly to any yoga class, the goal at the end is to leave in a State of Yoga, which is the union of the mind, body & soul: Where the mind is quiet, a little more spacious than before, and the body’s aches and pains are no longer an obstacle to living life.

3 takeaways of a successful prenatal yoga class:

  1. Students feel empowered & heard
  2. When they leave class, they feel like their needs or requests were met
  3. They feel they moved their body in a safe & nurturing way, which reconnected them with a sense of normalcy

The ultimate goal of a prenatal yoga class is to build week after week a deeper connection to the ever-changing body. It’s like having a weekly call with your best friend – Catching up one time a week for an hour is much more manageable than trying to fit a full month recap in one chat!

Building a Prenatal Yoga Community

When they say it takes a village to raise a child, they aren’t kidding. As a young expat mom I knew no one with children. It is through prenatal yoga and childbirth education classes that I met and built my village. When you meet through yoga you are friends for life because you already know you have one thing in common, which is great!

I have lost count of the number of folks that start having side conversations during circle time in my class, when they find out they either have the same care provider or a similar annoying pregnancy symptom or live in the same building (yes – that happened!!!)

Community means support. It means that instead of having to read the entire book, you can split the task with other parents, each one reads a chapter and then you meet and discuss what you learned. It’s sharing the load and stress of the newborn and toddler stages with someone other than your partner. It’s sharing what trick worked to help soothe teething rashes and which toys to pack in a long airplane ride.

Life as a parent is busy, infancy and toddlerhood will be the only times you get to pick your kid’s friends! Do you know how nice it is to hangout with a family and have real adult conversations while the children entertain themselves?!
Highly recommend it!

The Benefits of Prenatal Yoga

A recent study was just published by Meta Analysis about the effects of prenatal yoga on perinatal mental health. While we know the enormous benefits on labor, birth, and revering when the expecting parent keeps a steady workout and movement routine, it’s hard to study mental health. This study is a great start to understanding the true benefits of Yoga Practices as a whole, not just the movement part.

Some highlight of the study include, “prenatal yoga bases interventions are considered as safe and harmless [11, 12] and seem to be more effective that other physical activity such as walking or standard prenatal exercise,” and “most meta- analysis (93%) underlined the importance of practicing prenatal yoga based interventions in comparison to different controlled interventions to improved mental health during pregnancy, concretely, anxiety, depression, and stress symptoms.”

Prenatal Yoga at Different stages of Pregnancy:

It would be pretty difficult from a scheduling standpoint to split a prenatal yoga class students into trimesters. In my opinion there would not be any benefits to splitting groups either. The entire class is merely an invitation to movement and inquiry about one’s feelings on a particular day. There are no rigid guidelines on the teacher’s part and everyone is invited to move at their own pace. I always offer modifications and adjustments so that everyone in the class, regardless of how far along they are, can have a good experience in class and get what they need.

I firmly believe that there is a huge benefit for someone newly pregnant coming to class and seeing a fellow parent reaching their due date. Similarly it is reassuring for someone very very pregnant to be in the same room, practicing at the same time as someone newly postpartum.

While needs vary depending on how much baby there is in front of you, I believe that through practice you acquire a knowledge of your body in space that allows you to move in a way that feels good at that moment. That knowledge will only grow the more a student comes to class and tunes into their body’s intuitive abilities, leaving expectations at the door.

First Trimester

We can always look at the physiology of pregnancy and assume that in the first trimester the practice should be slow and intentional. Making room in the mind and body for the fetus to attach and grow with a healthy foundation. It’s hard to switch things up on the mat at this point because, besides fatigue and nausea, you can still lay on your belly, twist deeply and have a seemingly normal practice – not that you should!

Second Trimester

The second trimester is famous for being the sweet spot. Energy is back on, bump is showing and things are usually at a status quo as the baby grows a steady space that allows the pregnant person to catch a breath between growth spurts. Most students in class will be in their second trimester and all will have special requests to accommodate some recent aches and pains like low back tenderness or calf cramps.

Third Trimester

The third trimester mirrors the first in that it is slow and intentional. Baby and parents grow fast now. Aches and pains can come overnight and there is a very clear end of the tunnel. A determination is later in the third trimester where pregnant folks want to feel good and also prepare their body for birth. Special attention is given to the baby’s positioning in the womb and acquiring the tools to welcome labor mentally and physically.

Prenatal Yoga Poses

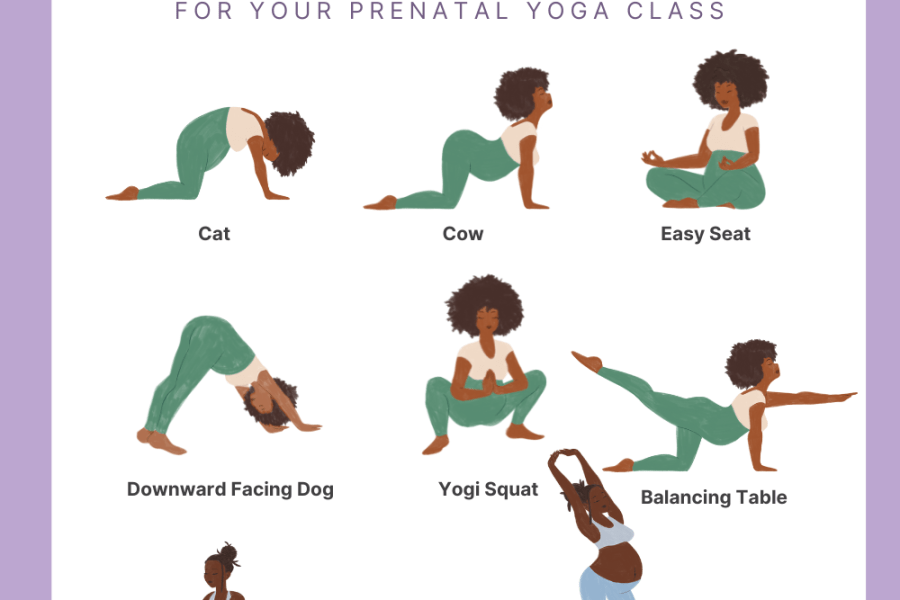
We’ve published another article with a list of 8 prenatal yoga poses that are safe for the pregnant body.

Popular Prenatal Yoga Poses Include:

  1. Cat/Cow
  2. Seated Side Bend (or full Janu Sirsasana)
  3. Supported Pigeon
  4. Warrior II
  5. Triangle Pose
  6. Downward Facing Dog
  7. Pigeon Pose
  8. Bound Angle Pose

Safety & Considerations for Prenatal Yoga

  • When it comes to safety and consideration while practicing prenatal yoga I always want to remind everyone of two things. 1 : no one in the US goes to the doctor or gets more bloodwork done than a pregnant person. So the risk of a student showing up to class with an unknown condition is very very limited! And 2 : Pregnancy is not an illness or an injury. So while there are certain things you should look at for, as a prenatal yoga teacher you must stay within the realm of your expertise. If a student comes to you with a question about their health that you cannot answer, refer them to their care provider.  Being CPR certified and keeping up with your reading on ongoing perinatal health will ensure that you are serving your students as best as you can.
  • We also published a full article on prenatal yoga pose modifications to make the practice even more safe & enjoyable.

Poses to avoid while pregnant:

  • Deep twists
  • Deep backbends
  • Prone and supine poses
  • Inversions during late pregnancy when the baby is in optimal fetal position and should be avoided


The 2 Workshops You Need to be Offering as a Yoga Teacher

By Yoga, Yoga Teachers

Workshops are an excellent way to offer students what I like to call “a concentrated learning experience.” Workshops allow you to expand on topics which you may not have time for or that may not be appropriate for a 60-75 minute open level class. How to choose what workshops to offer is entirely up to you and the studio(s) you work for. Think about the topics which you are interested in and that you have the ability to teach well (don’t teach something you don’t know anything or even a little about). What is your speciality? Think about the topics which the community members would be interested to learn and who would benefit from a deep dive of the offering.

Workshop Topics: Finding What to Offer

Think about the topics which you are interested in and that you have the ability to teach well (don’t teach something you don’t know anything or even a little about). What is your speciality? Think about the topics which the community members would be interested to learn and who would benefit from a deep dive of the offering. If nothing is landing on you right away, avoid rushing it or forcing it. Offering a workshop should feel completely aligned so that you can lead with intention, confidence, and authenticity.

Consider Which Workshops are Trending

When offering concentrated learning experiences, you can also look to the trends to see what people are interested in macroscopically. I’ll include this as well, do not overlook your knowledge in lieu of what is trending. Meaning, do not offer something only because it is trending if you do not have the interest, skill set, or personal practice of the trending topic. Now, if you do have the interest, skill set, and the trending topics are part of your personal practice, absolutely consider offering this as a workshop to students! Read on to see what may resonate in terms of workshop offerings right NOW…

1. Breathwork

Breathwork has gotten a lot of attention recently and for excellent reason. It is the one of the only physical mechanisms we can alter in order to affect our energetic state. Breathwork is powerful when done correctly allowing you to fully step into yourself and access deeper layers of consciousness. When consistently done incorrectly, the full benefits may not be experienced, it may be ineffective, or even detrimental. Furthermore, people may be fearful of doing breathwork on their own if they don’t know how to do breathwork, or if they don’t feel confident practicing unsupervised. Deep emotions may rise to the surface, uncomfortable physical sensations may be felt, thoughts may be revealed whether good or bad…all of which a teacher can help with and community members can be supportive of.

Scroll to the end of this article for a breathwork challenge led by Katie Healy, YogaRenew’s Certified Breathwork + Reiki Practitioner!

2. Arm Balances and Inversions

I always think it’s a good idea to offer a workshop on arm balances and inversions. In my experience, these types of postures are frequently offered in typical yoga classes, but there isn’t much emphasis on the direction for how to get into these postures in detail – it’s usually a quick demonstration in between a 60 minute vinyasa class. Offering a full workshop on them allows you to really dissect the pose, in detail, and with variations on how to offer the pose in different ways (whether with support or additional prop education).

Sometimes students think to themselves, “I just can’t do it,” but really it’s because they haven’t learned how to do it. In an open level class, especially during prime times, there can be little wall space available. Wall space is imperative for an inversion practice!

All in all, when you have the ability to dive deeper into the alignment principles of these more challenging poses, you open up the doorway to a deeper learning experience. This makes the journey towards these considerably complex postures a process of true self-awareness and growth.

I’ve developed both a handstand workshop and forearm workshop for those looking to dive deeper into these poses. These were poses I not only felt connected to physically, but I realized I loved being able to teach people about them.  Technically any pose where the heart is over the head is considered an inversion and an arm balance is, well, where you’re using your arms to provide balance or stability in a pose as opposed to your feet.
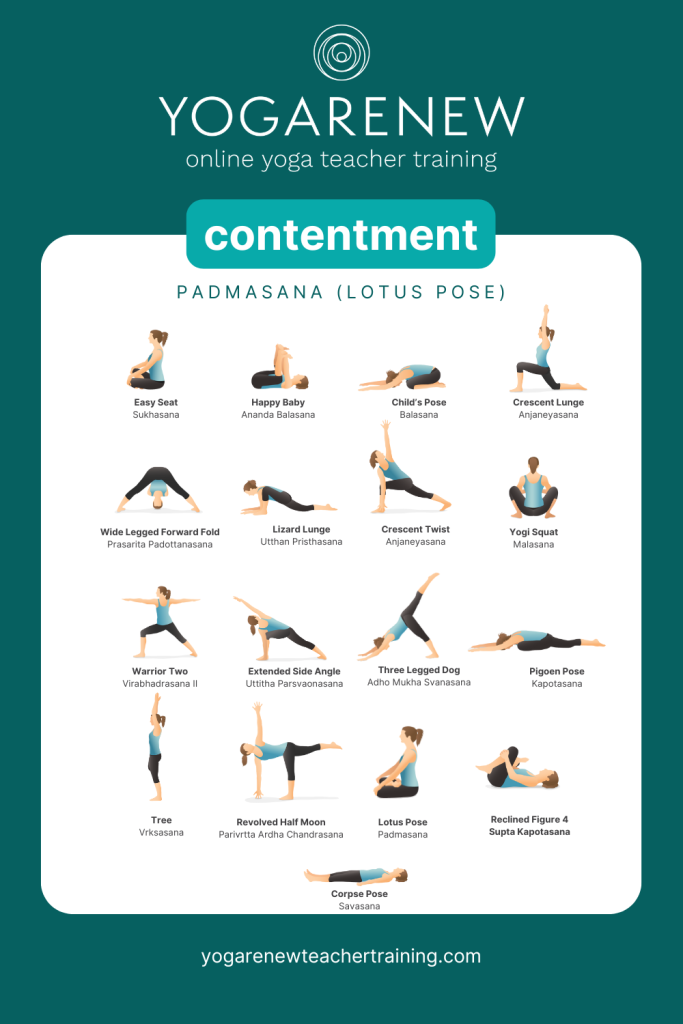
The Right Workshops for You (& Your Students)!

Leading workshops are special and fun opportunities, not to mention a great way to bring in more income from teaching yoga. It is a skill to create and execute a workshop… especially ones that your students love!

If you are interested in creating a workshop and have a topic in mind that you feel passionate about and eager to share, just start putting it together. What you practice yourself, you get better at, and once you’ve mastered something and have the passion and drive to share it with others, that’s when it becomes inspiring.

I hope this article helped you visualize what you’d like to offer and once you do, know that you are the main vehicle for bringing the vision into fruition. Love and Light! -Mel

Chair Yoga: The Ultimate Guide to Flexibility and Wellness from Your Seat

By Yoga

In an era where health and wellness have taken center stage, chair yoga emerges as a transformative practice that caters to everyone, regardless of age, fitness level, or mobility. This comprehensive guide will walk you through the ins and outs of chair yoga, illustrating how you can harness its benefits from the comfort of your chair. Whether you’re in an office, at home, or somewhere in between, chair yoga is your gateway to improved health, enhanced flexibility, and a serene mind.

What is Chair Yoga?

Chair yoga is a form of yoga that modifies traditional yoga poses so they can be done while seated. This makes yoga accessible to individuals who may find standard yoga poses challenging, including seniors, those with mobility issues, or people recovering from injuries. But don’t let its simplicity fool you; chair yoga is a potent practice that can improve flexibility, muscle tone, and mental well-being.

Benefits of Chair Yoga

The benefits of chair yoga are vast and varied, touching on physical, mental, and emotional well-being:

  • Accessibility: Being a low-impact form of exercise, it’s ideal for individuals who are just starting their fitness journey, have limited mobility, or are looking for a gentle way to stay active.
  • Enhanced Flexibility and Mobility: Regular practice gently stretches and strengthens the body, enhancing flexibility and joint mobility.
  • Improved Strength and Balance: Chair yoga helps build strength in the upper body, core, and even the lower body, contributing to better balance and reducing the risk of falls.
  • Stress Reduction and Mental Clarity: The meditative aspect of yoga, combined with deep breathing, significantly reduces stress levels and enhances mental clarity and focus.

Getting Started with Chair Yoga

Embarking on your chair yoga journey is straightforward. Here’s how to get started:

1. Choose the Right Chair

Select a sturdy chair without arms, allowing you freedom of movement. Ensure your feet rest flat on the floor when seated, with your knees at a 90-degree angle.

2. Wear Comfortable Clothing

Opt for attire that allows for a full range of motion. You don’t need special yoga clothes; just ensure your outfit is comfortable and doesn’t restrict movement.

3. Set Aside Time

Dedicate a specific time of day for your practice. Even ten minutes can make a significant difference in how you feel.

4. Start with Basic Poses

Familiarize yourself with a few basic poses first. Here are three to get you started:

Cat-Cow Stretch
Sit up straight with your feet flat on the ground. Place your hands on your knees. As you inhale, arch your back and look up towards the ceiling (cow position). As you exhale, round your spine and drop your head forward (cat position). Repeat for a few cycles.

Seated Twist
Sit up straight with your feet flat on the floor. As you inhale, extend your spine. As you exhale, gently twist to the right, placing your left hand on the outside of your right thigh. Look over your right shoulder. Hold for a few breaths, then switch sides.

Forward Bend
Inhale and raise your arms overhead. As you exhale, slowly bend forward, hinging at your hips. Let your hands rest on your legs or the floor. Relax your neck and let your head hang. Hold for a few breaths, then slowly rise.

Additional (Intermediate Chair Yoga Pose)

Sarvangasana (Shoulder Stand)

Start in Halasana and alternate lifting each leg and foot off the chair for full shoulder stand.

Patrick Franco of YogaRenew in an all black yoga outfit on a black and white blanket kicking up off of a black chair into shoulder stand with his hands supporting his back

Halasana (Plow Pose)

Start by lying on the ground with a blanket (or 2) underneath your shoulders, letting your head lay on the ground. Position the chair so that it is above where your head is. Use your hands to guide your lower back so you can roll up onto the chair, letting your feet touch.

Patrick Franco of YogaRenew in an all black yoga outfit with a black and white blanket underneath his shoulders in Halasana (plow pose) over a black yoga chair

Chair Yoga for All

Chair yoga is not just a practice but a journey towards better health and well-being. It’s a testament to the adaptability of yoga, proving that its benefits are accessible to everyone, regardless of their physical condition or age. By incorporating chair yoga into your daily routine, you’re choosing a path of gentle strength, flexibility, and mental clarity. So, take a seat—not just any seat, but one where you can unfold the myriad benefits of yoga right where you are.

Whether you’re a senior looking to maintain mobility, an office worker seeking relief from desk-bound stiffness, or simply someone searching for a gentle way to start exercising, chair yoga offers a versatile, accessible, and effective solution. Start your chair yoga journey today, and embrace the path to a healthier, more flexible, and tranquil you.

Vashistasana PDF download

Vashistasana

By Yoga Asana, Yoga Teachers

Vashistasana with the fully extended leg was a “unicorn” pose for me for a long time. It was one of those poses that I’d look around at other people doing and think, “maybe one day.”

To be honest, I can’t fully pinpoint when working on extending the leg became a part of my practice. It was one of those variations that I tried one day in a class and suddenly realized I could do.

That’s the beauty of the yoga practice though, right? We don’t have to do every pose every day because they all work as a system. Showing up and moving through any of them helps to lay the foundation for the others. It’s just this beautiful language for the body that all fits together.

I now love teaching this as a peak pose because there are so many different side plank variations that students can work on while building up to the extended version.

The sequence below works up towards the extended-leg version of the pose, but can apply to any of the others as well.

Have fun and let me know how it goes!

And, if you want more in-depth vinyasa sequences like this along with teaching notes + tips on how to cue them, enter your email below to grab our FREE guide:

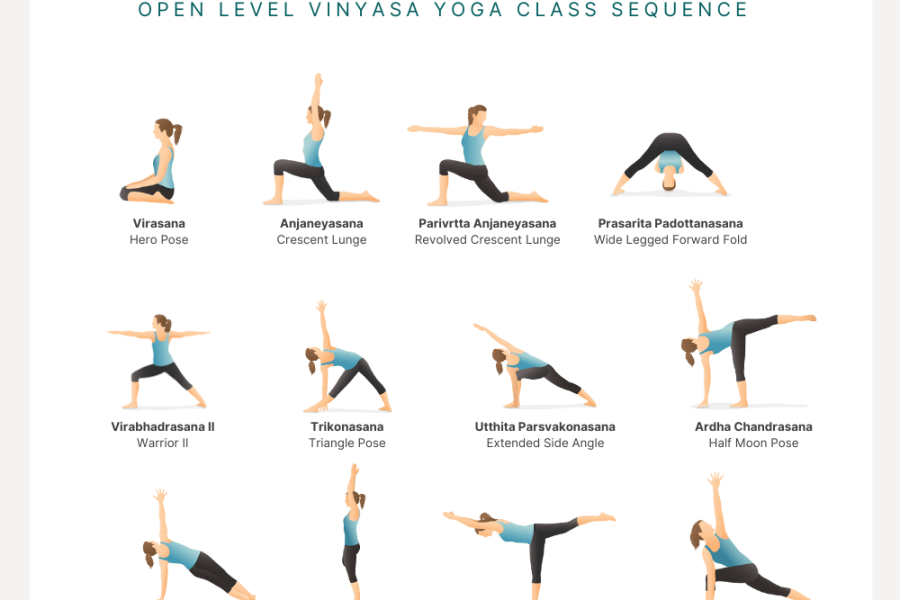
Warm Up Poses:

  • Supta Padangusthasana
  • Supported Side Plank (knee down)
  • Low Lunge Twist

Standing Poses:

  • Warrior 2
  • Triangle Pose
  • Ardha Chandrasana
  • Parsvottanasana

Balance Poses:

  • Tree Pose
  • Padangusthasana B

Twist Pose:

  • Revolved Triangle

Peak Pose: Vashistasana (either with tree leg or leg extended)

Seated Poses:

  • Uppavistha Konasana
  • Paschimottanasana

Reclined Poses:

  • Bridge Pose
  • Supine Spinal Twist
  • Happy Baby

What is Yin Yoga?

By Yoga, Yoga Asana

In the bustling rhythm of modern life, finding tranquility and flexibility, both mentally and physically, is a quest many undertake. Yin Yoga emerges as a beacon of peace and bodily liberation, offering a practice that contrasts yet complements the more dynamic yoga disciplines. This comprehensive guide delves into the essence of Yin Yoga, unraveling its principles, benefits, and how it can be seamlessly integrated into your lifestyle to promote well-being and inner harmony.

Understanding Yin Yoga

Yin Yoga, at its core, is a meditative approach to yoga, emphasizing passive stretching and aiming to cultivate a deeper internal awareness. Unlike its yang counterparts, which focus on muscle engagement and an energetic flow, Yin Yoga targets the deep connective tissues of the body such as the ligaments, joints, bones, and fascial networks. By holding poses for extended periods, typically between three to five minutes or even longer, practitioners are encouraged to tune into their bodies and minds, fostering a state of mindful stillness.

Yoga Asana: What is yin yoga?

Yin yoga is a style in which poses are passively held for a minimum of three minutes, but ideally 5-7 minutes or more, with the intention of targeting the fascia and other connective tissues of the body. The poses practiced in yin are mostly practiced on the floor with students never coming higher than their knees– meaning, there are typically no standing poses.

Yin’s goal of targeting connective tissue requires a different approach to the practice than more active forms of yoga. In yin yoga the large muscle groups are not engaged like they are in a Hatha or Vinyasa class. Instead, the body is meant to fully release into the shapes and work with gravity to slowly move deeper and deeper into each posture. Props are often used to support the body through the practice in order to allow for that release of muscle engagement.

Yin yoga is rooted in ancient Chinese philosophy and is deeply connected to the idea of balancing yin and yang. Where most of the activities in our modern lives– including our active yoga practices– fall more in the yang category, yin yoga seeks to bring the body back to a greater state of harmony by giving us the chance to slow down and move into the deeper layers of tension and tightness that are often held.

What is the difference in yin yoga poses?

Yin yoga poses naturally create a balance between tension and compression in the body, which help to exercise our joints in all directions. When a part of the body is placed under tension we’re creating a lengthening of the connective tissue and, depending on flexibility, the muscles as well. This is often experienced as a stretch in the body. Compression is the opposite. It’s the shortening of connective tissue while its being pressed together usually because this part of the body is reaching bone-on-bone.

Every yin yoga pose will bring either tension or compression to a different part of the body. For example, in caterpillar pose (similar to Paschimottanasana in an active class) the back body is under tension as the hamstrings and back muscles are lengthened in the forward fold. The front body is under compression with hip flexors shortening as the abdomen comes towards the legs. Conversely, in saddle pose (similar to Supta Virasana in an active class) the front body is under tension as the quadriceps, abdomen, and chest lengthens and opens while the lower back and hamstrings are compressed.

Both poses are hugely beneficial to the body, especially when practiced together in a class, as they allow the connective tissue to explore its full range of motion. It’s important to note that working with tension and compression will create physical sensation in the body. This sensation can be intense and be challenging for students but is also the goal of the physical practice of yin yoga. Cueing students to use their breath to ease any feelings of discomfort can be helpful in guiding them through the practice.

Yin Yoga Tension and Compression in Caterpillar and Saddle Pose

The Origins of Yin Yoga

Tracing back to the ancient Taoist concepts of Yin and Yang—opposite and complementary forces in the universe—Yin Yoga is a relatively modern practice that integrates these philosophies with traditional Chinese medicine and Western science. It was popularized in the West in the late 20th century by martial artist and Taoist yoga teacher Paulie Zink. Today, it is widely recognized for its restorative and introspective nature, making it a perfect complement to the more physical styles of yoga and hectic lifestyles.

Practicing Yin Yoga: Tips for Beginners

Embarking on a Yin Yoga journey requires little beyond a willingness to explore the depths of your own mindfulness and flexibility. Here are some tips to get started:

  1. Create a Comfortable Space: Ensure you have a quiet, comfortable space where you won’t be disturbed. Props like yoga blocks, bolsters, and blankets can enhance your practice.
  2. Listen to Your Body: Yin Yoga encourages listening to your body and respecting its limits. Never force a pose to the point of pain.
  3. Focus on Your Breath: Use your breath as a guide to deepen your relaxation and focus during each pose.
  4. Be Patient: Progress in Yin Yoga, as with any yoga practice, takes time. Embrace each session as an opportunity to learn more about yourself.

The physical practice is just one side of the overall focus of yin yoga. The other key piece of the yin practice is about the effect on a student’s energy and emotions – and again, it’s all about balance.

Traditional Chinese Medicine uses the ideas of meridians to reference the different energy channels within the body. When those channels are opened and balanced, the belief is that energy can move freely which leads to optimal health, which makes it ideal for beginners. When that energy gets stuck or stagnant, that’s when imbalance occurs which can lead to disease. The poses in a yin yoga practice work to use tension and compression to target these meridians and help keep them open and balanced. And while this certainly contributes to physical health, it also has a profound effect on emotional health as well.

Feelings, emotions and the practice of yin yoga

It’s not uncommon for students (especially beginners) to experience strong feelings during a yin class that can range from agitation, to sadness, to fear, to joy. As students visit each pose and go deeper into the energetic layers of the body, stagnant emotions are released. Beginners should be aware that this is often why hip opening poses can cause tears and leave students thinking “what is happening and why am I crying?” It’s important to know that while confusing at times, this is a normal experience in a yin class. Through connection to the breath, those pent up emotions can be released, leaving more room and space for new experiences and emotions to move freely.

Yin practice offers an opportunity for safe exploration of the inner workings of the emotional body. Learning to sit with feelings that are overwhelming and using the breath to become aware of and metabolize those emotions is a skill that can be improved upon each time a student moves through a yin yoga practice. Building self-compassion and resiliency during this time is a benefit of yin yoga that helps not only during practice, but in life as well.

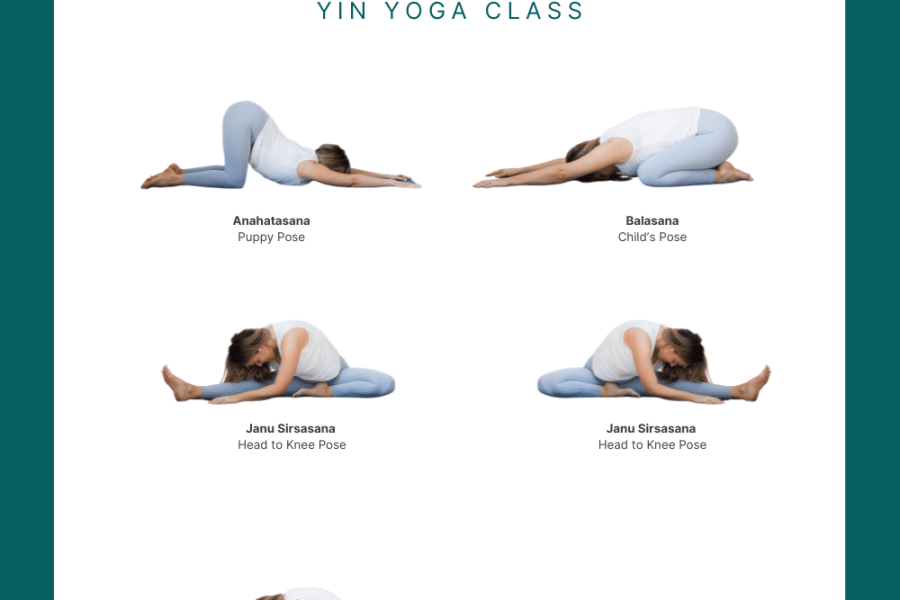
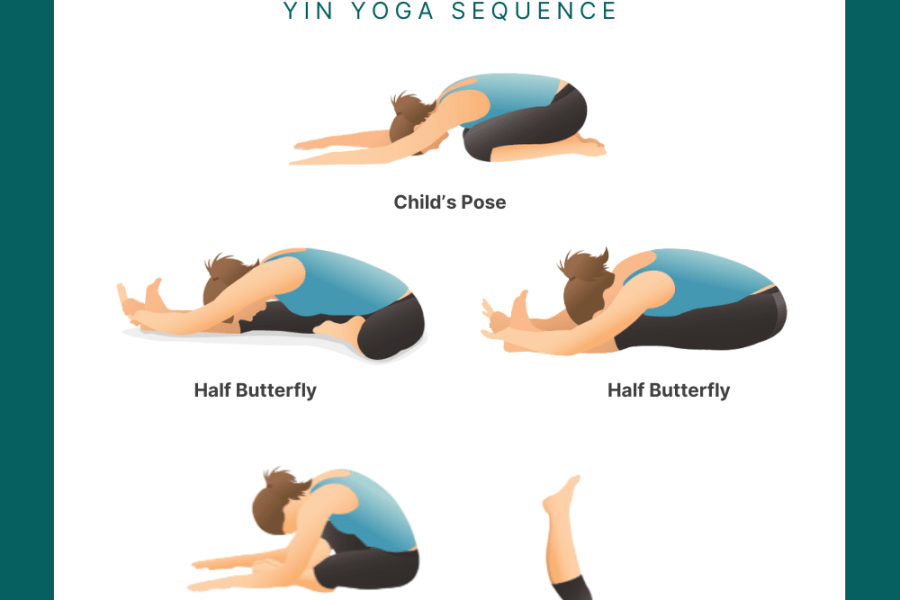
Popular Yin Yoga Poses

Free 60 minute yin yoga class sequence

Kate Lombardo in Child's Pose (Balasana)

Child’s Pose (Balasana)

Kate Lombardo in Puppy Pose (Uttana Shishosana)

Puppy Pose (Uttana Shishosana)

Kate Lombardo in Head to Knee Pose (Janu Sirsasana)

Head to Knee Pose (Janu Sirsasana) [be sure to do both sides]

Kate Lombardo in Seated Wide Angle Pose (Upavistha Konasana)

Seated Wide Angle Pose (Upavistha Konasana)

Kate Lombardo in Lizard Pose (Utthan Pristhasana)

Lizard Pose (Utthan Pristhasana)

Kate Lombardo in Corpse Pose (Savasana)

Corpse Pose (Savasana)

Benefits of Yin Yoga

Yin Yoga offers a myriad of benefits, extending beyond mere physical flexibility. Here are some of the key advantages:

  • Enhanced Flexibility: By gently stressing the connective tissues, Yin Yoga helps improve flexibility and promote the release of tension.
  • Deep Relaxation: The slow, meditative nature of the practice encourages a calming of the mind, leading to reduced stress and anxiety levels.
  • Improved Circulation: Holding poses for longer durations can enhance circulation, encouraging a better flow of nutrients and oxygen throughout the body.
  • Greater Emotional Balance: The introspective aspect of Yin Yoga aids in cultivating a balanced emotional state, fostering resilience against stress and adversity.
  • Stimulated Meridian Flow: The practice is said to stimulate the flow of Qi (life energy) through the meridian channels, harmonizing the body’s organs and systems according to traditional Chinese medicine.

Like the practice itself, the question “what is yin yoga?” has many layers to its answer and warrants a deep dive into the practice itself (which, ps– I have a course for if you’re interested!).

But, if you’re looking for the elevator-pitch explanation of yin yoga, it can best be summed up by two key points:

  1. It’s a passive physical practice of seated poses that target the connective tissue of the body through the exploration of balance between tension and compression.
  2. The physical practice aligns with the energetic systems of the body and can help with deep emotional connection and the releasing of stagnant energy.

There are so many benefits when it comes to the practice of yin. Take a look at a similar article where we listed 6 Key Benefits of Yin Yoga

YogaRenew’s Yin Yoga Teacher, Kate Lombardo’s First Experience with Yin Yoga

My love affair with yin yoga started pretty early on in my yoga teaching career and I have to admit, it caught me by surprise. I was (and still am) an avid vinyasa yoga teacher and student and (at the time) yin seemed like the “easy” yoga class to me.

I took my first yin class out of pure convenience because it was the class on the schedule right before the class I taught. I moved through the first few poses fairly easily and felt reaffirmed in my belief that this would be a simple practice. Then, we came to our first long hold in dragon pose (basically a lizard lunge with the hands down) and I suddenly realized how very wrong I was…

The rest of the class presented challenges for my body and mind in ways vinyasa didn’t. And despite the intense sensation each pose brought to my body and the mental focus it took to sit in that discomfort, I found it to be exactly what I was craving to bring more balance to my yoga practice and my life.

A few months later I took my first yin training and started adding yin classes into my teaching schedule immediately afterwards. For many of my students, this practice was brand new to them and their experiences reflected my own. But I soon came to realize that my students needed and enjoyed the balance the practice brought just as much as I did.

I’ve loved being able to see this practice continue to grow in popularity as years have gone by and more and more teachers and students seek to share in this healing practice.

Yin yoga, in many ways, is the perfect blend of the old and the new and it’s this confluence of our modern lives being served by a practice rooted in ancient eastern practices that gives yin its magic.

Conclusion

Yin Yoga stands out as a unique and powerful practice within the diverse spectrum of yoga. By embracing stillness, patience, and mindfulness, it offers a path to physical flexibility and mental tranquility that contrasts with the fast-paced rhythms of contemporary life. Whether you’re a seasoned yogi or a curious newcomer, incorporating Yin Yoga into your routine can unlock profound benefits for your body, mind, and soul. Dive into the tranquility of Yin Yoga and discover the transformative power of gentle, sustained poses in your quest for inner peace and flexibility.

Ready to learn more about the practice of yin yoga? Grab my totally free Yin Yoga Teacher Starter Kit below for the rundown of everything you need to get started practicing and teaching yin yoga:

Astavakrasana with Patrick Franco

By Yoga Asana

Astavakrasana, which is translated as 8-angle pose, is named after Astavakra, a sage that was cursed at birth to be born with 8 bends or angles in his body. Despite his physical disabilities, Astavakra became a great scholar and spiritual teacher. He was appointed the preceptor of King Janaka, who was the father of Sita (the perfect wife). His curse was later lifted, and his body straightened, as his prowess grew after defeating a court scholar in a philosophical debate.

The pose is a complex and challenging arm balance, and as its name suggests, consists of 8 bends in the body – the wrists, elbows, hips, and ankles. As with all arm balances, they require a mix of mental focus, concentration, and coordination. Additionally, Astavakrasana physically requires spinal extension and rotation, scapular abduction, elbow flexion, hip flexion and adduction.

As you can imagine, sequencing for Astavakrasana needs to account for all of the different actions required to work on the pose. This is a sequence that needs to be put together thoughtfully and mindfully to give students the best chance for success.

In this sequence, poses such as Chaturanga Dandasana teaches spinal extension and elbow flexion. Warrior 2, extended side angle, and child’s pose, prepare the body for the deep bend of the knee required to get the leg over the shoulder. Poses like Gomukhasana and Garudasana allow for scapular abduction. Lastly, spinal rotation is accomplished in revolved side angle and Ardha Matsyendrasana. All of these poses together prepare the body for the work necessary to practice this complex and challenging pose.

By now, you should be ready to work on Astavakrasana. Remember, especially when working on arm balances as challenging as Astavakrasana, that the essence of yoga is in the journey and the effort, not in the result. Start seated in Dandasana, bend one leg fully and slip it over your shoulder (*pro tip – as long as you get the leg above the elbow you are in good shape). Squeeze that thigh in towards the midline. Cross your opposite ankle over your bent leg. Press your palms down into the earth and lift by straightening your arms. From here, squeeze your thighs together and straighten them around your arm. Bend your elbows straight back and pull your chest forward. Stay for a few breaths. Come down and try the other side.

Since we worked so hard getting to Astavakrasana, it is important to take your time winding down. We start with Bharadvajasana which is an open twist which should feel good at this point. From here we move through bridge pose, shoulderstand, and finally towards final relaxation… Savasana.

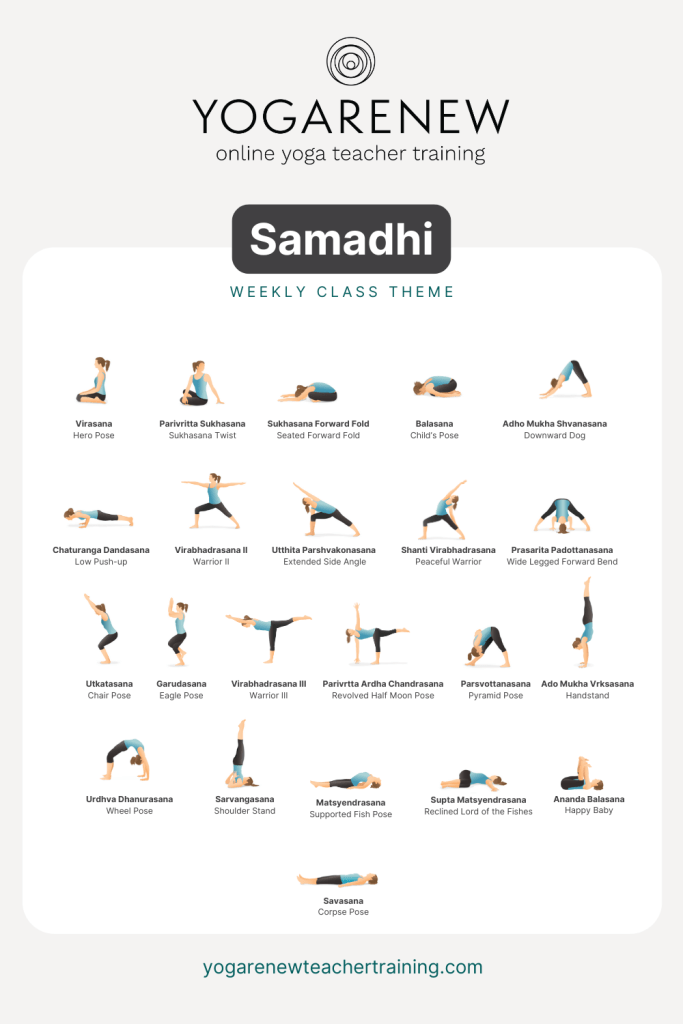
Here’s the full sequence pose by pose (broken out into specific sections based on YogaRenew sequencing):

Puttering/Warm-Up:

  • Virasana w/ Garuda Arms
  • Sukhasana Twist
  • Sukhasana Forward Fold
  • Child’s Pose
  • Downward Dog
  • Chaturanga Dandasana

Standing Poses:

  • Warrior 2
  • Extended Side Angle
  • Prasarita Padottanasana
  • Parsvottanasana
  • Utkatasana

Balance Pose:

  • Eagle Pose

Standing Twist:

  • Revolved Side Angle

Seated Poses: 

  • Gate Pose
  • Ardha Matsyendrasana
  • Gomukasana

Abdominal Poses: 

  • Navasana
  • Jathara Parivartanasana

Peak Pose: Astavakrasana

Wind Down:

  • Bharadvajasana
  • Chatush Padasana
  • Sarvangasana

Savasana

This is the full, downloadable PDF of the poses used in this class:

If you want more in-depth vinyasa sequences like this along with teaching notes + tips on how to cue them, enter your email below to grab our FREE guide:

Yoga Teacher’s Guide to Self-Care

By Lifestyle & Wellness, Yoga Teachers

In the whirlwind of teaching, training, and guiding others, yoga teachers have to navigate through the ebbs and flows of inspiration and exhaustion. In the hustle of crafting sequences, leading classes, and embodying the principles of yoga, it’s easy to overlook the person most in need of care: yourself.

This guide is a tool for yoga teachers seeking to recalibrate, rejuvenate, and rediscover the joy in their practice and life. Drawing from Ayurveda, the ancient sister science to yoga, we will dive into practices designed to harmonize body, mind, and spirit, offering a path back to equilibrium and joy in teaching and living.

It’s way too easy to feel tired, burnt out, and unmotivated – or uninspired as a result of teaching too many classes, saying “yes” to too many things, and trying to just make rent, pay bills, and live your dream. I’ve experienced the burnout, the anxiety, and all of the things that come with pushing too hard and not setting boundaries. Now, I’m excited to share the tools that helped me stay in love with teaching and stay connected to what makes me happy and balanced.

Rediscovering Your Why: The Heart of Self-Care

You probably hear this a lot: “What is your ‘why?’”

If you haven’t heard it yet, you’re about to really hear it. Whenever you begin to make a living out of something you love, it’s incredibly important to remember why you love it and what keeps you coming back to it. It’s important to remind yourself what inspired you to try yoga and also how you felt when you first fell in love with it. You need to remember what keeps you coming back to the practice and also how you feel when you’re not practicing.

When you remember why you do what you do, you’re going to want to keep returning to it. It won’t feel like a chor or just something on a “to do” list that you need to check off. Once you tap into your “why”, it can serve as a reminder for why you actually want to keep showing up.

5 Essential Self-Care Tips for Yoga Teachers:

  1. Acknowledge Your Limits: Start by observing moments of fatigue or frustration. Use a journal to track these instances and seek patterns. Understanding your boundaries is the first step towards honoring them.
  2. Embrace Routine: Consistency is key. Select a few daily rituals—waking, eating, or sleeping at the same times—to anchor your day and signify that your well-being is a priority.
  3. Connect with Nature: Regular walks, especially in natural settings, can profoundly restore balance. Leave distractions behind and immerse yourself in the rhythm of the natural world.
  4. Learn to Say No: Asserting boundaries by declining requests that don’t serve you is not just okay—it’s necessary for preserving your energy and maintaining your integrity as a teacher.
  5. Deepen Your Practice: Remember to be a student first. Engage in workshops, classes, and trainings that fuel your passion. Let this exploration be a source of inspiration and renewal.

How Ayurveda Can Help a Yoga Teacher’s Self-Care Routine

Ayurveda offers a lens through which to view ourselves and the world in terms of the five elemental energies: earth, water, fire, air, and ether. These elements combine into three doshas: Vata, Pitta, and Kapha—that influence our physical, emotional, and mental tendencies. Recognizing your predominant dosha(s) can guide you in tailoring self-care practices that foster balance and well-being.

Understanding The Doshas:

  • Kapha (Earth & Water): Stability, compassion, and nurturing are hallmarks of Kapha energy. When in balance, Kapha types are the grounding force in any setting.
  • Pitta (Fire & Water): Organization, drive, and determination define Pitta. A balanced Pitta is a source of transformation and leadership.
  • Vata (Air & Ether): Creativity, adaptability, and spontaneity are characteristic of Vata. In balance, Vata energies inspire innovation and exploration.
A chart of the Doshas

Vata, pitta and kapha doshas with ayurvedic icons of elements – ether, fire, air, water and earth. Banner, poster, design for yoga class. Used in Yoga, Ayurveda, Buddhism.

Practices to Cultivate Balance for Yoga Teachers

Sometimes “self care” can sound like too much work. You don’t actually need to have a long ritual with candles and incense to practice self care. Self care can look like sipping warm lemon water every morning or reminding yourself to thank your body while you take a shower every evening. Self care can also look like tapping into your own unique rhythms and acknowledging their wisdom.

Below are some suggestions to understand the concept of routine and also see what a routine can look like. If you’re inspired to try out any practices, begin with one of them and then build on that once it’s established.

Dinacharya: The Power of Routine

Ayurveda emphasizes the significance of aligning with nature’s rhythms through Dinacharya, or daily routine. This practice encourages adherence to natural cycles, promoting harmony and ease in daily life. Consider incorporating simple rituals that resonate with your dosha and lifestyle, aiming for consistency to build a resilient foundation for well-being.

Morning Rituals for Awakening:

  1. Rise with the sun to harness the energy of a new day.
  2. Practice oil pulling, tongue scraping, and eye cleansing with rose water for physical purification.
  3. Engage in gentle movement, meditation, or gratitude practices to set a positive tone for the day.

Mid-Day Practices for Nourishment:

  1. Make lunch your largest meal, eaten in a calm and mindful state.
  2. Integrate a short walk or nature connection post-meal to aid digestion and mental clarity.

Evening Rituals for Rest:

  1. Opt for a light dinner, allowing your digestive system to relax before sleep.
  2. Disconnect from electronics to unwind and prepare for rest.
  3. Engage in calming activities like meditation, reading, or a gentle self-massage to signal the body it’s time to rest.

Yoga Teacher’s Self-Care: Embracing Ayurveda in Your Life and Teaching

Woman scrubbing her leg with a dry brush as an Ayurvedic self-care practice for yoga teachers

Dry brushing is a common Ayurvedic self-care practice that is perfect for yoga teachers to balance their doshas

The journey into Ayurveda and self-care is deeply personal and endlessly rich. As yoga teachers, integrating these practices offers not only personal balance but also enriches our teaching, allowing us to share from a place of groundedness and authenticity. The path of self-care is a continuous exploration, one that invites us to return to ourselves, to our why, and to the joy that originally called us to the mat and the teaching of yoga.

This exploration into Ayurveda and self-care for yoga teachers is more than a guide; it’s an invitation to get yourself on a journey of self-discovery, balance, and renewed passion for yoga and life. By prioritizing well-being, you not only enhance your own life but also enrich the lives of those you teach, leading by example and inspiring a culture of self-care within your communities.

Take a few moments right now to jot down how you currently feel. Be honest with yourself and use words that help you understand the current qualities of your current state. Once you make that list, take the time to reflect on it. How does it make you feel? If you aren’t happy with what you see, use this guide to help you make some small changes. The smaller the change, the easier it will be to stick with it. Once you find that you’ve stayed with a self care practice for longer than two weeks, you can begin to add more to your routine.

A woman in a white tank-top cooking an Ayurvedic meal on a kitchen counter with grapefruits, tea and a plant in front of her.

Cooking Ayurvedic meals is another great practice for self-care for yoga teachers.

One of the biggest mistakes people make with self care is adding too much too soon and also trying to make extreme changes immediately. This shocks their system and their minds and bodies think that it’s not what should be happening. When that occurs, it becomes way too easy to fall back into old habits and lose the ability to take care of yourself.

I hope this guide helps your find your rhythms and tap back into self love!

Join our mailing list for incredible weekly content!

What’s it Really Like Being Enrolled in a YTT?

By Yoga Teacher Training

Nowadays it seems like yoga teacher trainings are EVERYWHERE. There are 200 hour teacher trainings, advanced 300 hour teacher trainings, speciality certifications such as prenatal, yin, and restorative just to name a few…

The premise is that upon completion of one of these programs you’ll have learned about the topic at hand and be equipped with the skills to teach said topic(s). I have been both a student and teacher in various teacher training programs. You may be wondering, what’s the deal with these programs? And what is it really like to be enrolled in a yoga teacher training? Well, I’m here to tell you.

Your 200 Hour Yoga Teacher Training is a “Broad Brush Stroke”

Meaning… it’s the first dip of the toe into the pond. If you are reading this blog post, it is likely that you are interested in doing a 200 hour teacher training… or at least curious about what it is. You may be wondering what to expect and what you’ll learn — what the curriculum is like and just how much work goes into the training.

Firstly, every training program is a little bit different but most trainings are required (by Yoga AllianceÂŽ) to cover the following topics:

  1. Asana
  2. Pranayama & subtle body
  3. Meditation
  4. Anatomy & physiology
  5. Yoga humanities
  6. Teaching methodology
  7. Professional development

Some trainings will include other topics such as Ayurveda, yin, and restorative yoga, etc. This is a lot! And while 200 hours may seem like plenty of hours, it is not enough to do a thorough deep dive of all topics within this ancient practice.

Your 200 hour is simply an introduction to these topics and it’s your job to continue the learning once your 200 hours is over.

You’ll Be Asked to Step Outside Your Comfort Zone in a YTT

Yoga teacher training is not just about teaching yoga.

You will have to learn about topics that may not come so easily to you. You will be asked to practice your teaching, which will require public speaking skills. You will be offered many moments of reflection and looking inward all in service of expression through your teachings. More often than not, people say yoga teacher training changed their life and this often comes from the self-growth through the process. Putting together a class and leading it with confidence (or semi-confidence at first) is simply a reflection of all the hard work and efforts done through training.

200 Hour YTT House Rule: You Must Practice and Apply

You attending and being a part of a teacher training program is not enough if you wish to carry out a yoga lifestyle, much less incorporate the deep teachings of yoga into your classes. I cannot stress this enough that it takes effort, time, and consistent practice to connect with the teachings of yoga and then to share that in a clear and authentic way.

Regardless of whatever teacher training you are doing, to embody the teachings of yoga you have to practice the skills outside of training hours. This means practicing in your own body and practicing teaching to others whether that is with your family and friends or in a studio class. If you are not practicing or applying what you have learned, you may forget the skills or you won’t feel confident in delivering them. On the other hand, if you practice and if you work to actively apply what you have learned, you will not only embody the teachings of yoga but you’ll deliver the teachings like the professional you are.
If you have gotten this far, I am going to guess that in some way you are being called towards the idea of doing a yoga teacher training. Maybe you have a specific training in mind. Let this be a sign to take yourself seriously. Teacher training IS a commitment physically, mentally, energetically, and financially. However, in my humble opinion, what you get out of the investment lasts a lifetime!

Join our mailing list for incredible weekly content!

Parivrtta Janu Sirsasana 60 minute yoga sequence PDF

Parvritta Janu Sirsasana

By Yoga Asana, Yoga Teachers

When it comes to choosing a peak pose to teach in class, most of the time they come from what we often call the “big 3” categories– backbends, inversions, or arm balances.

But, sometimes choosing a deep forward bend is a great way to change things up a bit, especially during a time that students are craving some extra grounding.

Parivrtta Janu Sirsasasana – or Revolved Head-to-Knee pose – is a personal favorite because it has all of the forward bend actions, but adds in the element of a twist so you can still work in a lot of side body opening during class.

The sequence below focuses on a variation of this pose, with an added virasana leg, to provide a different way of looking at things.

It focuses on a lot of side body lengthening and hamstring opening but also incorporates the bent knee as often as possible in order to prep students for that action with the virasana leg.

One thing to note is that with a class that focuses on a lot of forward bending action, it’s nice to offer some passive heart opening during the Wind Down section of class. This gently moves the body in the opposite direction, which creates a more balanced experience overall.

Have fun and let me know how it goes!

Also, if you want more in-depth vinyasa sequences like this along with teaching notes + tips on how to cue them, be sure to enter your email below to grab our FREE guide:

Puttering/Warm-Up:

  • Sidhasana w/ side body stretches
  • Low lunge twist
  • Tadasana w/ side leans

Standing Poses:

  • Warrior 2
  • Extended Side Angle (with hand outside of the ankle)
  • Peaceful Warrior
  • Triangle Pose
  • Ardha Chandrasana
  • Ardha Chapasana (cue keeping leg close to hip)

Balance/Twist/Reclined:

  • Tree Pose
  • Revolved Triangle Pose
  • Gate Pose

Peak Pose:

  • Parivrtta Janu Sirsasana w/ Virasana Leg

Wind Down Poses:

  • Pachimottanasana
  • Supported Fish Pose
  • Reclined Spinal Twists

Savasana