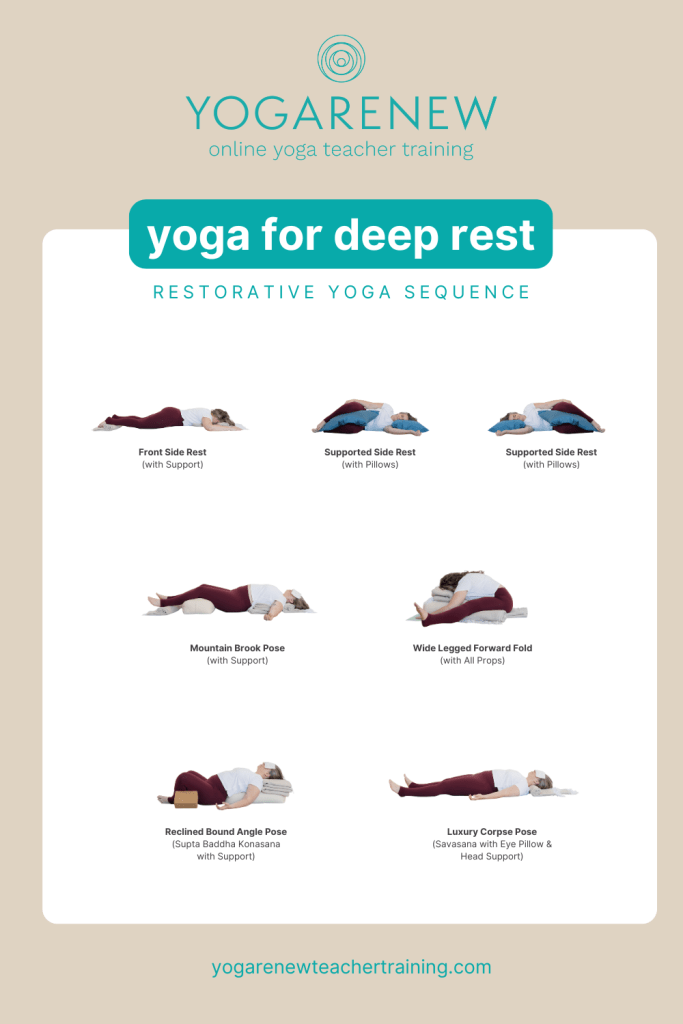
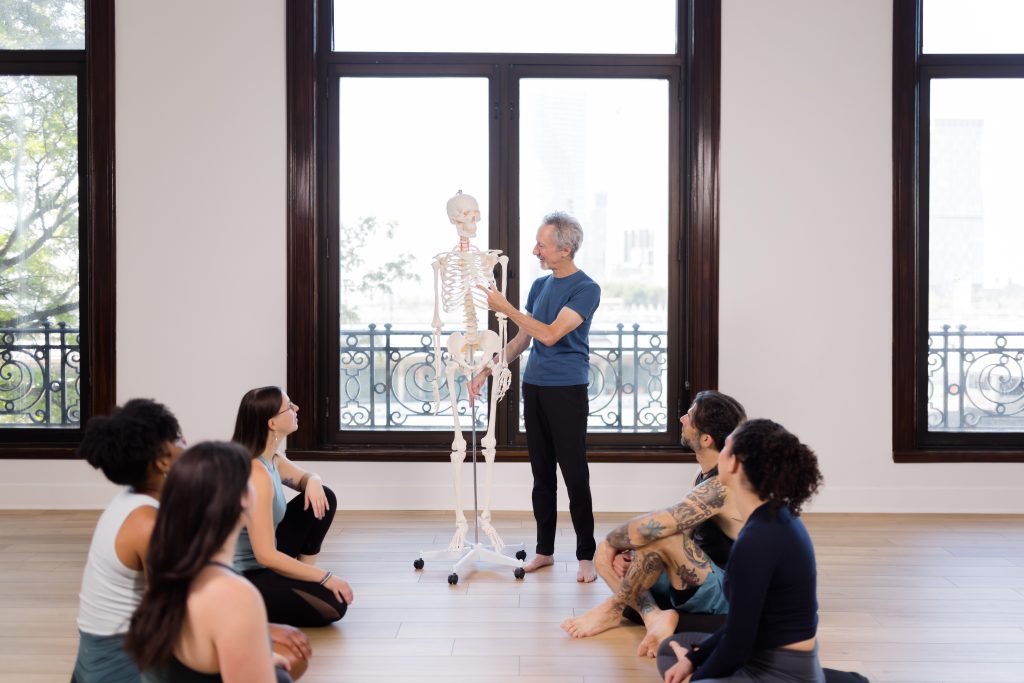
Weekly Class Theme: Self-Expression

By Yoga Teachers

Have you ever been in a relationship, or another situation, where you felt you could not express yourself? I certainly have.

The feeling of not being able to express myself is all things opposite of how I genuinely want to feel in my life as my highest and best self. Love, freedom, safety, connectedness, vitality are just some of the elevated emotions I consistently call into awareness for my highest self.

Any time I am in a space where I feel like my true self will not be supported or accepted, I slip into feelings of fear, worry, apathy, suppression, disconnectedness amongst other disempowering emotions that might arise. These types of emotions certainly do not support my highest and best self and definitely do not support me in working in the direction of the life I truly desire and deserve for myself.

The crazy thing about our emotions is how powerful they are. If we fail to check in with ourselves, our emotions can cause a negative feedback loop of disempowering states, within our internal and external world.

On the other side of the coin, the way our emotions can cause a negative feedback loop, they can also cause a positive feedback loop of empowering states. Practices, such as yoga, gives us the tools to be able to notice ourselves (physical body, mental body, emotional and spiritual body). This creates opportunities to become aware of when we are not in full expression mode. I don’t know about you, but when I am in a situation where I cannot fully express myself or be myself, I feel it within every layer of my being. My skin tingles, my chest feels tight, my head hurts, and I overall feel a sense of dullness.

This gives me a signal that something needs to change. Yes, putting myself into a different environment and around different people might be part of that change, but the first step is loving myself enough to want to make that change. Even if it takes effort.

It takes practice to not only become aware of oneself, but to be able to trust oneself in order to make the changes necessary (which often involves stepping outside of our comfort zones) to allow our truest, highest, and best selves to bloom. But I know I can speak for myself when I say the feelings of being able to embrace myself, express myself, and spread my wings are completely worth any initial discomfort. Sometimes we don’t even notice how much we are hiding ourselves until we finally let go and let ourselves truly live.

I couldn’t think of a better pose to highlight self-expression than Wild Thing; there is an openness and a playfulness within this posture that feels very appropriate for this week’s sequence. Let’s get to it…

Supporting Pose 1: 3-Leg Downward Facing Dog (Eka Pada Adho Mukha Svanasana)

Person doing 3 Leg Downward Facing Dog on a yoga mat

One of the entry ways into Wild Thing is from a 3-Leg Downward Facing Dog. This entry (compared to side plank) starts the hips high which is what we are going for in Wild Thing. Taking time to use this pose as a prep pose is worthwhile if you’re planning to enter from here.

How to:

  1. From Downward Facing Dog, take the right leg high to the sky behind you.
  2. Bend the right leg so the front of the right thigh and hip are open and long.
  3. Firm the sacrum in to assist the opening of the front of the pelvis.
  4. Keep the left leg and arms firm on the ground and allow your torso to turn towards the right. Turning the torso might not always be appropriate, but in this case that is an action we will take when coming into the peak pose.
  5. Look under the right armpit.

Supporting Pose 2: Peaceful Warrior (Shanti Virabhadrasana)

Person doing Peaceful Warrior on a yoga mat

Peaceful warrior is an excellent pose for creating expansion in the body, particularly the sides of the body which is great for back-bending. This pose also has the arm reaching alongside the ear, similar to Wild Thing.

How to:

  1. From Warrior II, take your back arm to your back leg.
  2. Flip the front hand to the sky and then sweep the arm up and overhead towards the back of the room. Attempt to bring the arm right alongside the ear. Extend through the fingertips.
  3. Keep the belly facing the side wall (as opposed to twisting it towards the sky) and look underneath the armpit towards the ceiling.

Supporting Pose 3: Side Plank (Vasisthasana)

Side Plank

Side Plank is an awesome prep pose for Wild Thing as it preps the actions within the arms, pelvis, and feet for the peak.

How to:

  1. From Downward Facing Dog, bring the legs together.
  2. Keep the left palm down on the ground with fingers spread wide and evenly.
  3. Swivel your heels to the left and balance on the outer blade of your left foot. Stack the right foot on top and keep pressing the feet together while spreading the toes.
  4. Lift the right arm to the sky while externally rotating the left, supporting arm. This will open the belly to the side wall.
  5. Press into the left hand and foot to lift the body up.

Peak Pose: Wild Thing (Camatkarasana)

How to:

  1. From Downward Facing Dog, lift your right leg high to the sky and come into a 3-Leg Downward Facing Dog.
  2. Begin to reach your right foot towards the floor behind you while spinning the left heel towards the floor, similar to the foot’s rotation in Side Plank.
  3. As the actions of the feet are taking place, lift the left arm off the floor.
  4. Begin to turn your belly to the sky as you externally rotate the right, bottom arm and plant the right foot to the floor behind you. Now take the left arm overhead and reach to the front of the room.
  5. Press your right hand and feet into the ground and firm the sacrum in to encourage a backbending shape.
Yoga teacher sitting in front of a class in Sukasana while the students lie down in Savasana

How to Stay Inspired as a Yoga Teacher

By Yoga Teachers

1. Stay Committed to Your Personal Practice

Your personal practice is the foundation of your teaching. Take time to nourish your own practice and explore what it is that keeps you coming back to the mat! . Attend workshops, retreats, or other trainings so you can learn from other experienced teachers and gain fresh perspectives. By continuously deepening your understanding and experience of yoga, you can infuse your teaching with new energy and inspiration.

2. Connect with Your Colleagues

Building a strong network of life-minded yoga teachers can be incredibly empowering. If you teach at a studio, take classes with the teachers you teach with. Share experiences, exchange ideas, and support each other whenever there are questions or inquiries about something that may have come up in class. Surrounding yourself with passionate yoga teachers can reignite your own love for the practice and provide a platform for new growth and inspiration.

3. Attend Continuing Workshops and Trainings

As yoga teachers, your learning never really ends. Seek out new workshops and trainings that align with whatever it is you’re interested in. Whether it’s deepening your knowledge in sequencing, anatomy, meditation, philosophy, Ayurveda, or sound healing, investing in continuing education keeps your teaching fresh and allows you to bring new insights to your students.

4. Stay Connected with Your Students

Your students are a constant source of inspiration. Take time to connect with them, listen to their stories, and understand their individual journey. Create a welcoming and inclusive space where they feel comfortable and want to keep coming back. When you witness their growth and transformation through the yoga practice, it can be incredibly motivating and remind you of the huge impact your teaching has on others’ lives. It’s pretty amazing!

5. Read Yoga Philosophy

While the physical yoga practice is important, so is everything else that falls under the whole umbrella of yoga! It’s important to stay connected to what makes your soul feel fulfilled and whatever it is that helps you remember who you are and why you’re here. When you’re connected to the philosophical texts, you add a layer of depth to your teaching which can keep you inspired and engaged.

6. Practice Self-Care

As a yoga teacher, you are always giving. This means it’s important to prioritize self-care and nourish yourself as much as you can. You most likely already talk about self care, so make sure you’re doing the home practice, the meditation, the pranayama, and all of the things that keep you fueled. When you nurture your own physical, mental, and emotional needs, you will have the energy and inspiration to show up fully for your students.

Check out YogaRenew’s course on Ayurveda and Self Care by Lisa Bermudez

Remember, staying inspired as a yoga teacher is a forever journey that requires dedication and self-reflection. Embrace the evolution of your practice and teaching, and don’t be afraid to explore new things. By cultivating your own passion for yoga and sharing it authentically with others, you have the power to inspire countless lives. We are all trying to find balance and stay connected to who we are and why we are here. It’s your job to keep reminding your students of that. ✨

#YogaTeacherInspiration #YogaTeachingJourney #PassionForYoga #ContinuingEducation #SelfCareInYogaTeaching #StayInspired #YogaCommunity #YogaInspiration #YogaTeacherTips

Join our mailing list for incredible weekly content!

Person in Side Lunge facing the camera

Weekly Class Theme: Unapologetically You

By Yoga Teachers

This is a blog post to all my people pleasers, shape-shifters, potential minimizers… and anyone else who has ever felt like they’ve spent much of their time accommodating others. This goes out to anyone that has made themselves feel/play small, or shrunk themselves in any aspect because of other people’s energy (or crossed their own boundaries in service of making someone else (or a group of people) feel more comfortable).

As someone who has done all of the above, in a variety of aspects, I can say from personal experience that there is no benefit to doing any of these things. In fact, it is a major disservice as the only plausible result of crossing my own boundary is abandonment of myself.

As we are in the midst of pride month, highlighting the topic of being unapologetically you feels appropriate (although, it’s always appropriate to highlight this within our lives). Stepping into one’s power and owning who you truly are is one of the most freeing and loving things we can do for ourselves… but that doesn’t mean it is easy; it doesn’t mean that the journey is without effort. It also doesn’t mean that there is a destination or final result. Being yourself, and not apologizing for it, is an everyday act and overall embodiment.

It’s the choice to get out of bed and wear what you want to wear. It’s the choice to fiercely love who you love with no explanation or justification. It’s the choice to express yourself visually, vocally, and creatively in the ways that feel most aligned for you.

Here is the best part about showing up as your most authentic self: When we make the decision to love ourselves enough to be the fullest expression of who we are, regardless of how others feel about us, we give others permission to do exactly the same.

Peak Pose: Side Lunge (Skandasana)

In my humble opinion, I think Skandasana is a highly overlooked peak pose. Both legs have to externally rotate, while one leg folds in half and the other leg is fully straight. In addition, we’re in a squat position meaning we have to be able to access a widening across the front of the groin (amongst other physical prep work for the pose). While Skansasana might appear like a “small” posture, the prep work to get there requires we open ourselves up and take up space. The poses chosen for this particular journey (aka sequence) specifically focuses on widening across the front side of the body, which sometimes we choose to hide, and taking up space in order to do so.

Supporting Pose 1: Lizard Pose (Utthana Pristasana)

Lizard pose

Lizard is a relatively familiar and accessible pose to widen the across the front of the pelvic groins and inner thighs. It also has one bent leg (although not folded as in Skansasana) and one straight leg, lending some similarity between the two postures. There are also many ways in which one could adjust the pose in order to experience the actions necessary to prep for the peak pose, such as adjusting how wide the front foot steps or usage of props beneath the hands.

How to get into Lizard Pose:

  1. From downward facing dog, step the right foot to the outside of the right hand. Ensure the sole of the foot is firmly planted on the floor.
  2. Place the left knee on the ground keeping the front of the thigh long. Think about aiming the top of the kneecap towards the floor or blanket if you’re using one.
  3. Either keep your palms down on the ground or blocks, or lower your forearms down to the ground or blocks. Do whatever will lend the most sensation without overdoing it.

Supporting Pose 2: Goddess Pose (Utkata Konasana)

Person in Goddess Pose

Goddess pose is not only the perfect pose for being unapologetically you and taking up the space around you, but it’s also the perfect prep pose for Skandasana. Both legs are externally rotated, the front of the pelvis and inner thighs are wide, and the chest is open and lifted.

How to get into Goddess Pose:

  1. Turn towards the side wall and widen your feet about 2-3 feet (.61-.91 m).
  2. Turn out your legs and feet, which will externally rotate the legs at the pelvis, so that your toes are more or less facing the corners of your mat.
  3. Bend your knees so the thighs are “ideally” parallel to the floor and the knees are above the ankles. If your knees cave in when you do this either focus on widening your knees using the strength of outer glute, or narrow your stance. If narrowing your stance forces the thighs out of a parallel position to the floor, that is OK.
  4. Take your arms out to shoulder height with palms forward and then bend your elbows into a goal-post shape. Try to relax the muscles of your neck while engaging the shoulder blades slightly towards one another to support the chest widening.

Supporting Pose 3: Tree Pose (Vrksasana)

Person in Tree Pose

Tree Pose is yet another posture where we are working with the action of external rotation of the leg and in this posture we have one folded leg and one straight leg, just like we see in Skandasana.

How to get into Tree Pose:

  1. Begin in Mountain Pose. Draw your shoulders down away from your ears and stand tall.
  2. Ground down through all four corners of your feet and engage your leg muscles.
  3. Find a point of focus to help you stay balanced in front of you – on the floor, wall, or ceiling.
  4. Engage your abs and begin to lift one foot off the ground.
  5. Bring the sole of your foot on your ankle, shin, or upper thigh – avoiding the knee to prevent injury. To help bring your foot on your upper thigh, you can use your hand to guide it there.
  6. Bring your hands together in prayer position at your chest or bring your arms overhead with the palms facing each other. Another option is to interlace your fingers together, keeping your shoulders drawn away from the ears. You can also bring your hands on your hips to help with your balance.
  7. Hold for several breaths before releasing your leg back down.
  8. Repeat on the opposite side.

Peak Pose: Side Lunge (Skandasana)

Person in Side Lunge facing the camera

How to get into Side Lunge:

  1. Start in wide leg forward fold.
  2. Turn out your right foot and leg, which will externally rotate the leg at the pelvis.
  3. Fold your right leg while simultaneously externally rotating your left leg so the knees and toes face the sky.
  4. Sit your bum towards the floor as your chest lifts. Steps 3 and 4 more or less happen at the same time.
  5. Draw your hands together in front of your heart. Bring your thumbs to your sternum and your sternum to your thumbs.

*Other arm variations are available such as arms overhead or arms spread for a twist to name a couple.

Elephant Trunk pose

Weekly Class Theme: Arm Balances

By Yoga Asana, Yoga Teachers

“Perfection in asana is achieved when the effort to perform it becomes effortless”
Yoga Sutra 2.47

Arm balances require strength, agility, coordination, and concentration in both body and mind. Physically they tone the arms, wrists, shoulders, back, and abdomen. They also require flexibility and mobility of the hips and shoulder joints.

Ultimately, as we continue to practice these physically challenging poses we begin to develop lightness, equanimity, and poise. The effort to maintain the pose remains, yet tension and strain is released and left behind.

Arm balances undoubtedly require a fair amount of effort, especially at first, but as we refine our practice we can start to find strength as integration, not hardness, which is relaxation is action or effortless effort.

Peak Pose: Eka Hasta Bhujasana

Eka means “one,” Hasta means “hand” and Bhuja means “arm.” This pose is translated as one hand and arm pose but often referred to as “Elephant Trunk Pose” as the shape resembles the trunk of an elephant. This arm balance is in the family of poses with the leg over the upper arm (above elbow) and is a great place to start before moving onto poses such as Koundinyasana II, Tittibhasana, Bhujapidasana, and Astavakrasana.

Supporting Pose 1: Utthan Pristhasana (Lizard Pose)

Lizard pose

Lizard Pose is a great pose to incorporate into a sequence when practicing arm balances, but especially arm balances with the leg over the upper arm. It’s a deep hip opener that also opens the groins, hamstrings, and hip flexor muscles. It also opens the upper back, shoulders, and neck.

How to get into Lizard Pose:

  1. Start in Downward Facing Dog Pose
  2. Lift your right leg and step it outside your right hand. Bend your knee until its over your heel
  3. Bring your back knee to your mat to start
  4. You can keep your arms straight with your palms under your shoulders or for a deeper stretch bring your forearms to the mat with your elbows under your shoulders
  5. Option to curl your back toes and lift your back knee making your back leg straight
  6. Breathe into your upper back and let your head relax
  7. Stay for 5 to 10 breaths
  8. Repeat on the other side

Supporting Pose 2: Utthita Parsvakonasana (Extended Side Angle)Extended Side Angle pose

Extended Side Angle is a standing pose that extends the trunk laterally over a bent front leg. It does precisely what its name suggests, extending the sides of the trunk. It creates a single line of lengthening from the back foot to the extended fingertips.

How to get into Extended Side Angle:

  1. Stand in Tadasana and step your feet 3 ½ to 4 feet wide
  2. Turn your right leg and foot out to 90 degrees and the left leg and foot inward 15 degrees – Bend your right leg until the knee is over the ankle forming a right angle. Keep your back leg straight
  3. Extend your torso laterally alongside your right leg and bring your right hand outside your right foot – Your outer right knee and inner right armpit should be sealed together
  4. Extend your left arm overhead alongside your left ear – Your palm should face the floor and fingers outstretched.
  5. Turn your gaze upwards towards your inner left bicep
  6. Stay for 5 breaths
  7. Repeat on the other side

Supporting Pose 3: Marichyasana 1 (Sage Pose)

Sage pose

This complex seated forward fold binds the hands together behind the back and around a bent leg. This pose stimulates the abdominal muscles and kidneys and opens the muscles of the back, shoulders and neck.

How to get into Sage Pose:

  1. Start seated on the floor with your legs extended straight in front of you – You can sit up on a blanket to help lift
  2. Bend your right leg, bringing your heel towards your sit bone
  3. Lift your right arm and reach forward inside your right thigh towards your left big toe
  4. Turn your arm, bringing your thumb to face the floor, and then bend your elbow, wrapping your arm around your bent leg – Your armpit and shin should be sealed together
  5. Take your left arm and wrap it behind your back, clasping your hands together – If your hands don’t reach you can use a strap
  6. Inhale lift your chest, exhale extend your torso over your straight left leg
  7. Stay for 5 breaths
  8. Repeat on the other side.

Peak Pose: Eka Hasta Bhujasana (Elephant Trunk Pose)Elephant Trunk pose

How to get into Elephant Trunk Pose

  1. Start seated on the floor with your legs extended straight in front of you
  2. Bend your right leg and place it over your right upper arm. Keep the inner right thigh and knee pressing into the torso and shoulder – Keep your left leg straight
  3. Plant your hands alongside your hips – You can use blocks under your hands to help lift
  4. Inhale, and as you exhale, press your palms down and lift your buttocks, torso, and straight (left) leg off the floor
  5. Pull your abdomen back towards your kidneys, round your upper back and lean forward
  6. Stay for 5 to 10 breaths
  7. Repeat on the other side
Girl in full wheel pose

Weekly Class Theme: Self-Acceptance

By Yoga Asana, Yoga Teachers

The human experience is filled with the good, the bad, and the ugly. In fact, a rich human experience has the highest of highs and the lowest of lows. When I began my yoga practice, I noticed feelings of awareness, presence, and even peace. For a long time, my yoga practice (and all other spiritual practices such as pranayama, meditation, journaling, etc,) was viewed as something that only brought about positive and peaceful feelings.

As I have gotten older, wiser, and deeper into my practice and therefore myself I have noticed that yoga does not only open us up to the “good and fluffy feelings,” but it opens us up in all directions. Meaning our range of experiences actually become wider and the capacity with which we can feel and sense things is much deeper.

This level of self-awareness gained through various modalities of practice has caused deep introspection into the wonderful, light-filled corners of myself and the scarier, darker corners of myself. I’ve gained tools to notice patterns, behaviors, and past actions which have both served me and not served me. I’ve become aware of where I have limited myself in the past and where I continue to do so today.

Still sounding fun and fluffy? Haha, maybe not so much.

Noticing and accepting the good is easy. Noticing and accepting the bad and ugly is not so easy. It’s taken time, effort, and consistency to really accept patterns, behaviors, and actions which have hurt me or others, limited my potential, and failed to honor who I am and who I wish to become.

However, I’ve come to view the acceptance of such things as a gift…a vital and necessary part of my own growth and evolution. Because without accepting the past versions of myself, I have absolutely no shot of becoming the future versions of myself.

Self-acceptance creates the foundation from which to notice, accept, and love ourselves. By accepting we have dark corners, we give ourselves the opportunity to illuminate and make bright again those corners. We grant ourselves the space and time to continuously learn, integrate, grow, and evolve into the fullest and brightest version of you, me, us. By accepting ourselves, we give ourselves a shot at loving ourselves and if you ask me, looking at and acknowledging the dark corners is worth it every time.

This week’s peak pose is Full Wheel. Full Wheel is a pretty complex and intense posture — It takes time, effort, and consistency to prep the whole body to be able to backbend in this capacity. It requires that we check in with ourselves, accept our starting point, and incrementally work from there. The main action we’ll be focusing on for this sequence is length through the sides of the body and the spreading of the ribs from one another.

Supporting Pose 1: Upward Hands (Urdhva Dhanurasana)Woman reaching her arms straight up by her ears for Upward Hands posture in yoga

Upward hands is really like the blueprint for full wheel. Theoretically, if we were to keep stretching the body up, we would eventually go into a backbend. So it’s important we set ourselves up right here with strong feet and hands to reach and stretch the sides of the body up.

How to:

  1. Stand in mountain pose with the feet a few inches apart or all the way together.
  2. Reach the arms up alongside the ears with the fingers spread.
  3. Press from the heels of your feet up through the fingers and sense each rib being lifted off the one beneath.
  4. Ensure you are not excessively pressing the ribs forward by compacting the hips in, drawing the front ribs down, and reaching the arms up.

Supporting Pose 2: Extended Side Angle (Utthita Parsvakonasana)

I love extended side angle for full wheel because it stretches the side of the body and it gets the arm right alongside the ear, similar to the arm position in full wheel. In addition, there is a slight twisting action of the torso which also serves our backbending practice.

How to:

  1. Start in warrior 2 and hinge at the front hip to bring the chest forward.
  2. Take the forearm on top of the thigh and firmly press down to support the torso.
  3. Take the top arm over the ear towards the front of the room and stretch from the back foot up through the top arm.

Supporting Pose 3: Warrior I (Virabhadrasana I)

Girl in Warrior I on yoga mat

Warrior I is great prep for backbending because it puts the back leg into an extended position from the hip which is the action that takes place in backbending. It also teaches us to reach the arms up away from the hips to stretch the sides of the body and straighten the arms towards the sky.

How to:

  1. Take one leg towards the front of the mat and the other leg about 2-3 feet behind that one towards the back of the mat. Aim the front toes and knee directly forward.
  2. Take the back toes down at an angle so the toes are facing about 10 or 11 o’clock on an imaginary clock face.
  3. Bend the front leg to 90 degrees and press the shin forward whilst keeping the back leg straight and press the thigh back. The opposing actions of the legs should help to bring the sides of the pelvis more or less squared towards the front of the room.
  4. Reach the arms up and overhead and press the palms together. Use the pressing of the palms together to reach the straight arms to the sky. As you lengthen the arms, imagine the ribs spreading apart from one another vertically.
  5. Take the gaze towards your thumbs.

Peak Pose: Full Wheel (Urdhva Dhanurasana)

Girl in full wheel pose

How to:

  1. Lie on your back with your knees bent and soles of the feet flat on the floor.
  2. Bring your hands to the floor under your shoulders. Press your palms to the ground with your fingers facing the heels of your feet.
  3. Firm the elbows towards one another and firm the upper back in.
  4. On your inhale, come to half wheel with the crown of the head placed on the floor.
  5. On your exhale, straighten the arms and press your feet down to come into full wheel.
  6. Keep firming the upper back in so your chest aims towards the back of the room and as you remain in this posture, attempt to keep lengthen through the sides of the body as opposed to compressing any part of the semi-circle created with your torso and spine.
Strength Training + Yoga

Strength Training & Yoga: How to incorporate both

By Lifestyle & Wellness, Yoga Asana

When considering how you can incorporate a yoga practice into your regular fitness routine, it can seem complicated… but it doesn’t have to be. A lot of people like to engage in different physical fitness activities, and sometimes that can mean a multitude of vastly different modalities with varying intensities.

Here is an example of how I like to work out weekly:

  • Monday: 60 Min. Cycle Class
  • Tuesday: 60 Min. Strength Training
  • Wednesday: 60 Min. Yoga Class
  • Thursday: 5K Run (3 Miles)
  • Friday: 45 min High Intensity Strength + Conditioning Session
  • Saturday: 75 minute Yoga Class
  • Sunday: Rest

This is an example of how I may spend one week of working out, but it is based on what I could potentially do in a single week according to the activities that I currently participate in. What I am trying to demonstrate is that when it comes to our health and fitness, there are so many options and varying ways to piece them together.

A question that might come up is, “How do we approach fitting in multiple fitness modalities into our lives? How do we get better within each mode if we’re constantly spreading ourselves out?”

Your body, like anything else, has a particular tolerance for capacity. This capacity can be increased given that we dedicate time, effort and energy to do so. When it comes to the example I gave above of my hypothesized week in fitness, I’m spreading myself out a lot. My time, effort, and energy are going towards many activities as opposed to being focused on one particular activity.

Assuming you are paying attention to your body, breath, and form within each class, it’s said to be healthy to fully embrace whatever means of physical movement you enjoy. If nothing else, it is perfectly safe and effective in getting you to just simply move and feel your body; to find what resonates most with you.

However, when it comes to optimizing your body, and optimizing your performance the method of trying to fit it all in most likely won’t yield the greatest results.

In order to get stronger, we must work on lifting/moving heavy loads. If we wish to get faster, we must perform exercises which allow us to work on our speed. If we wish to generate more power, we must lift/move heavy loads at high speeds. If we wish to increase our flexibility and mobility, we must perform movements and exercises geared towards those specific components.

If you are someone who feels like you’re at a plateau and you want to see progress in particular areas or if you want to work on performance and optimization in particular areas, then this article is for you…

How does yoga fit in with strength training?

Let’s say we want to do all of the above while simultaneously deepening our yoga practice — Keep in mind, yoga postures can take us to our extreme ranges of motion, positions that are typically not our strongest. Meaning, you might have a strength goal, which is in opposition to the yoga postures you’re aiming to get better at.

How you approach your health and fitness is heavily based upon your goals at any given time.

Your goals determine what takes priority. How you train will determine what your body is capable of achieving. If you want to lift heavy weights (think about working towards your 1 rep maximum for a back squat), you must lift heavy weights regularly, focusing solely on increasing the amount of pounds each time. If you want to work on deep back-bending (think poses like full King Dancer and King Pigeon), you must work on poses and positions that support such a shape. These two things can feel like they are on opposite ends of the spectrum when it comes to the specific physical fitness goal trying to be attained.

Using back squats and king pigeon as an example, I generally would not recommend for someone to be working on both at full capacity at the same time. Why? The muscular actions needed for each are different. Working on a 1RM (1 rep maximum) back squat requires muscular shortening in places where yoga postures like King Pigeon requires lengthening.

This isn’t to say that if you’re currently working on lifting heavy loads and King Pigeon comes up in class that you should avoid it, but this is to say that your King Pigeon will most likely not feel the best it could if you’re currently working on lifting near max loads in the gym.

Now, I don’t want this to feel limiting. Actually, I want the opposite for you. You can work on all of your goals and expand what your body is capable of in all the ways you wish in a way that is safe, effective, and efficient. It might just take a little bit more time and planning than you initially intended.

Steps towards working on strength + yoga goals:

  1. Identify and acknowledge the activities you enjoy and want to spend time doing: This can be general because we’re going to get into specific goals in a second. You can approach this like, “I want to participate in yoga, strength training, running, rock climbing, swimming, etc.”
  2. Determine your goals for the next 6 months to a year: Write them all down. Be more specific here. Approach this like “I want to be able to do a handstand, I want to run a 5K, I want to increase the weight I can deadlift, etc.” If there’s an event you want to participate in like a particular race or competition, this is a good place to write it down. Is time a factor for any of your goals? Perhaps there is a particular race or competition you want to participate in. These generally occur on specific dates. Maybe you are preparing for a trip or life event. Things like going on a trip with a lot of walking or preparing to have kids might be events that you want to think about in preparing your body’s strength and/or conditioning.
  3. Prioritize your goals: Which goal is most important for you to work towards first? This could be determined by need, time, and/or desire. For example, you might be recently recovered from an injury and now you need to rebuild strength. You might want to compete in a CrossFit Murph workout (occurs every Memorial Day). Depending on the time you have until the intended event, you can determine the priority level for your training efforts. You might have a desire to land in and hold a scorpion handstand. This will create an “ordered list” of what goals take precedence. I want to emphasize that you can work on all your goals at the same time, but this will limit the capacity you reach in each modality. This doesn’t mean your performance will be bad, but it just means you might not be optimizing your performance.
  4. Acknowledge your goals can change: You might start your strength training journey after injury and discover other strength training goals. You might change your mind and not want to do Murph anymore. You might decide that arm balances and deep backbending are not places you want to deepen your Yoga practice at this time. Nothing is set in stone. If this happens, just reevaluate and tweak.

Plan it out & try to stick to your routine

Get to work! Create a training plan with your goals and intentions in mind, giving each goal the space and time it deserves and follow your plan. Still honor all the activities you enjoy and want to participate in, but focus on your top priority goals with the most effort and intention and be aware that what you train at you will get better at. And remember that if you notice your performance declining in other areas, that it is OK!

And if you need help, know that there are people who are suited just for this kind of thing. Reach out to any instructors, trainers, or coaches whose goal is to help YOU succeed at whatever it is you want to do.

Join our mailing list for incredible weekly content!

Person in Camel Pose

Weekly Class Theme: Love Yourself ❤️

By Yoga Asana, Yoga Teachers

Love is a word that when you see or hear you can immediately relate to in some way. You might think about how much you “love” something, someone, or somewhere. You might think about a display of love between people, a hug or a kiss. You might think about a feeling within yourself…perhaps a warmth spreading through your body or a brightness which brings a smile to your face.

However you relate to love, one thing is for certain is that it is a transcendent feeling. It is something that has the ability to be felt and shared by all beings. Love, in its truest form, can act as a binding agent closing the gap between even the seemingly largest of enemies. When love is felt and is given room to blossom, hate and other lower frequency emotions have no room to grow.

But how can such a powerful thing be cultivated? How does one experience love? And if love is so transcendent, why is there so much hate in the world?

The ability to love another only goes as deep as the love one has of themselves.

The thing with love is that while we all have a right to love and to be loved, it does not exist outside of us waiting to be packaged and delivered to us to buy or ingest. And while companies continuously try to sell us on this idea (and we continue to buy in thinking this emotion originates from another being or entity other than ourselves), love in its purest form can only be created from within and for within. The love that makes the world go round begins with the love we have for ourselves. For when we truly fall in love with ourselves, as we are and for who we are, we have the capacity to fall in love with everything and everyone around us.

Some people may read the above paragraph and think it’s a little bit too “woo-woo,” but doesn’t that sound like a magical world to live in? One where people truly love themselves? And because of that, they love one another? I don’t know about you, but it sounds pretty magical to me. I actually think that the term “woo-woo” was created for things in this world and life experience that are in-fact wonderful and magical, but almost seem too good to be real. Therefore, people don’t want to believe they are real or achievable. I, though, fully believe in the magic and something tells me you do as well.

Why not give it a go? Why not just try to fall in love with yourself? You might just love the outcome. It does require that you open yourself and your heart up to the world and to this life. It requires trust, and it also doesn’t mean you won’t get hurt. But opening yourself up, and allowing yourself to be receptive is what is required for you to have the opportunity to not only receive love, but to share love.

Supporting Pose 1: Goddess with Groin Stretch (Utkata Konasana)

Person doing Goddess Pose with their groin stretched

Getting into the hip groins can assist in opening up the connective tissues which run from the inner thigh/pelvis to the lower spine. It’s often we overlook stretching the inner thigh as a way of approaching backbends, which is why I’ve decided to add it into this sequence for Camel.

How to:

  1. Turn towards the side wall with the feet about 2-3 feet apart from one another.
  2. Turn the heels in and toes out to widen the inner thighs and turn the legs out at the hips.
  3. Bend the knees to about 90 degrees and with the knees stacked over the ankles. For less intensity, bring the feet closer together and bend the knees to a less degree.
  4. Take the hands to the legs and turn the torso towards the left while widening the right hip groin. Hold for 3-5 breaths and then go the other way.

Supporting Pose 2: High Lunge

Person doing High Lunge on a yoga mat with arms up overhead beside the ears

High lunge is a great prep pose for Camel for a variety of reasons. Reaching the arms up encourages length along the spine and torso. You can also interlace the hands behind the lower back to mimic the actions of the arms in Camel. This particular variation with the back knee slightly bent lends a bit more access to the pelvis to lift the frontal hip point towards the belly button, aka take the pelvis towards a posterior pelvic tilt, which is helpful for our peak pose.

How to:

  1. From a Downward Facing Dog, step the right foot in between the hands.
  2. Keeping the back heel lifted, rise up so the torso is upright and the crown of the heading is aiming towards the ceiling.
  3. Reach the arms up alongside the ears. Imagine each rib was lifting off the lower rib. It is okay if the shoulders reach up a little bit so long as they are not scrunched up by the ears.
  4. Slightly bend the left knee and firm the left buttocks forward. This should encourage a lengthening of the lower spine and a slight lift of the frontal hip points. Don’t overdo this. It should not feel like you are “tucking the tail” or rounding the back. It should just be enough to note the action of the sacrum going slightly forward to prepare for a backbend.

Supporting Pose 3: Revolved Chair with Arms Spread (Parivrtta Utkatasana)

Revolved Chair with Arms Spread Pose

Twisting is generally a good idea to prep for backbending as it helps to invite movement into the spine and torso. I like this particular twist because it has both legs going in the same direction and bent, as we see in Camel. The arms spreading helps to teach the action of the shoulder blades moving towards one another to invite in a widening of the collarbones.

How to:

  1. Start in a Mountain Pose.
  2. Bend the knees and press the sit bones back in space to come into a chair pose.
  3. Turn the torso to the right and hook the left elbow to the outside of the right thigh.
  4. Take the shoulder blades towards one another and spread the arms so the left hand reaches towards the floor and the right hand reaches towards the ceiling.
  5. Reach the center of the chest and crown of the head forward.

Peak Pose: Camel (Ustrasana)

Girl in Camel Pose

Camel is not only a heart opener, literally opening up your heart to the space around you, but it is a pose that requires conscious effort, patience, and practice. Because of the way the body is positioned in relation to the earth, it is easy for this pose to feel a little (or a lotta) uncomfortable in the lower back region. We might think we can just drop back into the pose, but this pose takes a lot of time to do with good alignment so that it actually feels good in the body.

How to:

  1. Come into a high kneeling position on the floor with the tops of the feet pressing down into the mat.
  2. Bring your hands to the sides of your pelvis with your shoulder blades coming towards one another and the collarbones spread.
  3. Press the pelvis forward and reach up through the spine and the sides of the body. Reach up so much that your body begins to backbend.
  4. Keep lifting the center of the chest forward and up and walk your hands down your legs towards your feet. You can use blocks on either side of your feet if the feet are too far away.
  5. Connect the palms of your hands to the soles of your feet and use that connection as an anchor to continue to backbend.
  6. The head can relax back if it feels okay for the neck. Breathing should feel even and steady.

Weekly Class Theme: Forward Folds

By Yoga Asana, Yoga Teachers

“After acting, reflect on what you have done.
If you do not reflect, there is confused action.
Pause between each movement.
The self has to find out whether the posture has been done well or not.”
— B.K.S. Iyengar

Seated Forward Fold poses are calming, introspective, and soothing to the nervous system. They turn off the brain, reduce fatigue and promote healthy sleep. These poses can be done with props such as blankets, bolsters, straps, etc to enhance their therapeutic effects.

Physically they stretch the abdomen, lengthen the spine, lengthen the hamstrings, and open the groins. They help prepare the body and mind for Savasana.

Supporting Pose 1: Supta Padagusthasana B (Reclined Hand to Foot Pose)

Practicing Supta Padagusthasana is a great way to work on opening the legs while keeping the spine in a neutral position. Using a blanket under the head for support and a strap for your leg are also useful in making the pose more accessible.

How to:

  1. Lie on your back with a blanket folded under your head and your legs straight.
  2. Bend your right leg towards your chest and place a strap around the ball of your right foot. Keep your left leg completely straight on the floor.
  3. Inhale and straighten your right leg by pressing your right foot towards the ceiling. Let your left hand rest on your left thigh.
  4. Exhale and swing your straight right leg out to the right side. Lengthen your inner right thigh towards your foot while maintaining a straight left leg. The trunk should remain neutral.
  5. Stay for 5 to 10 breaths before lifting your leg back to the ceiling and then to the floor. Repeat on the other side.

Supporting Pose 2: Trikonasana (Triangle Pose)

Triangle Pose extends the torso and limbs in multiple directions forming triangles with the body. It’s a spacious standing pose that helps tone the arms and legs while expanding the chest and torso.

How to:

  1. Stand in Tadasana and step your feet 3 ½ to 4 feet wide.
  2. Turn your right leg and foot out to 90 degrees and the left leg and foot inward 15 degrees. Keep both legs straight
  3. Extend your torso laterally over your right leg and bring your right hand to your shin or ankle. Extend your left arm upward towards the ceiling directly above your bottom arm.
  4. Turn your gaze towards your top hand.
  5. Stay for 5 breaths and repeat on the other side.

Supporting Pose 3: Prasarita Padottanasana (Extended Wide Leg Pose)

This standing wide leg forward fold strengthens and tones the legs and opens the hamstrings. Energetically it helps quiet the mind and nervous system as the head is releasing towards the floor.

How to:

  1. Stand in Tadasana and step your feet 3 ½ to 4 feet wide. Make sure the outer edges of your feet are parallel to the edges of your mat.
  2. Bring your hands to your hips, inhale and lift your torso. As you exhale, bring your chest parallel to the floor, placing your hands under your shoulders.
  3. Keeping your legs straight, bring your hands and fingers in line with your feet and toes. Bend your elbows back forming a right angle and place the crown of your head on the floor. If your head does not reach the floor use a blanket or bolster to fill the space.
  4. Gently lift your shoulders away from your ears to elongate the cervical spine.
  5. Stay for 5 to 10 breaths.

Peak Pose: Upavistha Konasana

Upavishta is translated as “seated” and Konas is translated as “angle.” This seated forward fold stretches the hamstrings and opens the pelvic region. When done with the right mindset and quiet breathing, its practice induces a meditative state.

How to:

  1. Start seated on the floor with your legs extended straight in front of you. You can sit up on a blanket to help lift
  2. Extend your legs out wide, keeping the legs straight and the toes facing the ceiling.
  3. Inhale, grab the big toes and lift the chest.
  4. Exhale, extend the torso forward and bring your forehead towards the floor. If you head doesn’t reach the floor place a blanket or block under your forehead.
  5. Stay for 5 to 10 breaths.
Patrick in warrior 1 pose on a yoga mat

Weekly Class Theme: Standing Poses

By Yoga Asana, Yoga Teachers

“We must learn to stand on our feet before we stand on our head.” ~ B.K.S. Iyengar

I love this quote from Yoga Master B.K.S. Iyengar because it’s a great reminder of the importance of Standing Poses in the practice of asana. The fundamental movements and precision we learn in standing poses directly relates to how the human body moves in everyday life as we sit, stand, walk, and run. These

Although they may seem simple, they provide a strong foundation for many yoga practitioners. Standing poses provide strength and mobility in the feet, ankles, legs, hips, torso, arms, shoulders, and neck. In essence, standing poses work the entire body and much of the alignment and movement necessary to practice advanced postures are learned in the standing poses.

Supporting Pose 1: Supported Fish with arms overhead (Matsyasana)

Firming in the upper back, aka the thoracic spine, is a key component when we want to lift our chest. Using the blocks in this posture helps make an impression in the upper back that is needed later when we practice Warrior 1. The arms extending overhead alongside the ears is also a key component in Warrior 1

Patrick in supported fish pose with arms overhead

How to get into supported fish pose:

  1. Set up your blocks with one block on the horizontal medium height and the next block on the vertical high height.
  2. Use your hands to hold the horizontal block in place as you lie back, starting with your knees bent. The horizontal block should be positioned at the bottom tips of your shoulder blades which helps firm in the upper back.
  3. Now lift your arms up and hold the vertical block as you place the back of your head on it. Your face should be parallel to the ceiling with your chin slightly tucked towards your chest.
  4. Lift your arms to the ceiling, palms facing each other, and extend your arms over your head right next to your ears. Imagine you are holding a block between your hands and you extend your arms fully.
  5. Reach the legs long towards the front of the mat, no wider than hip distance and stay for 1 to 2 minutes.

Supporting Pose 2: Crescent Lunge (Anjaneyasana)

Crescent lunge is a great pose to help open up the psoas muscle (think back leg in Warrior 1). Lifting the arms alongside the ears with the head back and gaze upward is also the same action needed in Warrior 1

Patrick in crescent lunge pose with arms and hands overhead

How to get into crescent lunge:

  1. Bring your back knee to the floor and uncurl your toes.
  2. Have your front knee deeply bent and placed over your front heel.
  3. The back of your pelvis should move down (away from your low back) and your sacrum and tailbone should move inward. This provides space and stability to your lumbar spine.
  4. Lift your arms up alongside your ears. Take your head back and bring your palms together. Use your arms to help lift your chest up off your pelvis.

Supporting Pose 3: Tree Pose (Vrksasana)

Tree pose is a great standing balance that teaches strength and flexibility in the foot, ankle, and lower leg. WIth the arms lifted overhead it also helps lengthen and lift the torso.

Patrick in tree pose on a yoga mat

How to get into tree pose:

  1. Start standing in Mountain Pose.
  2. Lift one leg and bend it. Now rotate it out to the side and place the sole of your foot on your upper inner thigh. If your foot doesn’t lift that high you can place it on your lower leg. Be sure not to place your foot on your knee joint however.
  3. Take your arms upward alongside your ears, bringing your palms together. Look straight ahead.
  4. Stand into your bottom foot and standing leg and dynamically reach up through your palms.

Peak Pose: Warrior 1 (Virabhadrasana 1)

Warrior 1, as its name implies, is a strong and rigorous pose. It’s dynamic and energizing, built from the ground up with a strong foundation. Its an invigorating pose that is great for all levels of students and a foundational posture.

Patrick in warrior 1 pose on a yoga mat

How to get into warrior I:

  1. Start standing in Mountain Pose.
  2. Step one leg back about 3 to 4 feet with your back toes pointed at a 45 degree angle. Press firmly through the outer edge of your back foot and keep your back leg straight
  3. Bend your front knee until it is over your front knee.
  4. Just like in crescent lunge, the back of your pelvis should move down (away from your low back) and your sacrum and tailbone should move inward. This provides space and stability to your lumbar spine.
  5. Lift your arms up alongside your ears. Take your head back and bring your palms together. Use your arms to help lift your chest up off your pelvis.
Woman in lotus, breathing outdoors

Pranayama – An Ancient Breath Practice

By Lifestyle & Wellness, Meditation, Yoga Philosophy

Pranayama is an ancient breath practice, commonly recognized as the fourth limb of yoga. Also utilized in the yoga practice, pranayama has more widely been known to reduce stress, ease anxiety and help alleviate other ailments as well as support healthy lung function.

When we break apart the word pranayama, we find that:

Prana = life force energy
Ayama = expansion, extension, or control
Pranayama = Expansion, extension or control of the life force energy.

There are also various types of pranayama. Some of the types of breath practices include:

  • Nadi Shodhana — Alternate Nostril Breathing
  • Bastrika — Bellow Breath
  • Ujjayi — Oceanic Breath
  • Dirgha — Three Part Breath
  • Bhramari — Bee Breath

While breathwork is an ancient yogic practice originating in India, it has migrated to the Western world and been popularized as a sound healing method. It is also frequently incorporated with the yoga practice here and many yoga teachers incorporate several breathing techniques into their yoga and meditation practices.

Practicing Pranayama

As stated above, there are several different styles of the ancient breathing practice that can be used to bring certain benefits to the mind and body. In this section, we’ll review some of the most popular pranayama techniques and how to practice them.

3 Pranayama Breath Practices for Beginners

1. Alternate Nose Breathing (Nadi Shodhana)

Alternate nose breathing brings balance to the nervous system. In Sanskrit, Nadi means channel and Shodhana means purification; translating to the purification of both channels of the nervous system. These two channels are the parasympathetic (the place where we tap into relaxation) and the sympathetic (our “fight or flight” response). The left side of the body is representative of the parasympathetic and the right side of the body is representative of the sympathetic. Breathing through both channels brings balance and harmony to our nervous system.

How to practice Alternate Nostril Breathing:

  1. Sit in a comfortable seated position. If you’re practicing yoga, this can look like Sukhasana (legs crossed), Virasana (kneeling), or Padmasana (legs cross and lifted onto the opposite thighs).
  2. Use your right hand ring finger over your left nostril and your right thumb to place over your right nostril (with your pointer and middle finger folded into your palm).
  3. Close your right nostril with your thumb and inhale through your left nostril for 5 counts.
  4. Close the left nostril with your ring finger and exhale through the right nostril for 5 counts.
  5. Alternate between the sides, still using a 5 count.
  6. Increase the retention once you find the breathing becomes easier (by increasing the counts).

2. Three Part Breath (Dirgha)

This breathing practice is deeply calming and quieting for the mind. It also works to relax the nervous system to bring you into a state of full relaxation. Three part breath is typically practiced lying down, which makes it suitable for beginners and easier to tune inward and focus on the breath. This is also a great breathing exercise to do on a consistent basis, with the body in an easy position to begin to relax.

How to practice Three Part Breath:

  1. Find a comfortable position lying down, preferably with the use of props such as: a yoga blanket and a bolster.
  2. Lie down with your palms facing the ceiling, collarbone spread, and head also facing the ceiling.
  3. Let your eyes close, breathe in and out through your nose with your natural rhythm of breath.
  4. Breathe in halfway, emptying all the air from your body.
  5. Breathe in through your nose, just into your abdomen. Pause.
  6. Breathe in through your nose, into your side ribs. Pause.
  7. Breathe in through your nose, into your collarbone. Pause.
  8. Take a long exhalation out through your nose, relaxing your abdomen, followed by a few regular cycles of breath.

3. Victorious Breath (Ujjayi)

This breathing technique is purely to bring a strong sense of relaxation to the body. Victorious breath is namely incorporated into the Ashtanga yoga practice. In Ashtanga, each movement is tied to a cycle of breath. When others hear someone engaging in Ujjayi breath, it is usually a gentle reminder to keep breathing, as it signals others in the class to focus on their breathing. In Sanskrit, Ujjayi loosely translates to “victorious” or “one who is victorious.” Ujjayi engages the diaphragm and the pelvic floor, making it a full body breath.

How to practice Victorious Breath:

  1. Sit in a comfortable seat.
  2. Take a few normal breaths, in and out, focusing your mind purely on the breath.
  3. Inhale through your nose and exhale through your nose for 4 counts.
  4. Repeat this a couple times.
  5. Take a slow, deep steady breath through the nose, making the sound of “sa” internally.
  6. Fill up to the top and pause.
  7. Exhale through the nose, slowly deeply and steadily with the sound of, “ha,” until you’re completely empty of air.

Why do breathing exercises help with stress and anxiety?

When we focus on our breathing, we are tapping into our body’s relaxation response. By focusing on the breath and controlling it in a way, we are signaling the nervous system to slow down. With deeper intention placed on the inhalation and exhalation of oxygen in the body, our brain notices we are trying to enter a more calm state. When the breath is slower and longer, the body and brain adapt to this steady flow of oxygen. Usually in states of high anxiety or stress, the breath is short and rapid, in turn increasing our heart rate and oftentimes signaling a “fight, flight or freeze” response. When trying to alleviate that tension, we should initially focus on the breath. Using breathing exercises to reduce stress and anxiety has not only been known to help the body enter a more relaxed state, but it can also help nurture the muscles, enhance respiratory wellness, lower pain levels, and increase overall brain function.

Breathing techniques are an ancient practice that have stood the test of time for many reasons, namely the fact that it is the function we are inherently born with, doing it both subconsciously and consciously (able to be controlled or trained). Since breathing is such a vital function of the human body in order to exist, paying attention to it and nurturing it can provide longterm health benefits that can outweigh most other mechanisms.

How can I learn more about Pranayama?

In YogaRenew’s 200 Hour Yoga Teacher Training program, the basic fundamental of pranayama is introduced. Moving onto the 300 Hour course allows you to dive deeper into applying pranayama to the practice of yoga. Whether you’re a beginning practitioner, or an experienced yogi, our online courses provide you with information you may not have heard before and is broken down in a digestible way.


Join our mailing list for incredible weekly content!